
NestJS JWT Auth Cookie Series - Part-2 - Generating Access Token

In this article, we target to generate the jwt authentication and store it in the HttpOnly cookie for user authentication. Part-1 completely explains implementing user registration in the nestjs application.

Implement Logic To Validate User Credentials:

First, let's create a model to store the valid user.
src/models/current.user.ts:
export class CurrentUser {
  userId: number;
  firstName: string;
  lastName: string;
  email: string;
}
Now we have to implement the logic for the login endpoint that is to validate user email and password.
src/users/users.service.ts:
public async validateUserCredentials(email: string, password: string):Promise<CurrentUser> {
    let user = await this.user.findOne({ email: email });

    if (user == null) {
      return null;
    }

    const isValidPassword = await bcrypt.compare(password, user.password);
    if (!isValidPassword) {
      return null;
    }

    let currentUser = new CurrentUser();
    currentUser.userId = user.userId;
    currentUser.firstName = user.firstName;
    currentUser.lastName = user.lastName;
    currentUser.email = user.email;

    return currentUser;
}
  • Using email fetching user data from the database. Using 'bcrypt.compare' method validating the hash password. If credentials are valid then returning the user information.

Passport Library:

  • Passport is the most popular node.js authentication library. 
  • The 'Passport' library integration involves 'Strategy'. The 'Strategy' is used for reading the user credentials and validating them by invoking the 'validation()' method to check for the valid user. 
  • After successfully validating the user, then the 'Passport' attaches the user information to the 'Request' object which will be used by the route handlers.

passport-local Library:

By extending the 'Passport' library there are so many different strategies that are available as separate plugins. The 'passport-local' library is one such strategy.

The 'passport-local' strategy to authenticate the user using 'username' and 'password'. These values will be read by the strategy from the body of the request. By default 'username' and 'password' parameter names should be the same as here we mentioned, if we pass the values with different names then the PassportStrategy unable to read the values. So to make use of the custom payload variable name we need to specify those names at the time of local PassportStrategy configuration using the options 'usernameField', 'passwordField'.

Install passport-local Npm Packages:

Command To Install passport-local Packages:
npm install --save @nestjs/passport passport passport-local
npm install --save-dev @types/passport-local

Create A passport-local Strategy:

First, let's import the 'PassportModule' into the 'UsersModule'.
src/users/users.module.ts:
import { PassportModule } from '@nestjs/passport';
// code hidden for display purpose
@Module({
  imports: [
    PassportModule
  ]
})
export class UsersModule {}
Now let's create a model that will be used by the local passport strategy to hold the valid user information.
src/users/local.strategy.ts:
import { Injectable, UnauthorizedException } from '@nestjs/common';
import { PassportStrategy } from '@nestjs/passport';
import { Strategy } from 'passport-local';
import { CurrentUser } from 'src/models/current.user';
import { UsersService } from 'src/users/users.service';

@Injectable()
export class LocalStrategy extends PassportStrategy(Strategy, 'local') {
  constructor(private userService: UsersService) {
    super({ usernameField: 'email' });
  }

  async validate(email: string, password: string): Promise<CurrentUser> {
    let user = await this.userService.validateUserCredentials(email, password);

    if (user == null) {
      throw new UnauthorizedException();
    }
    return user;
  }
}
  • To create a strategy class must implement the 'PassportStrategy'. Here we specified our strategy name like 'local'.
  • By default, the local passport strategy reads the fields like 'username' and 'password, from the request body. Here we override the 'usernameField' with our custom variable name like 'email'.
  • The 'validate' method gets automatically executed.
Now register our strategy into the provider's array of 'UserModule'.
src/users/users.modulet.ts:
import { LocalStrategy } from './local.strategy';
// code hidden for display purspose

@Module({

  providers: [LocalStrategy],
})
export class UsersModule {}

Install NestJS JWT Npm Package:

Command To Install NestJS Jwt Package:
npm install --save @nestjs/jwt

Configure JwtModule:

We have to configure the 'JwtModule' in the 'UsersModule'.
src/users/users.module.ts:
import { JwtModule } from '@nestjs/jwt';
// code hidden for display purpose
@Module({
  imports: [
    JwtModule.register({
      secret: 'My random secret key never let others',
      signOptions: {
        expiresIn: '1h',
      },
    })
  ],
 
})
export class UsersModule {}
  • Here 'secret' key will be utilized as one of the ingredients in the generation JWT token.
  • Here specified expiration time like '1hr.

Implement Logic To Generate JWT Token:

Using the jwt plugin that we installed, it is very easy to generate the JWT auth token.
src/users/users.service.ts:
import { JwtService } from '@nestjs/jwt';
import { CurrentUser } from 'src/models/current.user';

@Injectable()
export class UsersService {
  constructor(@InjectRepository(User) private user: Repository<User>,
  private jwtService:JwtService) {}

  public async getJwtToken(user:CurrentUser): Promise<string>{
    const payload = {
     ...user
    }
    return this.jwtService.signAsync(payload);
  }
}
  • Here generating the jwt token with some user's data as payload to it.

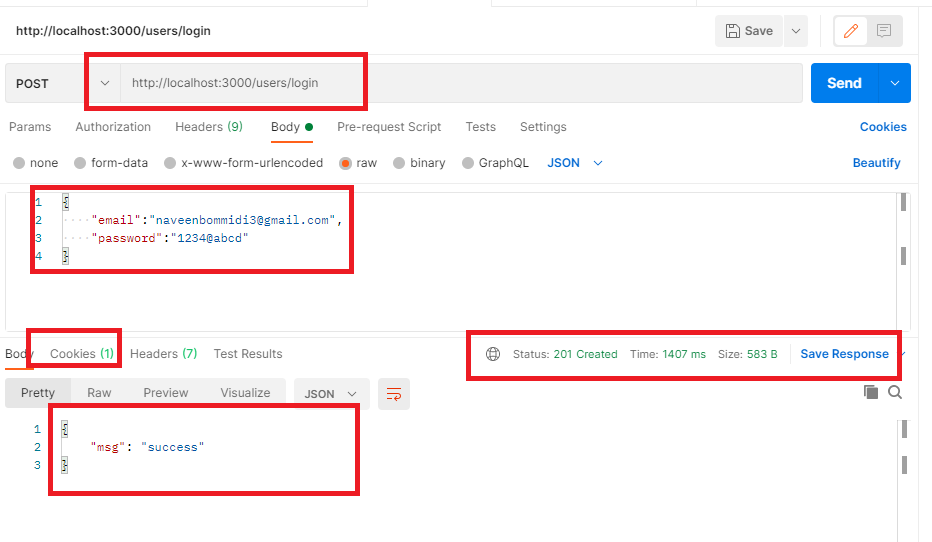
Create Login Endpoint To Generate Jwt HttpOnly Cookie:

Now let's create our user login endpoint.
src/users/users.controllers.cs:
import {
  Body,
  Controller,
  Get,
  Post,
  Req,
  Res,
  UseGuards,
} from '@nestjs/common';
import { AuthGuard } from '@nestjs/passport';
import { Response } from 'express';
import { CurrentUser } from 'src/models/current.user';
import { UsersService } from './users.service';

@Controller('users')
export class UsersController {
  constructor(private userService: UsersService) {}
  
  @Post('login')
  @UseGuards(AuthGuard('local'))
  async login(@Req() req, @Res({ passthrough: true }) res: Response) {
    const token = await this.userService.getJwtToken(req.user as CurrentUser);

    const secretData = {
      token,
      refreshToken: '',
    };

    res.cookie('auth-cookie', secretData,{httpOnly:true,});
    return {msg:'success'};
  }
}
  • (Line: 20) The 'AuthGuard' takes the name of our password strategy as an input parameter(ex: 'local'). So this guard will trigger our password storage and fetches the valid user information based on the credentials. Finally, it adds the valid user information into the 'Req' object.
  • (Line: 22) Generating the user jwt auth token.
  • (Line: 24-27) Preparing secret data that needs to be stored in the cookie like jwt and refresh(refresh token generation will be explained in the next part of the series).
  • (Lin: 29) Creating the HTTP-Only auth cookie. So the HttpOnly cookie only read by the server, can't be accessed by the javascript.
Now let's test our login endpoint.
So that's all about the generating HttpOnly jwt cookie. In the next part, we will implement steps to protect the secured endpoint and also refresh token utilization.

Video Session:

Support Me!
Buy Me A Coffee PayPal Me

Wrapping Up:

Hopefully, I think this article delivered some useful information on generating HttpOnly Jwt Auth Cookie in the NestJS application. I love to have your feedback, suggestions, and better techniques in the comment section below.

Refer:

Follow Me:

Comments

Popular posts from this blog

Angular 14 Reactive Forms Example

In this article, we will explore the Angular(14) reactive forms with an example. Reactive Forms: Angular reactive forms support model-driven techniques to handle the form's input values. The reactive forms state is immutable, any form filed change creates a new state for the form. Reactive forms are built around observable streams, where form inputs and values are provided as streams of input values, which can be accessed synchronously. Some key notations that involve in reactive forms are like: FormControl - each input element in the form is 'FormControl'. The 'FormControl' tracks the value and validation status of form fields. FormGroup - Track the value and validate the state of the group of 'FormControl'. FormBuilder - Angular service which can be used to create the 'FormGroup' or FormControl instance quickly. Form Array - That can hold infinite form control, this helps to create dynamic forms. Create An Angular(14) Application: Let'

.NET 7 Web API CRUD Using Entity Framework Core

In this article, we are going to implement a sample .NET 7 Web API CRUD using the Entity Framework Core. Web API: Web API is a framework for building HTTP services that can be accessed from any client like browser, mobile devices, and desktop apps. In simple terminology API(Application Programming Interface) means an interface module that contains programming functions that can be requested via HTTP calls either to fetch or update data for their respective clients. Some of the Key Characteristics of API: Supports HTTP verbs like 'GET', 'POST', 'PUT', 'DELETE', etc. Supports default responses like 'XML' and 'JSON'. Also can define custom responses. Supports self-hosting or individual hosting, so that all different kinds of apps can consume it. Authentication and Authorization are easy to implement. The ideal platform to build the REST full services. Install The SQL Server And SQL Management Studio: Let's install the SQL server on our l

ReactJS(v18) JWT Authentication Using HTTP Only Cookie

In this article, we will implement the ReactJS application authentication using the HTTP-only cookie. HTTP Only Cookie: In a SPA(Single Page Application) Authentication JWT token either can be stored in browser 'LocalStorage' or in 'Cookie'. Storing the JWT token inside of the cookie then the cookie should be HTTP Only. The HTTP-ONly cookie nature is that it will be only accessible by the server application. Client apps like javascript-based apps can't access the HTTP-Only cookie. So if we use the authentication with HTTP-only JWT cookie then we no need to implement the custom logic like adding authorization header or storing token data, etc at our client application. Because once the user authenticated cookie will be automatically sent to the server by the browser on every API call. Authentication API: To authenticate our client application with JWT HTTP-only cookie, I developed a NetJS(which is a node) Mock API. Check the GitHub link and read the document on G

.NET6 Web API CRUD Operation With Entity Framework Core

In this article, we are going to do a small demo on AspNetCore 6 Web API CRUD operations. What Is Web API: Web API is a framework for building HTTP services that can be accessed from any client like browser, mobile devices, desktop apps. In simple terminology API(Application Programming Interface) means an interface module that contains a programming function that can be requested via HTTP calls to save or fetch the data for their respective clients. Some of the key characteristics of API: Supports HTTP verbs like 'GET', 'POST', 'PUT', 'DELETE', etc. Supports default responses like 'XML' and 'JSON'. Also can define custom responses. Supports self-hosting or individual hosting, so that all different kinds of apps can consume it. Authentication and Authorization are easy to implement. The ideal platform to build REST full services. Create A .NET6 Web API Application: Let's create a .Net6 Web API sample application to accomplish our

Angular 14 State Management CRUD Example With NgRx(14)

In this article, we are going to implement the Angular(14) state management CRUD example with NgRx(14) NgRx Store For State Management: In an angular application to share consistent data between multiple components, we use NgRx state management. Using NgRx state helps to avoid unwanted API calls, easy to maintain consistent data, etc. The main building blocks for the NgRx store are: Actions - NgRx actions represents event to trigger the reducers to save the data into the stores. Reducer - Reducer's pure function, which is used to create a new state on data change. Store - The store is the model or entity that holds the data. Selector - Selector to fetch the slices of data from the store to angular components. Effects - Effects deals with external network calls like API. The effect gets executed based the action performed Ngrx State Management flow: The angular component needs data for binding.  So angular component calls an action that is responsible for invoking the API call.  Aft

Angular 14 Crud Example

In this article, we will implement CRUD operation in the Angular 14 application. Angular: Angular is a framework that can be used to build a single-page application. Angular applications are built with components that make our code simple and clean. Angular components compose of 3 files like TypeScript File(*.ts), Html File(*.html), CSS File(*.cs) Components typescript file and HTML file support 2-way binding which means data flow is bi-directional Component typescript file listens for all HTML events from the HTML file. Create Angular(14) Application: Let's create an Angular(14) application to begin our sample. Make sure to install the Angular CLI tool into our local machine because it provides easy CLI commands to play with the angular application. Command To Install Angular CLI npm install -g @angular/cli Run the below command to create the angular application. Command To Create Angular Application ng new name_of_your_app Note: While creating the app, you will see a noti

Unit Testing Asp.NetCore Web API Using xUnit[.NET6]

In this article, we are going to write test cases to an Asp.NetCore Web API(.NET6) application using the xUnit. xUnit For .NET: The xUnit for .Net is a free, open-source, community-focused unit testing tool for .NET applications. By default .Net also provides a xUnit project template to implement test cases. Unit test cases build upon the 'AAA' formula that means 'Arrange', 'Act' and 'Assert' Arrange - Declaring variables, objects, instantiating mocks, etc. Act - Calling or invoking the method that needs to be tested. Assert - The assert ensures that code behaves as expected means yielding expected output. Create An API And Unit Test Projects: Let's create a .Net6 Web API and xUnit sample applications to accomplish our demo. We can use either Visual Studio 2022 or Visual Studio Code(using .NET CLI commands) to create any.Net6 application. For this demo, I'm using the 'Visual Studio Code'(using the .NET CLI command) editor. Create a fo

Part-1 Angular JWT Authentication Using HTTP Only Cookie[Angular V13]

In this article, we are going to implement a sample angular application authentication using HTTP only cookie that contains a JWT token. HTTP Only JWT Cookie: In a SPA(Single Page Application) Authentication JWT token either can be stored in browser 'LocalStorage' or in 'Cookie'. Storing JWT token inside of the cookie then the cookie should be HTTP Only. The HTTP-Only cookie nature is that it will be only accessible by the server application. Client apps like javascript-based apps can't access the HTTP-Only cookie. So if we use authentication with HTTP only JWT cookie then we no need to implement custom logic like adding authorization header or storing token data, etc at our client application. Because once the user authenticated cookie will be automatically sent to the server by the browser on every API call. Authentication API: To implement JWT cookie authentication we need to set up an API. For that, I had created a mock authentication API(Using the NestJS Se

ReactJS(v18) Authentication With JWT AccessToken And Refresh Token

In this article, we are going to do ReactJS(v18) application authentication using the JWT Access Token and Refresh Token. JSON Web Token(JWT): JSON Web Token is a digitally signed and secured token for user validation. The JWT is constructed with 3 important parts: Header Payload Signature Create ReactJS Application: Let's create a ReactJS application to accomplish our demo. npx create-react-app name-of-your-app Configure React Bootstrap Library: Let's install the React Bootstrap library npm install react-bootstrap bootstrap Now add the bootstrap CSS reference in 'index.js'. src/index.js: import 'bootstrap/dist/css/bootstrap.min.css' Create A React Component 'Layout': Let's add a React component like 'Layout' in 'components/shared' folders(new folders). src/components/shared/Layout.js: import Navbar from "react-bootstrap/Navbar"; import { Container } from "react-bootstrap"; import Nav from "react-boot

A Small Guide On NestJS Queues

NestJS Application Queues helps to deal with application scaling and performance challenges. When To Use Queues?: API request that mostly involves in time taking operations like CPU bound operation, doing them synchronously which will result in thread blocking. So to avoid these issues, it is an appropriate way to make the CPU-bound operation separate background job.  In nestjs one of the best solutions for these kinds of tasks is to implement the Queues. For queueing mechanism in the nestjs application most recommended library is '@nestjs/bull'(Bull is nodejs queue library). The 'Bull' depends on Redis cache for data storage like a job. So in this queueing technique, we will create services like 'Producer' and 'Consumer'. The 'Producer' is used to push our jobs into the Redis stores. The consumer will read those jobs(eg: CPU Bound Operations) and process them. So by using this queues technique user requests processed very fastly because actually