
When To Use Queues?:
API request that mostly involves in time taking operations like CPU bound operation, doing them synchronously which will result in thread blocking. So to avoid these issues, it is an appropriate way to make the CPU-bound operation separate background job.
In nestjs one of the best solutions for these kinds of tasks is to implement the Queues.
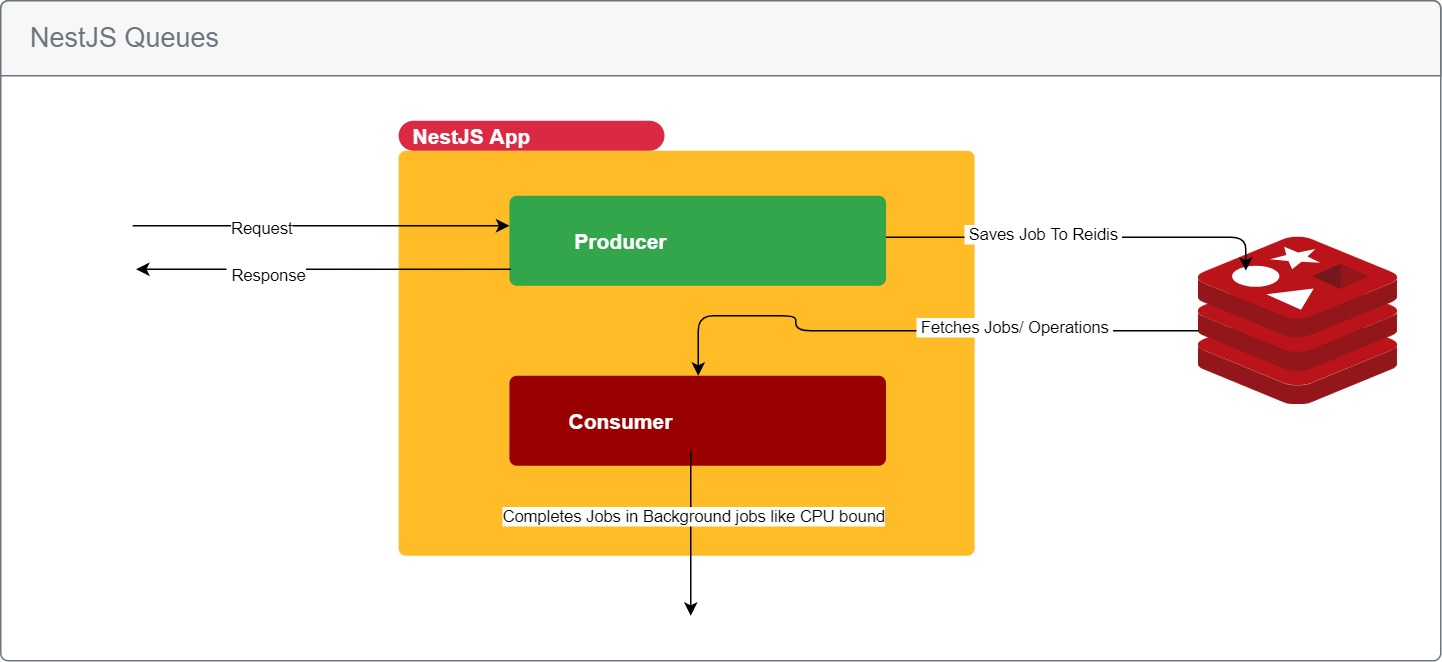
So by using this queues technique user requests processed very fastly because actually logics(for example time taking operations like CPU related) will be carried out by the consumers later as a background job.
Setup Redis Docker Image Container:
For this sample to use Redis instance locally we will use Docker. If you don't have any prior knowledge of docker, not a problem just follow the steps below. Click here for a video session on Redis docker setup
Note:
Skip this section if you already have redis direct instance or azure or any cloud provider that have redis
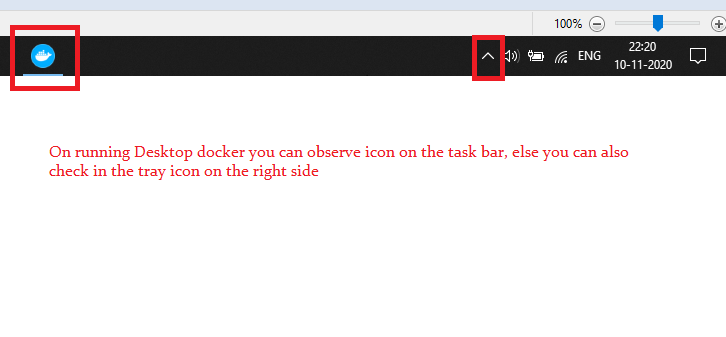
Step1:Download docker into our local system "https://docs.docker.com/desktop/". Docker was available for all desktop operating systems.

After downloading the docker installer, then install it. Now to run any docker containers(eg: Redis, MongoDB, PostgreSQL, etc) this docker instance we just installed should be active(should be running).
Now we need to pull the docker Redis image from the docker hub "https://hub.docker.com/_/redis".

Command To Pull Redis Image:
docker pull redis
The final step to run the docker Redis image container by mapping our local system port. By default, the Redis instance runs with the '6379' default port inside of the docker container. So to access the Redis we need to port mapping on starting off the container.
Command To Start Redis Container:
docker run --name your_containerName -p your_PortNumber:6379 -d redis
The '--name your_containerName' flag to specify the Redis container name. The '-p your_PortNumber:6379' mapping the Redis port '6379' to our local machine port all our application will use local machine port to communicate with Redis. The '-d' flag represents to run the container in the detached mode which means run in the background. At the last of the command 'redis' to specify the image to run in our container.
Step5:
After creating a docker container, it will be stored in our local machine so to start again the container any time run the following command
docker start your_container_name
Let test our Redis instance
Command To Use Redis CLI
docker exec -it your_docker_container_name redis-cli
Create A Sample NestJS Application:
Let's begin our journey by creating a sample NetsJS application.
Command To Install CLI:
npm i -g @nestjs/cli
Command To Create NestJS App:
nest new your_project_name
Install Bull Library Package:
npm install --save @nestjs/bull bull

npm install --save-dev @types/bull
Register BullModule And Setup Redis Connection:
Configure the BullModule into the AppModule.ts. The Bull library depends on the 'Redis' store for data communication. So BullModule provides configuration options to register the 'Redis' store.
src/app.module.ts:
import { BullModule } from '@nestjs/bull';
import { Module } from '@nestjs/common';
import { AppController } from './app.controller';
import { AppService } from './app.service';

@Module({
  imports: [
    BullModule.forRoot({
      redis: {
        host: 'localhost',
        port: 5003,
      },
    }),
  ],
  controllers: [AppController],
  providers: [AppService],
})
export class AppModule {}
Register A Queue:
Use the 'registerQueue' method from 'BullModule' to configure a queue. So queue a can be identified by its name, we have to name our queue on configuring. Also support multiple queues can be registered as well.
src/app.module.ts:
import { BullModule } from '@nestjs/bull';
import { Module } from '@nestjs/common';
import { AppController } from './app.controller';
import { AppService } from './app.service';

@Module({
  imports: [
    BullModule.forRoot({
      redis: {
        host: 'localhost',
        port: 5003,
      },
    }),
    BullModule.registerQueue({
      name:'message-queue'
    })
  ],
  controllers: [AppController],
  providers: [AppService],
})
export class AppModule {}
- Here configure a new queue and its name is 'message-queue'.
Create A Producer To Push Jobs Into Queue:
Job producers add the job to the queues. Producers are typically services. Now we will implement a producer to push the messages into the queue.
Note: Pushing messages into the queues might not be the ideal task. But for beginners to understand the nestjs queues it is the ideal choice.
so let's create a new Producer like 'message.producer.service.ts'.
src/message.producer.service.ts:
import { InjectQueue } from '@nestjs/bull';
import { Injectable } from '@nestjs/common';
import { Queue } from 'bull';

@Injectable()
export class MessageProducerService {
  constructor(@InjectQueue('message-queue') private queue: Queue) {}

  async sendMessage(message:string){
    await this.queue.add('message-job',{
        text: message
    });
  }
}
- So to read the queue we have to use '@InjectQueue' decorator along with the name of the queue like 'message-queue'.
- To push the job into the queue, we have to use the 'add' method of the 'Queue' instance. Here we can specify the job name as well. So this job name will be used by the consumer to read messages as well.
- So to the 'add' method we can pass the data of our job.
src/message.producer.service.ts:
import { MessageProducerService } from './message.producer.service';
@Module({
  providers: [MessageProducerService],
})
export class AppModule {}
Let's create a new endpoint to invoke our newly created producer service.src/app.controller.ts:
import { Controller, Get, Query } from '@nestjs/common';
import { MessageProducerService } from './message.producer.service';

@Controller()
export class AppController {
  constructor(
    private readonly messageProducerService:MessageProducerService) {}

  @Get('invoke-msg')
  getInvokeMsg(@Query('msg') msg:string){
    this.messageProducerService.sendMessage(msg);
    return msg;
  }
}
Create A Consumer To Read Jobs:
A consumer is a class-defining method that processes jobs added into the queue. To make a class consumer it should be decorated with '@Processor()' and with the queue name. A consumer class must contain a handler method to process the jobs. The handler method should register with '@Process()'.
src/message.consumer.ts:
import { Process, Processor } from "@nestjs/bull";
import { Job } from "bull";

@Processor('message-queue')
export class MessageConsumer {

    @Process('message-job')
    readOperationJob(job:Job<unknown>){
        console.log(job.data);
    }
}
Now register our 'MessageConsumer' class in provider array of AppModule. By registering automatically NestJS application activates consumer to read and process jobs.src/app.module.ts:
import { MessageConsumer } from './message.consumer';

@Module({
  providers: [MessageProducerService],
})
export class AppModule {}
Now to test our queue, run the application then access the endpoint and check the console log.
Create A New Queue For CPU Bound Operation:
Our previous queue is a simple message reading job, which is good for understand about the nestjs queue concept. Now here we will create a new queue that depends on CPU operations.
Case Study:
Let's assume we need to create an endpoint to delete the files from the physical folder path and database as well. Deleting files will be CPU dependent operation, so doing this process synchronously with the user request to the endpoint might lead to an increase in the time taken by the endpoint to serve the users. This may lead to user thread blocking as well.
Queue Solution:
For the above case study best solution is to implement the queues. So if we implement queues then our logic should be like, in the endpoint request, we have to delete the file name from the database, and then we need to save the physical path for the file in the Redis as job data then return the response to the user immediately. So by this time file is not deleted from the physical location. Now server consumer runs regular interval of times to finish the jobs in the Redis store. So a consumer on reading our job related to file deletion and its physical path value then it will execute the job handler method to delete the file as a background job.
Let's register a new queue in AppModule.
src/app.module.ts:
import { BullModule } from '@nestjs/bull';
// code hidden for display purpose

@Module({
  imports: [
    BullModule.forRoot({
      redis: {
        host: 'localhost',
        port: 5003,
      },
    }),
    BullModule.registerQueue(
      {
        name: 'message-queue',
      },
      {
        name: 'file-operation-queue',
      },
    ),
  ]
})
export class AppModule {}
- Our new queue name is 'file-operation-queue'
src/file.producer.service.ts:
import { InjectQueue } from "@nestjs/bull";
import { Injectable } from "@nestjs/common";
import { Queue } from "bull";

@Injectable()
export class FileProducerService{
    constructor(@InjectQueue('file-operation-queue') private queue:Queue){

    }

    async deleteFile(fileName:string){
        let filePath = `C:/Users/hchowdary/Desktop/testimages/${fileName}`;
        // implementh logic delete the file record from database.
        await this.queue.add('delete-file',{
            filePath: filePath
        });
    }
}
- Here we pushing the physical location of the file into the Redis store.
src/app.module.ts:
import { FileProducerService } from './file.producer.service';
// code hidden for displya purpose
@Module({
  providers: [
    FileProducerService,
  ],
})
export class AppModule {}
Now create a new endpoint as below.src/app.controller.cs:
import { FileProducerService } from './file.producer.service';
// code hidden for display purpose
@Controller()
export class AppController {
  constructor(
    private readonly fileProducerService:FileProducerService) {}

  @Get('remove-file')
  async deleteFile(@Query('file') file:string){
    await this.fileProducerService.deleteFile(file);
    return 'file deleted';
  }
}
Let's create a Consumer for our new queue.src/file.consumer.ts:
import { Process, Processor } from "@nestjs/bull";
import { Job } from "bull";
import * as fs from 'fs';

@Processor('file-operation-queue')
export class FileConsumer{

    @Process('delete-file')
    async filedeletionJob(job:Job<unknown>){
        let jobData:any = job.data;
        fs.unlinkSync(jobData.filePath);
    }
}
- Here consumer deleting the file from the specified location as a background job.
src/app.module.ts:
import { FileConsumer } from './file.consumer';
// code hidden for display purpose
@Module({
  providers: [
    FileConsumer,
  ],
})
export class AppModule {}
So that all about the usage of queues in the nestjs application.Video Session:
Support Me!
Buy Me A Coffee
PayPal Me
Wrapping Up:
Hopefully, I think this article delivered some useful information on queues in NestJS. I love to have your feedback, suggestions, and better techniques in the comment section below.
great job on this blog! I'd love to see a NestJS + SQS blog... where you are not using all these things packaged with NestJS. Would be cool to see some custom implementation!
ReplyDeletegreat contribution thx so much, is required the implementation of redis with bull ?
ReplyDeleteHi FMedina
Deleteyes bull backend is redis
Putting request handling, producer and consumer in same service will not be an ideal solution. Isn't it? even though we have queues we are using resources from same nestjs service to process the background job.
ReplyDeleteYes I agree to implement in seperate service, i have shown one of the option with a case study to do in the same service. Here i just explained one of the inbuild option like provided by NestJS.
DeleteIf we implement in separate service then how can they interact with each other? anything specific we need to do here?
DeleteI want to know that the queues are running in a separate process or a thread? Or the queue uses the same main thread to process jobs?
ReplyDeleteNest JS allows you to run it in a separate thread, there's an example in the docs on how to set it up.
Delete