
Configuration And Working Mechanism Of JSON Files On .Net Core Application Starts


.Net Core application JSON file configuration technique has come into picture by replacing traditional way like Web.Config file approach. By default application loads "appSettings.json" file on startup. If we have defined environment variable then application also loads environmental specific json files like "appSettings.Development.json"(for environment variable is Development), "appSettings.Stage.json"(for environment variable is Stage), "appSettings.Production.json"(for environment variable is Production) along with the "appSetting.json".

Create A Sample .Net Core Application:

Now for better understanding let's walk through with a sample .Net Core Web API application. The application can be created either by using Visual Studio 2019(VS Editor supports .Net Core Version 3.0plus) or visual Studio Code

App Loads appSettings.json And appSettings.{Environmental_Variable}.json By Default:

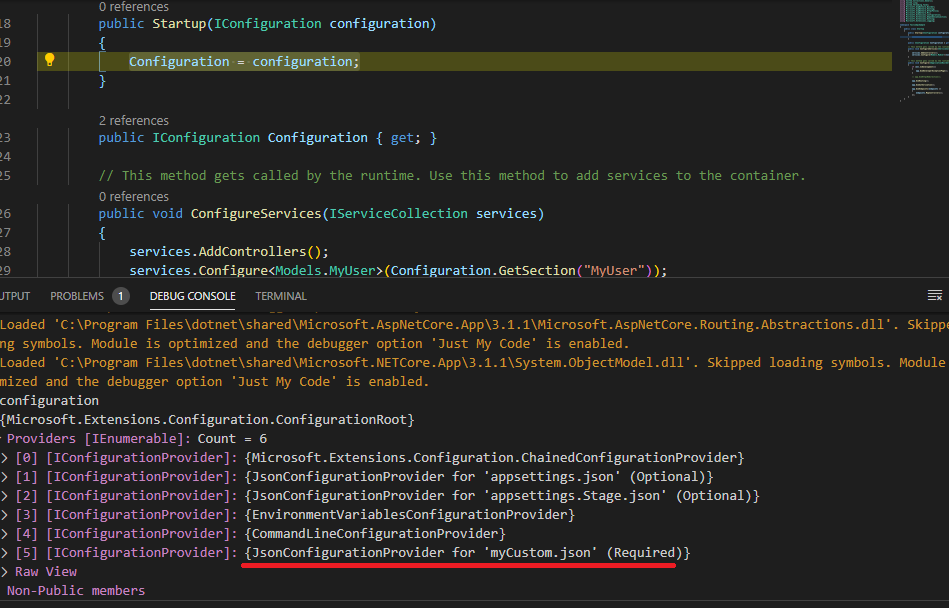
On application start, appSettings.json and appSettings.{Environment_Variable}.json file automatically loaded by the application and injected those file values into the Microsoft.Extensions.Configuration.IConfiguration in Startup file. So let's add debugger in Startup.cs file and inspect the JSON files as below.
Here in the picture, we can observe that appSettings.json and appSettings.Development.json are loaded on the app starts.

Let's change the 'Environmental variable' to confirm based on setting the file will get loaded.

In Visual Studio Code editor to set the environment variable for testing open the launch.json file in '.vscode' folder as below

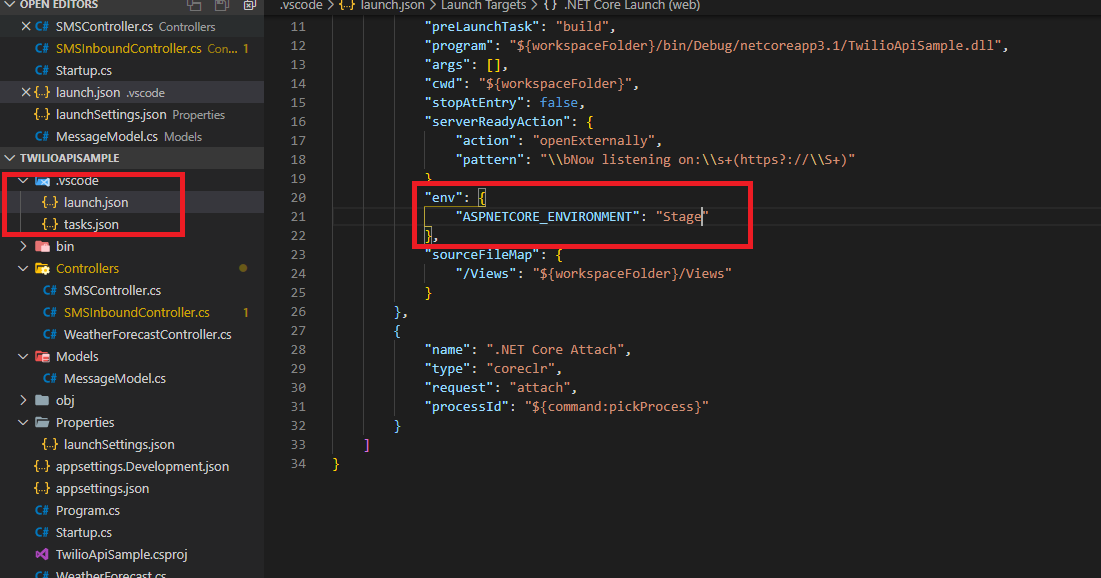
For Visual Studio 2019 or 2017 open launchSettings.json file in 'Properties' folder.

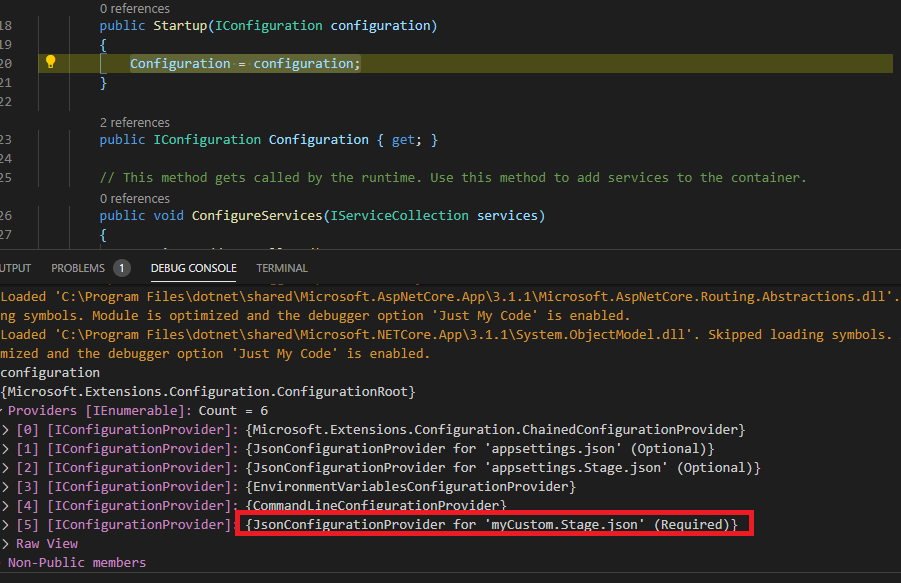
Now let change the environmental variable to 'Stage' and check the Startup.cs file by running application in debug mode as below.

Values Of appSettings.json Override By appSetting.{Environmental_Variable}.json:

Till now we learnt along with appSetting.json file environmental variable json files get loaded on application starts. One more important thing to remember is appsettings.json file values will be overridden by appsettings.{environmental_variable}.json while reading the settings in the application. So properties name should be matched in both files to get the benefit of the override mechanism.

Let's understand this overriding concept by implementing a sample endpoint. Now in "appsetting.json" file add new object property as below
appsettings.json:
{
  "MyUser":{
    "VariableName":"Production"
  }
}
Let's add a model to represent the above JSON object
Model/MyUser.cs:
public class MyUser
{
	public string VariableName{get;set;}
}
Now register 'MyUser' object with the json object in Startup.cs as below
Startup.cs:
public void ConfigureServices(IServiceCollection services)
{
	services.Configure<Models.MyUser>(Configuration.GetSection("MyUser"));
}
Now let's create a testing endpoint as below.
Controllers/TestController.cs:
[Route("test")]
public class TestController : ControllerBase
{
	private readonly MyUser _myUser;
	public TestController(IOptions<MyUser> myUser)
	{
		_myUser = myUser.Value;
	}
	[Route("get")]
	public IActionResult Get()
	{
		return Ok(_myUser);
	}
}
#L5 at this line number 'MyUser' object gets injected into the constructor using 'Microsoft.Extension.Options.IOption<MyUser>

Now run the application and output shows as below.
Now override the appsettings.json values with the appsettings.Development.json file values
appsettings.Development.json:
{
  "MyUser":{
    "VariableName":"Development"
  }
}
Now re-run the application and output shows like appsettings.Development.json values override the appsettings.json values as below.

Load Custom JSON File:

Configuring everything into the appsettings.json file is good, but there are cases where a large number of settings need to be read from a file(which are not suitable to store in Database) in that case adding everything into the appsettings.json makes the file more tedious and confusing. So it is always best to practise to maintain separate JSON files in this kind of scenarios. After separating settings into the custom file we need to configure the custom file to load at the time of application starts just like the appsettings.json.

Let's add a sample JSON file like 'myCustom.json' at the location(the root of the application) where appsettings.json existed.
Now in Program.cs file we need to use an extension method of IHostBuilder like 'ConfigureAppConfiguration' method. This method helps to add n-number of custom JSON files which gets loaded on application starts.
Program.cs:
public static IHostBuilder CreateHostBuilder(string[] args) =>
Host.CreateDefaultBuilder(args)
.ConfigureAppConfiguration((hoistingContext, config) => {
	config.AddJsonFile("myCustom.json");
})
.ConfigureWebHostDefaults(webBuilder =>
{
	webBuilder.UseStartup<Startup>();
});
#L4 at this we are adding our custom JSON file inside of the 'ConfigureAppConfiguration' methods. So this file will get loaded automatically along with appsettings.json file.

Now run the application in debug mode and we can see 'myCustom.json' file loaded.

Load Custom JSON File Based On Environmental Variable:

We can load custom files based on environment variable configured for the application.

Let's add files with environment variable inside of their file name as below.
Now update the "ConfigureAppConfiguration" method  in Program.cs file as below.
Program.cs:
public static IHostBuilder CreateHostBuilder(string[] args) =>
Host.CreateDefaultBuilder(args)
.ConfigureAppConfiguration((hoistingContext, config) => {
	config.AddJsonFile($"myCustom.{Environment.GetEnvironmentVariable("ASPNETCORE_ENVIRONMENT")}.json");
})
.ConfigureWebHostDefaults(webBuilder =>
{
	webBuilder.UseStartup<Startup>();
});
#L4 at this line using 'System.Environment.GetEnvironmentVariable()' method is used to fetch variable value.

Now run the application in debug mode and output as shown below.

Load JSON File From Custom Path:

Previously we have created custom JSON file in the root path, so we simply specified file name in Program.cs. If we have more number of custom JSON file it is good to maintain them inside of the folders.

Let's add our custom JSON file inside of the 'wwwroot' folder as below.
Update the Program.cs file as below.
Program.cs:
public static IHostBuilder CreateHostBuilder(string[] args) =>
	Host.CreateDefaultBuilder(args)
	.ConfigureAppConfiguration((hoistingContext, config) => {
		config.AddJsonFile("wwwroot/Config/myCustom.json");
	})
	.ConfigureWebHostDefaults(webBuilder =>
	{
		webBuilder.UseStartup<Startup>();
	});
#L4 at this line JSON file configured with the full file path.

Now run the application in debug mode and output shown below.

Wrapping Up:

Hopefully, I think this article delivered some useful information about loading of appsetting.json and custom JSON files in .Net Core application. I love to have your feedback, suggestions, and better techniques in the comment section below.

Follow Me:

Comments

Popular posts from this blog

Angular 14 Reactive Forms Example

In this article, we will explore the Angular(14) reactive forms with an example. Reactive Forms: Angular reactive forms support model-driven techniques to handle the form's input values. The reactive forms state is immutable, any form filed change creates a new state for the form. Reactive forms are built around observable streams, where form inputs and values are provided as streams of input values, which can be accessed synchronously. Some key notations that involve in reactive forms are like: FormControl - each input element in the form is 'FormControl'. The 'FormControl' tracks the value and validation status of form fields. FormGroup - Track the value and validate the state of the group of 'FormControl'. FormBuilder - Angular service which can be used to create the 'FormGroup' or FormControl instance quickly. Form Array - That can hold infinite form control, this helps to create dynamic forms. Create An Angular(14) Application: Let'

.NET 7 Web API CRUD Using Entity Framework Core

In this article, we are going to implement a sample .NET 7 Web API CRUD using the Entity Framework Core. Web API: Web API is a framework for building HTTP services that can be accessed from any client like browser, mobile devices, and desktop apps. In simple terminology API(Application Programming Interface) means an interface module that contains programming functions that can be requested via HTTP calls either to fetch or update data for their respective clients. Some of the Key Characteristics of API: Supports HTTP verbs like 'GET', 'POST', 'PUT', 'DELETE', etc. Supports default responses like 'XML' and 'JSON'. Also can define custom responses. Supports self-hosting or individual hosting, so that all different kinds of apps can consume it. Authentication and Authorization are easy to implement. The ideal platform to build the REST full services. Install The SQL Server And SQL Management Studio: Let's install the SQL server on our l

ReactJS(v18) JWT Authentication Using HTTP Only Cookie

In this article, we will implement the ReactJS application authentication using the HTTP-only cookie. HTTP Only Cookie: In a SPA(Single Page Application) Authentication JWT token either can be stored in browser 'LocalStorage' or in 'Cookie'. Storing the JWT token inside of the cookie then the cookie should be HTTP Only. The HTTP-ONly cookie nature is that it will be only accessible by the server application. Client apps like javascript-based apps can't access the HTTP-Only cookie. So if we use the authentication with HTTP-only JWT cookie then we no need to implement the custom logic like adding authorization header or storing token data, etc at our client application. Because once the user authenticated cookie will be automatically sent to the server by the browser on every API call. Authentication API: To authenticate our client application with JWT HTTP-only cookie, I developed a NetJS(which is a node) Mock API. Check the GitHub link and read the document on G

.NET6 Web API CRUD Operation With Entity Framework Core

In this article, we are going to do a small demo on AspNetCore 6 Web API CRUD operations. What Is Web API: Web API is a framework for building HTTP services that can be accessed from any client like browser, mobile devices, desktop apps. In simple terminology API(Application Programming Interface) means an interface module that contains a programming function that can be requested via HTTP calls to save or fetch the data for their respective clients. Some of the key characteristics of API: Supports HTTP verbs like 'GET', 'POST', 'PUT', 'DELETE', etc. Supports default responses like 'XML' and 'JSON'. Also can define custom responses. Supports self-hosting or individual hosting, so that all different kinds of apps can consume it. Authentication and Authorization are easy to implement. The ideal platform to build REST full services. Create A .NET6 Web API Application: Let's create a .Net6 Web API sample application to accomplish our

Angular 14 State Management CRUD Example With NgRx(14)

In this article, we are going to implement the Angular(14) state management CRUD example with NgRx(14) NgRx Store For State Management: In an angular application to share consistent data between multiple components, we use NgRx state management. Using NgRx state helps to avoid unwanted API calls, easy to maintain consistent data, etc. The main building blocks for the NgRx store are: Actions - NgRx actions represents event to trigger the reducers to save the data into the stores. Reducer - Reducer's pure function, which is used to create a new state on data change. Store - The store is the model or entity that holds the data. Selector - Selector to fetch the slices of data from the store to angular components. Effects - Effects deals with external network calls like API. The effect gets executed based the action performed Ngrx State Management flow: The angular component needs data for binding.  So angular component calls an action that is responsible for invoking the API call.  Aft

Angular 14 Crud Example

In this article, we will implement CRUD operation in the Angular 14 application. Angular: Angular is a framework that can be used to build a single-page application. Angular applications are built with components that make our code simple and clean. Angular components compose of 3 files like TypeScript File(*.ts), Html File(*.html), CSS File(*.cs) Components typescript file and HTML file support 2-way binding which means data flow is bi-directional Component typescript file listens for all HTML events from the HTML file. Create Angular(14) Application: Let's create an Angular(14) application to begin our sample. Make sure to install the Angular CLI tool into our local machine because it provides easy CLI commands to play with the angular application. Command To Install Angular CLI npm install -g @angular/cli Run the below command to create the angular application. Command To Create Angular Application ng new name_of_your_app Note: While creating the app, you will see a noti

Unit Testing Asp.NetCore Web API Using xUnit[.NET6]

In this article, we are going to write test cases to an Asp.NetCore Web API(.NET6) application using the xUnit. xUnit For .NET: The xUnit for .Net is a free, open-source, community-focused unit testing tool for .NET applications. By default .Net also provides a xUnit project template to implement test cases. Unit test cases build upon the 'AAA' formula that means 'Arrange', 'Act' and 'Assert' Arrange - Declaring variables, objects, instantiating mocks, etc. Act - Calling or invoking the method that needs to be tested. Assert - The assert ensures that code behaves as expected means yielding expected output. Create An API And Unit Test Projects: Let's create a .Net6 Web API and xUnit sample applications to accomplish our demo. We can use either Visual Studio 2022 or Visual Studio Code(using .NET CLI commands) to create any.Net6 application. For this demo, I'm using the 'Visual Studio Code'(using the .NET CLI command) editor. Create a fo

Part-1 Angular JWT Authentication Using HTTP Only Cookie[Angular V13]

In this article, we are going to implement a sample angular application authentication using HTTP only cookie that contains a JWT token. HTTP Only JWT Cookie: In a SPA(Single Page Application) Authentication JWT token either can be stored in browser 'LocalStorage' or in 'Cookie'. Storing JWT token inside of the cookie then the cookie should be HTTP Only. The HTTP-Only cookie nature is that it will be only accessible by the server application. Client apps like javascript-based apps can't access the HTTP-Only cookie. So if we use authentication with HTTP only JWT cookie then we no need to implement custom logic like adding authorization header or storing token data, etc at our client application. Because once the user authenticated cookie will be automatically sent to the server by the browser on every API call. Authentication API: To implement JWT cookie authentication we need to set up an API. For that, I had created a mock authentication API(Using the NestJS Se

ReactJS(v18) Authentication With JWT AccessToken And Refresh Token

In this article, we are going to do ReactJS(v18) application authentication using the JWT Access Token and Refresh Token. JSON Web Token(JWT): JSON Web Token is a digitally signed and secured token for user validation. The JWT is constructed with 3 important parts: Header Payload Signature Create ReactJS Application: Let's create a ReactJS application to accomplish our demo. npx create-react-app name-of-your-app Configure React Bootstrap Library: Let's install the React Bootstrap library npm install react-bootstrap bootstrap Now add the bootstrap CSS reference in 'index.js'. src/index.js: import 'bootstrap/dist/css/bootstrap.min.css' Create A React Component 'Layout': Let's add a React component like 'Layout' in 'components/shared' folders(new folders). src/components/shared/Layout.js: import Navbar from "react-bootstrap/Navbar"; import { Container } from "react-bootstrap"; import Nav from "react-boot

A Small Guide On NestJS Queues

NestJS Application Queues helps to deal with application scaling and performance challenges. When To Use Queues?: API request that mostly involves in time taking operations like CPU bound operation, doing them synchronously which will result in thread blocking. So to avoid these issues, it is an appropriate way to make the CPU-bound operation separate background job.  In nestjs one of the best solutions for these kinds of tasks is to implement the Queues. For queueing mechanism in the nestjs application most recommended library is '@nestjs/bull'(Bull is nodejs queue library). The 'Bull' depends on Redis cache for data storage like a job. So in this queueing technique, we will create services like 'Producer' and 'Consumer'. The 'Producer' is used to push our jobs into the Redis stores. The consumer will read those jobs(eg: CPU Bound Operations) and process them. So by using this queues technique user requests processed very fastly because actually