
Fluent Validation Library:
Fluent Validation is a popular .Net library for enabling validation rules. It has a lot of features like in-built validation rules that are most commonly used in any application and also has flexible support for creating custom rules. Implementing Fluent validation rules is a cleaner approach than using the 'DataAnnotation'(.Net default implementation for applying validation rules). It can be automatically injected into .NetCore model validations without any explicit implementation.
How To Implement Fluent Validation To A Model:
To apply fluent validation to the model, we have to create a separate validator class. The validator class must inherit from 'FluentValidation.AbstractValidator<TModel>'. Inside of the constructor need to apply required validation for the properties of 'TModel'.
public class Student
{
	public string Name { get; set; }
	public int Age { get; set; }
}

public class StudentValidator:AbstractValidator<Student>
{
	public StudentValidator()
	{
		RuleFor(_ => _.Name).NotNull();
		RuleFor(_ => _.Age).GreaterThan(10);
	}
}
Built-in Validators Of Fluent Validation Library:
The following are the build-in validators of the fluent validation library:
NotNull Validator
RuleFor(person => person.FirstName).NotNull()
NotEmpty Validator
RuleFor(person => person.FirstName).NotEmpty()
NotEqual Validator
RuleFor(person => person.Name).NotEqual("Naveen");
// can compare with another prop as well
RuleFor(person => person.Name).NotEqual(person => person.NickName);
// can compare with another prop as well
RuleFor(person => person.Name).NotEqual(person => person.NickName);
Equal Validator
RuleFor(person => person.Name).Equal("naveen")
//compare with other props
RuleFor(person => person.Name).Equal(person => person.NickName)
//compare with other props
RuleFor(person => person.Name).Equal(person => person.NickName)
Length Validator
RuleFor(person => person.Name).Length(1,50)
MaxLength Validator
RuleFor(person => person.Name).MaximumLength(100)
MinLength Validator
RuleFor(person => person.Name).MinimumLength(10)
Less Than Validator
RuleFor(person => person.Age).LessThan(20)
// less than another property
RuleFor(person => person.Age).LessThan(person => person.MaxAgeLimit)
// less than another property
RuleFor(person => person.Age).LessThan(person => person.MaxAgeLimit)
Less Than Or Equal Validator
RuleFor(person => person.Age).LessThanOrEqualTo(20)
// less than or equals to other property
RuleFor(person => person.Age).LessThanOrEqualTo(person => person.MaxAgeLimit)
// less than or equals to other property
RuleFor(person => person.Age).LessThanOrEqualTo(person => person.MaxAgeLimit)
Greater Than Validator
RuleFor(person => person.Age).GreaterThan(5)
// Greater than other property value
RuleFor(person => person.Age).GreaterThan(person => person.MinimumAgetLimit)
// Greater than other property value
RuleFor(person => person.Age).GreaterThan(person => person.MinimumAgetLimit)
Greater Than Or Equal Validator
RuleFor(person => person.Age).GreaterThanOrEqualTo(5)
// Greater than or equals to other property value
RuleFor(person => person.Age).GreaterThanOrEqualTo(person => person.MinimumAgetLimit)
// Greater than or equals to other property value
RuleFor(person => person.Age).GreaterThanOrEqualTo(person => person.MinimumAgetLimit)
Regular Expression Validator
RuleFor(person => person.Name).Matches("Regex pattern")
Email Validator
RuleFor(person => person.Email).EmailAddress()
Credit Card Validator
RuleFor(person => person.CreditCardNumber).CreditCard()
Null Validator
RuleFor(person => person.Name).Null()
ExclusiveBetween Validator
RuleFor(person => person.Rank).ExclusiveBetween(1,10)
InClusiveBetween Validator
RuleFor(person => person.Rank).InclusiveBetween(1,10)
Create A .Net5 MVC Application:
Fluent Validation library can be used in any of the Asp.Net Core Applications. In this demo, we are going to create a .Net5 MVC sample application.

Install Fluent Validation Library:
Package Manager Command:
Install-Package FluentValidation.AspNetCore -Version 10.3.3
Install-Package FluentValidation.AspNetCore -Version 10.3.3
.NET CLI Command:
dotnet add package FluentValidation.AspNetCore --version 10.3.3
dotnet add package FluentValidation.AspNetCore --version 10.3.3
Register Fluent Validation Service:
Now register the fluent validation service as an extension to the MVC service because of this service registration fluent validation gets integrated with MVC model validations.
Startup.cs:
services.AddControllersWithViews()
.AddFluentValidation(options =>
{
	options.RegisterValidatorsFromAssemblyContaining(typeof(Startup));
});
- Here 'RegisterValidatorsFromAssemblyContaining' it will load all the validator entity of each modal automatically without configuring explicitly. So to this option, we just need to pass any class that is under the root namespace of the library(eg: 'Startup.cs' & 'Program.cs'), so that it can identify all validator classes in our project under that namespace.
Implement Fluent Validation For Model:
Let's understand how to enable modal validation in Asp.Net Core using fluent validation. Let's create a view model like 'PersonViewModel.cs' in the 'Models' folder.
Models/PersonViewModel.cs:
namespace FluentValidationDemo.MVC.Models
{
    public class PersonViewModel
    {
        public int ID { get; set; }
        public string LastName { get; set; }
        public string FirstName { get; set; }
        public int Age { get; set; }
    }
}
Now our goal is to define validation rules for the above class, so we have to create a new validator class like 'PersonViewModelValidator.cs' in a 'Validators' folder like below.Validators/PersonViewModelValidator.cs:
using FluentValidation;
using FluentValidationDemo.MVC.Models;

namespace FluentValidationDemo.MVC.Validators
{
    public class PersonViewModelValidator:AbstractValidator<PersonViewModel>
    {
        public PersonViewModelValidator()
        {
            RuleFor(_ => _.FirstName).NotEmpty().Length(4,12);
            RuleFor(_ => _.Age).GreaterThan(10);
        }
    }
}
- (Line: 6) To create a validator class it should inherit 'FluentValidation.AbstractValidator<TModel>' where 'TModel' is the type of our model that we want to enable the validation rules
- All validation rules have to be defined inside of our validator class constructor.
- (Line: 10) Here I applied two validation rules for the 'FirstName' property like 'NotEmpty'(that means field can't be the empty string) and 'Length(4,12)' defined string range with min and max values.
- (Line: 11) Here I applied only one validation rule like 'Age' property needs to be greater than some specified limit value.
Controllers/PersonController.cs:
using FluentValidationDemo.MVC.Models;
using Microsoft.AspNetCore.Mvc;

namespace FluentValidationDemo.MVC.Controllers
{
    [Route("person")]
    public class PersonController : Controller
    {

        [HttpGet]
        [Route("create")]
        public IActionResult Create()
        {
            return View();
        }

        [HttpPost]
        [Route("create")]
        public IActionResult Create(PersonViewModel person)
        {
            if (ModelState.IsValid)
            {
                return Content("Success");
            }
            return View(person);
        }
    }
}
- (Line: 10-15) Defined a HttpGet action method, its just displays our page.
- (Line: 17-26) Define a HttpPost action method. At #Line21 checking our model is valid or not
@model FluentValidationDemo.MVC.Models.PersonViewModel

<div>
    <form asp-action="create" method="post">
        <div class="form-group row">
            <label asp-for="FirstName" class="col-sm-2 col-form-label">Name</label>
            <div class="col-sm-10">
                <input asp-for="FirstName" type="text" class="form-control" />
                <span asp-validation-for="FirstName" class="text-danger"></span>
            </div>
        </div>
        <div class="form-group row">
            <label asp-for="Age" class="col-sm-2 col-form-label">Name</label>
            <div class="col-sm-10">
                <input asp-for="Age" type="text" class="form-control" />
                <span asp-validation-for="Age" class="text-danger"></span>
            </div>
        </div>
        <div class="form-group row">
            <button type="submit" class="btn btn-primary">Submit</button>
        </div>
    </form>
</div>
- (Line: 1) Defined model for our razor view.
- Created a small form with MVC model binding using razor syntax.

Implement Fluent Validation For Nested Model:
Now let's explore how fluent validation rules are applied for the nested model. Let's create a child view model like 'PersonAddressViewModel.cs'.
Models/PersonViewModel.cs & Models/PersonAddressViewModel.cs:
namespace FluentValidationDemo.MVC.Models
{
    public class PersonViewModel
    {
        public int ID { get; set; }
        public string LastName { get; set; }
        public string FirstName { get; set; }
        public int Age { get; set; }

		// child navigation property
        public PersonAddressViewModel PersonAddress { get; set; }
    }
}


namespace FluentValidationDemo.MVC.Models
{
    public class PersonAddressViewModel
    {
        public int PersonAddressId { get; set; }
        public string AddressLine1 { get; set; }
        public string AddressLine2 { get; set; }
        public string City { get; set; }
        public string State { get; set; }
        public string Country { get; set; }
    }
}
- (Line: 11) Child class(PersonalAddressViewModel) navigation property.
- (Line: 18-26) Add new child class like 'PersonAddressViewModel'.
Validators/PersonAddressViewModelValidators.cs:
using FluentValidation;
using FluentValidationDemo.MVC.Models;

namespace FluentValidationDemo.MVC.Validators
{
    public class PersonAddressViewModelValidator: AbstractValidator<PersonAddressViewModel>
    {
        public PersonAddressViewModelValidator()
        {
            RuleFor(_ => _.AddressLine1).NotEmpty();
        }
    }
}
- (Line: 6) Inherited 'FluentValidation.AbstractValidotr<TModel>'.
- (Line: 10) For the 'AddressLine1' property applied a validation rule like it can't be empty.
Views/Person/Create.cshtml:
@model FluentValidationDemo.MVC.Models.PersonViewModel


<div>
    <form asp-action="create" method="post">
        <div class="form-group row">
            <label asp-for="FirstName" class="col-sm-2 col-form-label">Name</label>
            <div class="col-sm-10">
                <input asp-for="FirstName" type="text" class="form-control" />
                <span asp-validation-for="FirstName" class="text-danger"></span>
            </div>
        </div>
        <div class="form-group row">
            <label asp-for="Age" class="col-sm-2 col-form-label">Age</label>
            <div class="col-sm-10">
                <input asp-for="Age" type="text" class="form-control" />
                <span asp-validation-for="Age" class="text-danger"></span>
            </div>
        </div>
        <div class="form-group row">
            <label asp-for="PersonAddress.AddressLine1" class="col-sm-2 col-form-label">Address1</label>
            <div class="col-sm-10">
                <input asp-for="PersonAddress.AddressLine1" type="text" class="form-control" />
                <span asp-validation-for="PersonAddress.AddressLine1" class="text-danger"></span>
            </div>
        </div>

        <div class="form-group row">
            <button type="submit" class="btn btn-primary">Submit</button>
        </div>
    </form>
</div>
- (Line: 20-26) A new text field added for 'AddressLine1'
Startup.cs:
services.AddControllersWithViews()
.AddFluentValidation(options =>
{
	options.RegisterValidatorsFromAssemblyContaining(typeof(Startup));
	options.ImplicitlyValidateChildProperties = true;
});
- (Line: 5) The 'ImplicitlyValidateChildProperties' set to 'true' will fire child class properties validation rules automatically.

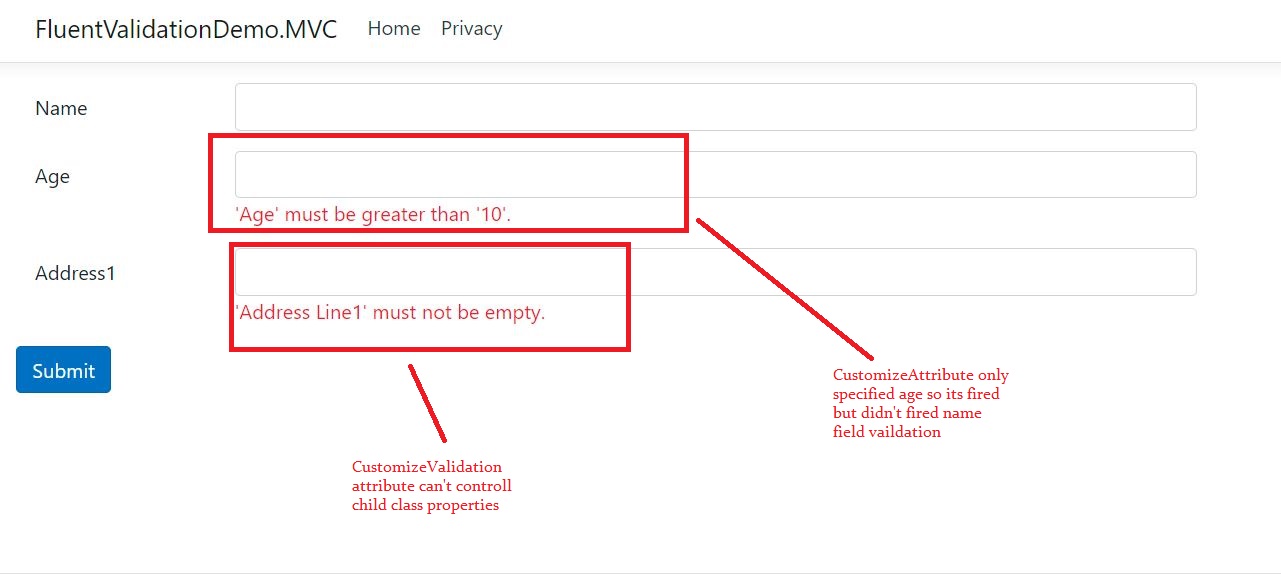
CustomizeValidator Attribute:
Fluent Validation provides an attribute called 'CustomizeValidator'. With this attribute, we can only validate the required properties we want, unspecified properties validation won't fire. But it won't have control over the child-class property.
So let's update our post-action method with this CustomizeValidator attribute.
Controllers/PersonController.cs:
[HttpPost]
[Route("create")]
public IActionResult Create([CustomizeValidator(Properties ="Age")] PersonViewModel person)
{
	if (ModelState.IsValid)
	{
		return Content("Success");
	}
	return View(person);
}
- (Line: 3) Payload decorated with 'FluentValidation.AspNetCore.CustomizedValidator' attribute. To this attribute, we have to pass the properties to which we want to fire the validation rules.
Video Session:
Support Me!
Buy Me A Coffee
PayPal Me
Wrapping Up:
Hopefully, I think this article delivered some useful information on the FluentValidation library in the AspNet Core application. I love to have your feedback, suggestions, and better techniques in the comment section below.
Comments
Post a Comment