
AutoMapper:
Automapper is an object-to-object mapper. Object to object mapping works by transforming an input object of one type into an output object of a different type. Manually mapping one object property value to another object property value leads to more lines of code, so all this dirty work can be avoided by using the Automapper. As long as all properties names are the same for 2 different objects that need to map, almost zero configuration is needed to map them.

When To Use AutoMapper?:
In any kind of architecture, it is always advised to not expose the 'Entity'(Table classes) directly. So we will create replica classes for 'Entity' we called them as 'DTO'(Data Transfer Object) or 'VM'(View Models). So this is the real-time best case to use Automapper for mapping 'Entity'(Table classes) data to DTO or VM's.
Create A Sample Dotnet5 Web API Project:
In this demo, we are going to understand the different mapping techniques that are provided by AutoMapper. So here I'm using Web API to accomplish my demo, but I'm not going to show all the API set up from the scratch, so I'm hoping everyone has a good idea on Web API. Here I'm going to show all the logic with and without auto mapper.
Install AutoMapper NuGet:
Package Manager:
Install-Package AutoMapper.Extensions.Microsoft.DependencyInjection -Version 8.1.1
Install-Package AutoMapper.Extensions.Microsoft.DependencyInjection -Version 8.1.1
.NET CLI:
dotnet add package AutoMapper.Extensions.Microsoft.DependencyInjection --version 8.1.1
dotnet add package AutoMapper.Extensions.Microsoft.DependencyInjection --version 8.1.1
Initial AutoMapper Setup For Asp.Net Core Application:
In Automapper we have to register our source and destination objects in our application. So the best way to organize them is to create a 'Profile'. So we can create a class that inherits 'Profile' and inside of the constructor, we can register our configuration. We can have multiple profiler classes if we need them. So let's create a folder like 'MapperProfiles' and a class like 'AppProfile.cs'
MapperProfiles/AppProfiles.cs:
using AutoMapper;
namespace AutoMapDemo.API.MapperProfiles
{
    public class AppProfile:Profile
    {
        public AppProfile()
        {

        }
    }
}
Now we have to register all the 'Profiles' classes we created. Either we register each individual 'Profile' class or we can register a root class like 'Startup.cs' then the library can load all the 'Profile' classes within that namespace.Startup.cs:
services.AddAutoMapper(typeof(Startup))Now inject 'AutoMapper.IMapper' interface in the required controller to use the AutoMapper.
Controllers/TestController.cs:
using AutoMapper;
namespace AutoMapDemo.API.Controllers
{
    [Route("api/[controller]")]
    [ApiController]
    public class TestController : ControllerBase
    {
        public TestController(IMapper mapper)
        {
            _mapper = mapper;
        }
    }
}
Simple Object Mapping:
Let's explore the simple object mapping case using Automapper. Now here will try to map object likes
'Entities/Gadgets.cs' and 'Dto/GadgetsDto.cs'.
Entites/Gadgets.cs:
namespace AutoMapDemo.API.Data.Entities
{
    public class Gadgets
    {
        public int Id { get; set; }
        public string ProductName { get; set; }
        public string Brand { get; set; }
        public decimal Cost { get; set; }
        public string Type { get; set; }
    }
}
DTOs/GadgetsDto.cs:
namespace AutoMapDemo.API.DTOs
{
    public class GadgetsDto
    {
        public int Id { get; set; }
        public string ProductName { get; set; }
        public string Brand { get; set; }
        public decimal Cost { get; set; }
        public string Type { get; set; }
    }
}
Let's go through the code how it looks without a mapper.
[HttpGet]
[Route("first-gadget")]
public IActionResult GetFirstGadget()
{
	var result = _myWorldDbContext.Gadgets
		.Select(_ => new GadgetsDto {
			Brand = _.Brand,
			Cost = _.Cost,
			Id = _.Id,
			ProductName = _.ProductName,
			Type = _.Type
		}).FirstOrDefault();
	return Ok(result);
}
- Here we can observe properties from 'Gadgets.cs' manually assigned to properties from 'GadgetsDto.cs'.
MapperProfiles/AppProfile.cs:
public class AppProfile:Profile
{
	public AppProfile()
	{
		CreateMap<Gadgets, GadgetsDto>();
	}
}
- Here left-hand side type is the source object type(Gadgets) and the right-hand side type is the destination object type(GadgetsDto).
[HttpGet]
[Route("first-gadget-with-map")]
public IActionResult GetFirstGadgetWithMapping()
{
	var gadgets = _myWorldDbContext.Gadgets.FirstOrDefault();
	var result = _mapper.Map<Gadgets, GadgetsDto>(gadgets);
	return Ok(result);
}
- Here '_mapper.Map<S, D>()' method to copy the data from the source object to the destination object.
Collection Mapping:
Now let's explore the object collection mapping using AutoMapper. Here we will try to map objects like a collection of 'Gadgets.cs' and the collection of 'GadgetsDto.cs'.
So coming to the configuration in 'Profile', since we have already mapped 'Gadgets' and 'GadgetsDto' for the simple single object mapping in the previous section, so the same configuration will be used by IMapper for the collection as well.
Now, let's look over the code without AutoMapper implementation.
[HttpGet]
[Route("all-gadgets")]
public IActionResult GetAllGadgets()
{
	var gadgets = _myWorldDbContext.Gadgets.ToList();
	List<GadgetsDto> result = new List<GadgetsDto>();
	foreach (var item in gadgets)
	{
		result.Add(new GadgetsDto
		{
			Brand = item.Brand,
			Cost = item.Cost,
			Id = item.Id,
			ProductName = item.ProductName,
			Type = item.Type
		});

	}
	return Ok(result);
}
- Here looping the data from the database and then assigning data to the 'DTO' object each property manually.
[HttpGet]
[Route("all-gadgets-with-mapper")]
public IActionResult GetAllGadgetsWithMapper()
{
	var gadgets = _myWorldDbContext.Gadgets.ToList();
	List<GadgetsDto> result = _mapper.Map<List<Gadgets>, List<GadgetsDto>>(gadgets);
	return Ok(result);
}
- (Line: 6) Here '_mapper.Map<List<SourceObject>, List<DestinationObject>>()' method source and destination method should be wrapped around the 'List'.
Nested Object Mapping:
Let's explore mapping between the objects that contain navigation property(nested objects). Here our source object is like 'Person.cs' which will have navigation property of type 'PersonAddress.cs' and the destination object is like 'PersonDto.cs' which will have navigation property of type 'PersonAddressDto.cs'.
Entities/Person.cs And Entities/PersonAddress.cs:
public class Persons
{
	public int ID { get; set; }
	public string LastName { get; set; }
	public string FirstName { get; set; }
	public int Age { get; set; }
	public List<PersonAddress> PersonAddresses { get; set; }
}

public class PersonAddress
{
	public int PersonAddressId { get; set; }
	public string AddressLine1 { get; set; }
	public string AddressLine2 { get; set; }
	public string City { get; set; }
	public string State { get; set; }
	public string Country { get; set; }
	public int PersonsId { get; set; }
}
DTOs/PersonDto.cs And DTOs/PersonAddress.cs:
public class PersonsDto
{
	public int ID { get; set; }
	public string LastName { get; set; }
	public string FirstName { get; set; }
	public int Age { get; set; }
	public List<PersonAddressDto> PersonAddresses { get; set; }
}

public class PersonAddressDto
{
	public int PersonAddressId { get; set; }
	public string AddressLine1 { get; set; }
	public string AddressLine2 { get; set; }
	public string City { get; set; }
	public string State { get; set; }
	public string Country { get; set; }
	public int PersonsId { get; set; }
}
Let's have look at the code without the Automapper.
[HttpGet]
[Route("person-address")]
public IActionResult GetPersonAddress()
{
	var persons = _myWorldDbContext.Persons.Include(_ => _.PersonAddresses).ToList();
	List<PersonsDto> result = new List<PersonsDto>();
	foreach (var person in persons)
	{
		var personDto = new PersonsDto();
		personDto.ID = person.ID;
		personDto.FirstName = person.FirstName;
		personDto.LastName = person.LastName;
		personDto.Age = person.Age;
		personDto.PersonAddresses = new List<PersonAddressDto>();
		foreach (var address in person.PersonAddresses)
		{
			personDto.PersonAddresses.Add(new PersonAddressDto
			{
				AddressLine1 = address.AddressLine1,
				AddressLine2 = address.AddressLine2,
				City = address.City,
				Country = address.Country,
				PersonAddressId = address.PersonAddressId,
				PersonsId = address.PersonsId,
				State = address.State
			}) ;
		}
		result.Add(personDto);
	}
	return Ok(result);
}
- Here we can observe both parent and child class collection are looped and manually assigned each property value to DTO's
MapperProfiles/AppProfile.cs:
public class AppProfile:Profile
{
	public AppProfile()
	{

		CreateMap<Persons, PersonsDto>();
		CreateMap<PersonAddress, PersonAddressDto>();
	}
}
Now let's take look at the code that uses Automapper.
[HttpGet]
[Route("person-address-with-auto-mapper")]
public IActionResult GetPersonAddressWithAutoMapper()
{
	var persons = _myWorldDbContext.Persons.Include(_ => _.PersonAddresses).ToList();
	List<PersonsDto> result = _mapper.Map<List<Persons>, List<PersonsDto>>(persons);
	return Ok(result);
}
- Here we can see the source as 'Persons' collection and destination object as 'PersonDto' collection since we had configured our child object in 'Profile' class, so internally child source object(PersonAddress) data copied into child destination object(PersonAddressDto).
ForMember() Method For Explicit Property Mapping:
In some cases we might have properties names different in source and destination or we might have defined some custom value with combination source properties then result need to be assigned to single destination properties can be achieved using the 'ForMember()' configuration.
DTOs/PersonOverviewDto.cs And Entities/Person.cs:
// Destination Object
public class PersonOverviewDto
{
	public int ID { get; set; }
	public string FullName { get; set; }
}

// Source Object
public class Persons
{
	public int ID { get; set; }
	public string LastName { get; set; }
	public string FirstName { get; set; }
	public int Age { get; set; }
	public List<PersonAddress> PersonAddresses { get; set; }
}
- Here 'Persons' class is the source and 'PersonOverviewDto' is the destination. By default, Automapper will copy the properties values whose names are the same in both objects. If the destination object has properties that are not in the source object then their value will be the default value of the property types. Now here I want to do an explicit mapping like in the destination object 'FullName' property value should be combination source object properties like 'FirstName' and 'Last' this can be achieved using 'ForMember' Method in the configuration.
MapperProfiles/AppProfile.cs:
public class AppProfile:Profile
{
	public AppProfile()
	{
		CreateMap<Persons, PersonOverviewDto>()
			.ForMember(d => d.FullName, s => s.MapFrom(_ => $"{_.FirstName} {_.LastName}"));
	}
}
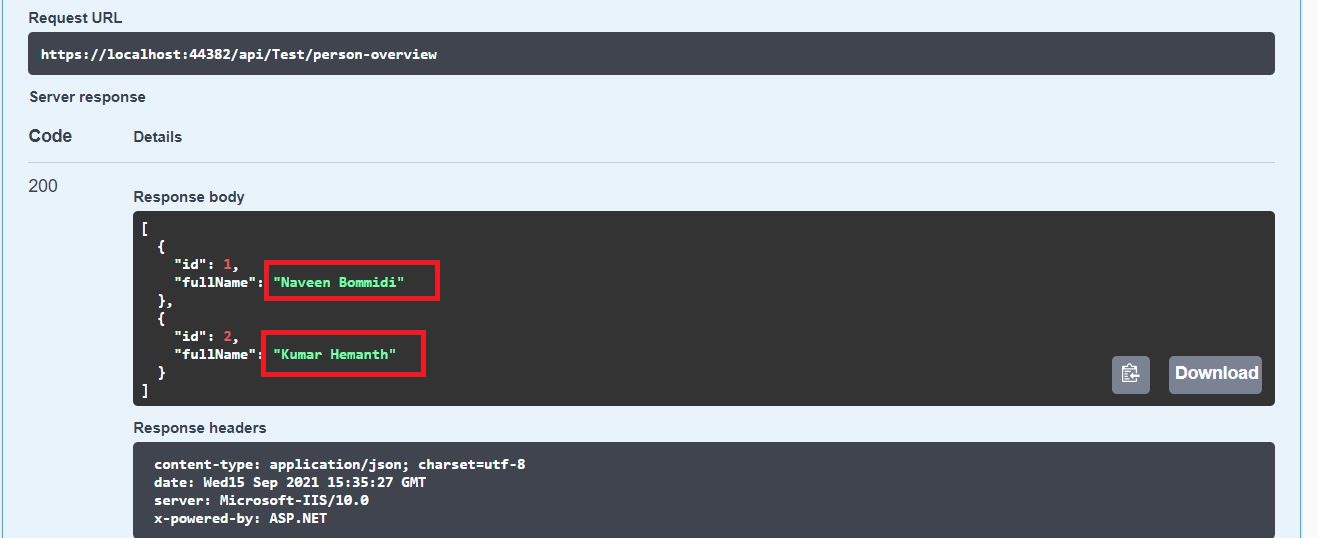
- Here we can observe the 'FullName' value created by combining 'FirstName' and 'LastName' properties of the source object. So 'IMapper' will respect this rule while mapping the 'Persons' and 'PesonOverviewDto' objects.
[HttpGet]
[Route("person-overview")]
public IActionResult GetPersonAddressOverView()
{
	var persons = _myWorldDbContext.Persons.Include(_ => _.PersonAddresses).ToList();
	List<PersonOverviewDto> result = _mapper.Map<List<Persons>, List<PersonOverviewDto>>(persons);
	return Ok(result);
}
IQueryable Mapping:
AutoMapper can be used along with the EntityFramework core IQueryable extension methods. so this can be achieved using 'ProjectTo<DestinationObject>()' extension method.
So here I want to map 'Persons' and 'PersonDto' objects, if we recall we have already configured mapping for these objects in the 'Nested Object Mapping' section above.
So code using the 'ProjectTo<>()' method looks as below.
[HttpGet]
[Route("person-address-with-auto-mapper-extend")]
public IActionResult GetPersonAddressWithAutoMapperExtend()
{
	var persons = _myWorldDbContext.Persons.Include(_ => _.PersonAddresses).ProjectTo<PersonsDto>(_mapper.ConfigurationProvider).ToList();
	return Ok(persons);
}
Video Session:
Support Me!
Buy Me A Coffee
PayPal Me
Wrapping Up:
Hopefully, I think this article delivered some useful information on AutoMapper techniques in Asp.Net Core Application. I love to have your feedback, suggestions, and better techniques in the comment section below.
Comments
Post a Comment