
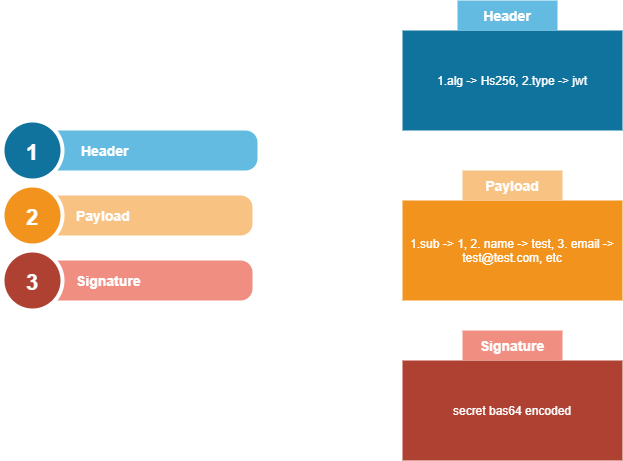
What Is JSON Web Token?:
JSON Web Token is a digitally signed and secured token for user validation. The jwt is constructed with 3 informative parts:
- Header
- Payload
- Signature
Create A Sample App Of Ionic5 Using Vue :
To begin to create an Ionic application, we should have the Ionic CLI installed in our system environment.
Command to install latest Ionic CLI:
npm install -g @ionic/cli@latest
Now run the following command to create Ionic5 using the Vue application.
Command to create Ionic Vue application
ionic start your_app_name blank --type vue
Now run the following command to install Vuex into our Ionic&Vue app.
Vuex Command
npm install vuex@next --save
TypeScript Or Javascript:
By default Ionic sample created with the support of TypeScript in any library like angular, react, and vue. Typescript can be chosen to develop our application. But in the case of Vue most of the developers or preferred to choose javascript syntax instead of Typescript for application development. So to make our Ionic Vue application use javascript we need to remove few Typescript references, so follow the below steps.
- Remove TypeScript dependencies.
command to unistall the typescript dependencies
npm uninstall --save typescript @types/jest @typescript-eslint/eslint-plugin @typescript-eslint/parser @vue/cli-plugin-typescript @vue/eslint-config-typescript- We need to change the file extensions from ".ts" to ".js", we mostly have 2 '.ts files' like 'main.ts' and 'router/index.ts'.
- In the '.eslintrc.js' file needs to remove the '@vue/typescript/recommended' from the 'extends' array property and next need to remove the @typescript-eslint/no-explicit-any': 'off' property from the rules object.
- Now remove the 'Array<RouteRecordRaw>' type in 'router/index.js'.
- Delete the 'shims-vue.d.ts' file.
- Remove the 'lang="ts"' attribute on script tag in our '.vue' files like 'App.vue' and 'view/Home.vue'.
Create A MasterLayout And Login Page:
Before creating a page vue component and master layout let's restructure our project template like:
Let's create a master layout for our Ionic&Vue sample application.- Delete the 'views/Home.vue' and 'views' folder.
- Remove the 'Home.vue' route configuration from the 'router/index.js'
components/MasterLayout.vue:
<template>
  <ion-page>
    <ion-header>
      <ion-toolbar>
        <ion-title>{{ pageTitle }}</ion-title>
      </ion-toolbar>
    </ion-header>
    <ion-content>
      <slot> </slot>
    </ion-content>
  </ion-page>
</template>
<script>
import {
  IonPage,IonHeader,IonContent,IonToolbar,IonTitle
} from "@ionic/vue";
export default {
  components: {
    IonPage,IonHeader,IonContent,IonToolbar,IonTitle,
  },
  props: ["pageTitle"],

};
</script>
<style scoped>
ion-toolbar{
    --background: var(--ion-color-primary);
    --color: var(--ion-color-primary-contrast)
}
</style>
Using '@Ionic/vue' core components we have created our master layout which will be used on our every page of the application.Let's configure our master layout globally in the main.js file.
src/main.js:
import MasterLayout from './components/MasterLayout.vue';

app.component('master-layout', MasterLayout);
Let's create our login page vue component.src/pages/Login.vue:
<template>
    <master-layout pageTitle="Login Form">
        <h3>Login Form</h3>
    </master-layout>
</template>
<script>
export default {

}
</script>
Now let's configure the route of Login.vue in our application.src/router/index.js:
import { createRouter, createWebHistory } from '@ionic/vue-router';
import Login from '../pages/Login.vue'
const routes = [
  {
    path: '/',
    redirect: '/login'
  },
  {
    path: '/login',
    component: Login
  }
]

const router = createRouter({
  history: createWebHistory(process.env.BASE_URL),
  routes
})

export default router
Setup Vuex Store:
Data flow in our application will be done from the vuex store state management. So let's set up our vuex state.
Our vuex state management folder structure looks as below.

src/store/module/auth.js:(Basic Skeleton Structure)
const state = () => ({
  authData: {
    token: "",
    refreshToken: "",
    tokenExp: "",
    userId: "",
    userName: "",
  },
});

const getters = {};

const actions = {};

const mutations = {};

export default {
  namespaced: true,
  state,
  getters,
  actions,
  mutations,
};
- (Line: 1-9) Initialized our auth module state object. Inside of it, we have initialized our 'authData' object that going to hold our authenticated user information.
- (Line: 11) The 'getters' object will have methods to fetch the data from the state.
- (Line: 13) The 'actions' object will have methods that do asynchronous jobs like calling API.
- (Line: 15) The 'mutations' object will have methods to update our state object.
- (Line: 17) While exporting we have mentioned using 'namespaced' which means while consuming this module any method should be prefixed with a namespace. This namespace property value will be the 'property' name where we register our auth module to the vuex store.
src/store/index.js:
import {createStore} from 'vuex';
import AuthModule from './modules/auth';

const store = createStore({
    modules:{
        auth:AuthModule
    }
});

export default store;
- Here creating vuex store to our application. Registered our 'AuthModule' to 'auth' property, this property will be used as a namespace to our 'AuthModule' function while invoking.
src/main.js:
import store from './store/index';

app.use(store);
Add Login Form:
Now let's design our page with a small login form and with a model binding to it.
src/pages/Login.vue:(Html Part)
<template>
  <master-layout pageTitle="Login Form">
    <ion-card>
      <ion-card-header>
        <ion-card-title>SignIn</ion-card-title>
      </ion-card-header>
      <ion-card-content>
        <ion-item>
          <ion-label position="floating">User Name</ion-label>
          <ion-input v-model="userInfo.username"></ion-input>
        </ion-item>
        <ion-item>
          <ion-label position="floating">Password</ion-label>
          <ion-input type="password" v-model="userInfo.password"></ion-input>
        </ion-item>
        <ion-button expand="full" @click="login()">Login</ion-button>
      </ion-card-content>
    </ion-card>
  </master-layout>
</template>
- A login form with vue model binding and submit button registered with a callback.
<script>
import {
  IonCard,IonCardHeader,IonCardTitle,IonCardContent,IonItem,IonLabel,IonInput,
} from "@ionic/vue";
export default {
  components: {
    IonCard,IonCardHeader,IonCardTitle,IonCardContent,IonItem,IonLabel,IonInput,
  },
  data() {
    return {
      userInfo: {
        username: "",
        password: "",
      },
    };
  },
  methods: {
    login() {
      console.log(this.userInfo);
    },
  },
};
</script>
- The 'userInfo' property to capture our form data. The 'login' call back method gets invoked on click the login method.

Mock JWT Access Token:
As a front-end developer no need to spend more time onto work on JWT authentication API (using nodejs, .net, java server programs). So let's use a sample JWT token by mocking it in a constant variable in our application, latter we will make a dynamic API call for fetching the Jwt token at the end section of this article.
A sample jwt token:
eyJhbGciOiJIUzI1NiIsInR5cCI6IkpXVCJ9.eyJ1c2VybmFtZSI6InRlc3QiLCJzdWIiOjEsImlhdCI6MTYwODIwNjE3OSwiZXhwIjozNjAxNjA4MjA2MTc5fQ.BcHKT6ffgvkt0EztkJT35a0Yc7iWF9wkeNxKB4wSJEQ
JWT Decoder:
As we know JWT token encrypted string which contains some information like 'username', 'expiration', and some other claims. So to decode the jwt access token use the below code snippet
src/shared/helper.js:
export function jwtDecrypt(token) {
  var base64Url = token.split(".")[1];
  var base64 = base64Url.replace(/-/g, "+").replace(/_/g, "/");
  var jsonPayload = decodeURIComponent(
    atob(base64)
      .split("")
      .map(function(c) {
        return "%" + ("00" + c.charCodeAt(0).toString(16)).slice(-2);
      })
      .join("")
  );

  return JSON.parse(jsonPayload);
}
Implement Store Logic For Authentication:
Now we are going to update our 'AuthModule' for user authentication.
Let's first update the store state with a new property like 'loginStatus'.
src/store/module/auth.js:(State Object)
const state = () => ({
  authData: {
    token: "",
    refreshToken: "",
    tokenExp: "",
    userId: "",
    userName: "",
  },
  loginStatus:'success'
});
(Line: 9) The 'loginStatus' property consumed by our 'Login.vue' page component to know the user authentication success or not.Let's create a new function in the mutation object, this function contains logic to update our 'authData' state property.
src/store/module/auth.js:(Mutation Object)
import { jwtDecrypt } from "../../shared/helper";

const mutations = {
  saveAuthToken(state, payload) {
    const jwtDecodeUserInfo = jwtDecrypt(payload.access_token);
    const newAuthData = {
      token: payload.access_token,
      refreshToken: payload.refresh_token,
      tokenExp: jwtDecodeUserInfo.exp,
      userId: jwtDecodeUserInfo.sub,
      userName: jwtDecodeUserInfo.username,
    };
    state.authData = newAuthData;
  },
  saveLoginStatus(state, status){
    state.loginStatus = status;
  }
};
- (Line: 1) Importing our token decryptor helper method.
- Created a 'saveAuthToken' mutation method. Here we decrypting our access token and storing the user information and token data to the 'authData' property of our state.
- Created a 'saveLoginStatus' mutation method that updates the 'loginStatus' property to determine user authentication success or failure.
src/store/module/auth.js:(Mutation Object)
import { Plugins } from "@capacitor/core";

const { Storage } = Plugins;

const actions = {
    async loginUser({commit},payload){
        console.log(payload);
        const response = {
            access_token:"eyJhbGciOiJIUzI1NiIsInR5cCI6IkpXVCJ9.eyJ1c2VybmFtZSI6InRlc3QiLCJzdWIiOjEsImlhdCI6MTYwODIwNjE3OSwiZXhwIjozNjAxNjA4MjA2MTc5fQ.BcHKT6ffgvkt0EztkJT35a0Yc7iWF9wkeNxKB4wSJEQ",
            refresh_token:"fake_refresh_token"
        };
        await Storage.set({
            key: "access_token",
            value: response.access_token
        });
        await Storage.set({
            key: "refresh_token",
            value: response.refresh_token
        });

        commit('saveAuthToken', response);
        commit('saveLoginStatus', 'success');
    }
};
- (Line: 1&3) Fetching the storage object from the Capacitor library like '@capacitory/core'. This storage chooses the storage area based on device operating systems for mobiles and for browsers it is saved to local storage.
- Here we're using a fake jwt access token and refresh token for user authentication for now later we will use the real jwt auth endpoint.
- Here storing the access token and refresh token using the Capacitor storage.
- Finally invoking mutation to update the 'authData' property and 'loginStatus' property of our state.
src/store/module/auth.js:(Getter Method)
const getters = {
     getLoginStatus(state){
        return state.loginStatus;
     }
};
Update Login Form To Invoke Store Action For Tokens:
Now in our login form for the login button callback method, we need to invoke the action that deals with the user tokens.
src/pages/Login.vue:(Script Part)
<script>
import {
  IonCard,IonCardHeader,IonCardTitle,IonCardContent,IonItem,IonLabel,IonInput,
} from "@ionic/vue";
import { mapGetters, mapActions } from "vuex";
export default {
  components: {
    IonCard,IonCardHeader,IonCardTitle,IonCardContent,IonItem,IonLabel,IonInput,
  },
  data() {
    return {
      userInfo: {
        username: "",
        password: "",
      },
    };
  },
  computed: {
    ...mapGetters("auth", {
      loginStatus: "getLoginStatus",
    }),
  },
  methods: {
    ...mapActions("auth", {
      loginUser: "loginUser",
    }),
    async login() {
      if (this.userInfo.username && this.userInfo.password) {
        await this.loginUser(this.userInfo);
        if(this.loginStatus === "success"){
            alert('login succes');
        }else{
            alert('falied to login')
        }
      }
    },
  },
};
</script>
- (Line: 19-21) Initialized the vuex mapGetters, inside of it registered our 'getLoginStatus' getter method which returns a string of status.
- (Line: 24-26) Initialized the vuex mapActions, inside of it registered our 'loginUser' action method that deals with user tokens
- In the 'login' call back method invoke the 'loginUser' action method, based on the 'loginStatus' we are displaying an alert message.


Create A Dashboard Page Vue Component:
Let's create a new page called 'Dashboard.vue' where will navigate the logged-in user. On this page, we will display the user name. So to get the user info into the 'Dashboard.vue' component let's create a getter method for it.
src/store/module/auth.js:(Getter Object)
const getters = {
     getAuthData(state){
        return state.authData;
     }
};
src/pages/Dashboard.vue:(Html Part)<template>
<master-layout pageTitle="Dashboard">
<ion-card>
<ion-card-header>
<ion-card-title>Welcome!</ion-card-title>
</ion-card-header>
<ion-card-content>
<ion-item>
<ion-label>Owner Name:</ion-label>
<ion-label>{{ authData.userName }}</ion-label>
</ion-item>
</ion-card-content>
</ion-card>
</master-layout>
</template>
- Here rendering the logged-in user.
<script>
import {
  IonCard,IonCardHeader,IonCardTitle,IonCardContent,IonItem,IonLabel,
} from "@ionic/vue";
import { mapGetters } from "vuex";
export default {
  components: {
    IonCard,IonCardHeader,IonCardTitle,IonCardContent,IonItem,IonLabel,
  },
  computed: {
    ...mapGetters("auth", {
      authData: "getAuthData",
    }),
  },
};
</script>
- Fetching user data from the store.

Navigation Gaurd:
Navigation guards are used to executing navigation conditionally means if the non-authenticated user tries to access the page that requires authentication then the navigation guards will restrict the user from accessing the page.
In our sample example, the 'Dashboard' component needs user authentication, but if we try to access it without authentication also user able to see this component. So now we need to apply guards to protect our 'Dashboard' component.
Let's first create a store action method to load the access token and refresh token from the device storage which helps to load user information when the application reopens by the user.
src/store/modules/auth.js:
async loadStorageTokens({ commit }) {
    const access_token = await await Storage.get({ key: "access_token" });
    const refresh_token = await await Storage.get({ key: "refresh_token" });
    if (access_token && refresh_token) {
      const tokenData = {
        access_token: access_token.value,
        refresh_token: refresh_token.value
      };
      commit("saveAuthToken", tokenData);
    }
}
- (Line: 2&3) Load the access token and refresh token from the device storage.
- After fetching the data from storage then again using the existing 'saveAtuhToken' mutation method that updates the 'authData' property of the store state.
src/router/index.js:
import { createRouter, createWebHistory } from "@ionic/vue-router";
import Login from "../pages/Login.vue";
import Dashboard from "../pages/Dashboard.vue";
import store from "../store/index";

const routes = [
  {
    path: "/",
    redirect: "/login",
  },
  {
    path: "/login",
    component: Login,
  },
  {
    path: "/dashboard",
    component: Dashboard,
    meta: { requiredAuth: true },
  },
];

const router = createRouter({
  history: createWebHistory(process.env.BASE_URL),
  routes,
});

function guard(to, from, next, authData) {
  if (to.meta && to.meta.requiredAuth) {
    if (authData && authData.userId > 0) {
      return next();
    }
    return next({ path: "/login" });
  } else {
    if (authData && authData.userId > 0) {
      return next({ path: "/dashboard" });
    }
    return next();
  }
}

router.beforeEach((to, from, next) => {
  let authData = store.getters["auth/getAuthData"];
  if (authData.userId == 0) {
    store.dispatch("auth/loadStorageTokens").then(
      () => {
        authData = store.getters["auth/getAuthData"];
        return guard(to, from, next, authData);
      },
      (error) => {
        console.log(error);
        return guard(to, from, next, authData);
      }
    );
  } else {
    return guard(to, from, next, authData);
  }
});

export default router;
- (Line: 8) The meta tag configured with route explains that the user navigates to this route must be authenticated or not.
- (Line: 27-39) This function contains our route gaud logic, to make reuse of this logic written as a separate method. If we observe here we are checking the metadata of the routes and based on it we are changing the navigation of the route if needed else it executes the original route request.
- (Line: 42-57) The 'beforeEach()' method runs for before every route execution.Here we checked the 'authData' object to verify user authenticated or not. Here we also invoking the 'loadStorageToken' action method because authenticated user information will be lost when the user refreshes the page so to fix this page loading issue we are checking user device storage as well.
NestJS(Nodejs) Server JWT API:
I have created a NestJS jwt mock API, where you can clone or download my git repository After downloading the repo run the following commands.
Command To Install NestJS CLI:
npm i -g @nestjs/cli
Next, go to the root folder of the repo and run the command to install all the package
Command To Install ALL Packages In our Repository application:
npm install
That's all we have set up a JWT API in our local system for testing, now run the following command to start the application.
Command To Start NestJS APP:
npm run start:dev
Our jwt token endpoint
Url:- http://localhost:3000/auth/login
Payload:-
{
	"username":"test",
	"password":"1234"
}

note:- payload should be same as above, variable name 'username' and 'password'
don't change them, they are even case sensitive. credentials also use as above

Integrate JWT Authentication Endpoint:
Till now we have used mock jwt token now will use real jwt endpoint in our sample.
Now to consume the rest of API calls we need to have an external library like Axios.
Now to consume the rest of API calls we need to have an external library like Axios.
Command to install axios:
npm install axios
Let's update the 'loginUser' action method to use the jwt rest API to authenticate the user.src/store/module/auth.js:
const actions = {
  async loginUser({ commit }, payload) {
    console.log(payload);
    const response = await axios.post("http://localhost:3000/auth/login", payload);
    if (response.status == 200 || response.status == 201) {
      await Storage.set({
        key: "access_token",
        value: response.data.access_token,
      });
      await Storage.set({
        key: "refresh_token",
        value: response.data.refresh_token,
      });

      commit("saveAuthToken", response.data);
      commit("saveLoginStatus", "success");
    } else {
      commit("saveLoginStatus", "failed");
    }
  }
};
Support Me!
Buy Me A Coffee
PayPal Me
Wrapping Up:
Hopefully, I think this article delivered some useful information on access token implementation in the Ionic&Vue application. I love to have your feedback, suggestions, and better techniques in the comment section below.
Comments
Post a Comment