
Introduction:
Vue.Js is a front-end progressive javascript framework. Vue.Js is one of the most widely used javascript frameworks. It is a very light-weight or skinny framework, which downloads very fastly on all most all modern browsers. It can be used in both multi-page and single-page applications.
Getting Started:
Let's start learning Vue.Js by hands-on by creating a single-page sample application by referring to all basic features in it. Create a folder to store sample application files, add an 'index.html' file and 'app.js'(maintain Vue.Js Code) file and refer Vue.Js CDN link on the index.html and for UI design let's refer Bootstrap links on the index.html page.
index.html:
<html>
  <head>
    <link
      rel="stylesheet"
      href="https://stackpath.bootstrapcdn.com/bootstrap/4.3.1/css/bootstrap.min.css"
      integrity="sha384-ggOyR0iXCbMQv3Xipma34MD+dH/1fQ784/j6cY/iJTQUOhcWr7x9JvoRxT2MZw1T"
      crossorigin="anonymous"
    />
  </head>
  <body>
    <script
      src="https://code.jquery.com/jquery-3.3.1.slim.min.js"
      integrity="sha384-q8i/X+965DzO0rT7abK41JStQIAqVgRVzpbzo5smXKp4YfRvH+8abtTE1Pi6jizo"
      crossorigin="anonymous"
    ></script>
    <script
      src="https://cdnjs.cloudflare.com/ajax/libs/popper.js/1.14.7/umd/popper.min.js"
      integrity="sha384-UO2eT0CpHqdSJQ6hJty5KVphtPhzWj9WO1clHTMGa3JDZwrnQq4sF86dIHNDz0W1"
      crossorigin="anonymous"
    ></script>
    <script
      src="https://stackpath.bootstrapcdn.com/bootstrap/4.3.1/js/bootstrap.min.js"
      integrity="sha384-JjSmVgyd0p3pXB1rRibZUAYoIIy6OrQ6VrjIEaFf/nJGzIxFDsf4x0xIM+B07jRM"
      crossorigin="anonymous"
    ></script>
    <script src="https://unpkg.com/axios/dist/axios.min.js"></script>
    <script src="https://cdn.jsdelivr.net/npm/vue/dist/vue.js"></script>
    <script src="app.js"></script>
  </body>
</html>
Vue Instance And It's Options:
Vue.Js application starts by creating an instance of 'Vue' with the 'new Vue({})' function which takes javascript object literal as input parameters which can be called options to Vue function.
Example:
var app = new Vue({
    el: '#app',
    data:{
        message:'hello'
    },
    // more options like methods, life cycle function,
    // computated properteis,registering components
})
Here example shows how to create an instance of 'Vue' and then options passed to the Vue function in an example like 'el' and 'data'.Now let's create a Vue instance in our sample application.
Add below the Html code in index.html file:
<div id="app">
   {{ message }}
</div>
Add below code to app.js file:var app = new Vue({
el: "#app",
data: {
message: "Hello Vue!"
}
});
- Here 'new Vue({})' creates an instance of Vue.
- 'el' refers to the Html element, it gives control over the Html tag to Vue for data manipulation and trigger events. Value it takes 'id' of an Html element.
- 'data' object works with Vue's reactivity system, data object properties hold the application information to display and on change in data in data object Html gets re-rendered by the principle of Vue's reactivity. 'message' is a property it holds data and observe the Html above {{message}}(Binding Interpolation) , value in the 'message' property get rendered on Html on loading the page.

Axios Plugin:
Promise based HTTP client libraries for browsers to consume the Rest API. Click here to reach Axios.
Add below script tag to 'index.html' file and it should be above our Vue file 'app.js' to avoid undefined issues(Note: any third party library js file should run before our application js files).
<script src="https://unpkg.com/axios/dist/axios.min.js"></script>
Axios Example:
axios({
  method: 'get',
  url: 'http://myapi',
})
.then(function (response) {
});
- Axios is a function which takes javascript object literal is an input parameter it can be called as Axios configuration.
- 'method' represents Http verbs like 'GET', 'POST', 'PUT' and 'DELETE'.
- 'url' represents the Rest API path.
- Axios returns a promise, a call back function passed as input parameter to the promise to catch the response from API.
Mounted Vue Js:
mounted() function is one of the life cycle methods of Vue.Js. mounted() is called when DOM has mounted so we can access the components, templates and DOM elements. In any application to display data, we need to call an API, in Vue we are going to consume all initial or page load API's in mounted function because this function automatically gets triggered once DOM has to get ready to render.
Consume API From Mounted Function:
Now in our sample going to consume API which returns a list of cricketers, in Vue mounted function.
Update the 'app.js' as below:
var app = new Vue({
  el: "#app",
  data: {
    message: "Hello Vue!"
  },
  mounted:function(){
     axios({
       method: 'get',
       url: 'https://localhost:44316/api/player/all'
     }).then(function(response){
        console.log(response.data);
     })
  }
});
Now load the 'index.html' and then mounted function automatically get executed and consumes API using Axios and in-browser console we can see the results.
v-for Directive:
Vue.Js rendering collection of items in Html by v-for Directive.
Example:
<div id="example">
  <ul>
 <li v-for="item in items">{{item.Text}}</li>
  </ul>
</div>
Template Element:
- <template/> element is a virtual element, which helps in rendering block of the element on using condition directive 'v-if' or looping directive 'v-for'.
- All the elements inside the template element get render, but the template element itself won't render in Html.
- v-for and v-if directives some times create a scenario to use both of them, but both directives can't be used on a single element at the time template tag very handy.
<template v-for="item in itemList">
  <div>
 Some Content
  </div>
</template>
API Data Binding To A Html Template:
In Vue.JS binding like eg: '{{property_from_data_object}}' is called Data Interpolation Binding. Now update the Html element with id 'app' in 'index.html' as below
index.html:
<div id="app">
  <div class="row">
 <template v-for="player in players">
   <div class="col-sm-4">
  <div class="card">
    <img src="player.jpg" class="card-img-top" />
    <div class="card-body">
   <h4 Card-title>{{player.firstName}} {{player.lastName}}</h4>
    </div>
    <ul class="list-group list-group-flush">
   <li class="list-group-item">
     <div class="row">
    <div class="col-sm-6">
      Age
    </div>
    <div class="col-sm-6">
      {{player.currentAge}}
    </div>
     </div>
   </li>
   <li class="list-group-item">
     <div class="row">
    <div class="col-sm-6">
      Playing Role
    </div>
    <div class="col-sm-6">
      {{player.playingRole}}
    </div>
     </div>
   </li>
   <li class="list-group-item">
     <div class="row">
    <div class="col-sm-6">
      Batting Style
    </div>
    <div class="col-sm-6">
      {{player.battingStyle}}
    </div>
     </div>
   </li>
   <li class="list-group-item">
     <div class="row">
    <div class="col-sm-6">
      Bowling Style
    </div>
    <div class="col-sm-6">
      {{player.bowlingStyle}}
    </div>
     </div>
   </li>
    </ul>
    <div class="card-body">
   <a href="#" class="btn btn-primary">Edit</a>
   <button class="btn btn-danger">Delete</button>
    </div>
  </div>
   </div>
 </template>
  </div>
</div>
Here binding list of 'players' by looping with the help of v-for directive on 'template' element(a virtual element which won't be rendered on the DOM).Since we are using 'players' property in binding it should be present in 'data object' in our Vue.Js file, and assign the data from API to the 'players' property. Since the properties of 'data object' are reactive which re-renders the Html template on every change in the property which is the Vue Reactive System principle. Now update the 'app.js' as below
app.js:
 var app = new Vue({
  el: "#app",
  data:function() {
    return{
      players:[]
    }
  },
  mounted:function(){
     axios({
       method: 'get',
       url: 'https://localhost:44316/api/player/all'
     }).then((response) => {
       this.players = response.data;
     })
  }
});
Now open 'index.html' on the browser and test the data binding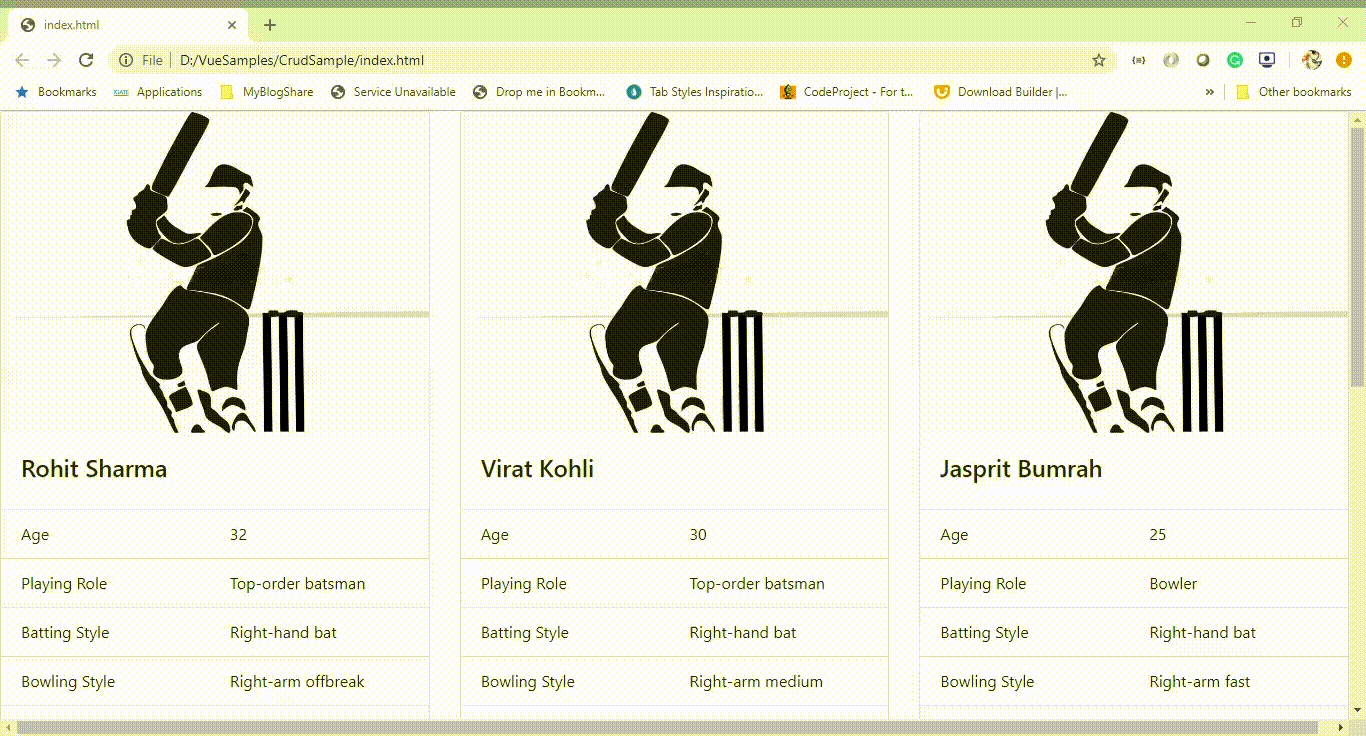
Vue Components:
- Components are reusable Vue instances, its initialization syntax will be different but more or less another way of creating Vue. So all the properties available by creating Vue instance like 'new View({})' are available in the Vue component also.
- The component gets created with a name, to render this component custom element tag which matches the name of the component will be placed on HTML.
- 'props' in component holds the data passed by the component parent, this 'props' helps to render the dynamic content in the component.
- 'template' property in component holds the Html content that will be displayed on using the component.
Vue.component('school',{
  props:['student'],
  template:`
  <h1>{{student.name}}</h1>
  `
})
Example Html Syntax:
<school v-bind:student="student"></school>
Update Sample Application Display Data To Vue Component:
Update the 'index.html' as below:
<div id="app">
  <circket-players v-bind:players="players"></circket-players>
</div>
'cricket-players' is a custom element tag, which renders the Vue component. Hereby using attribute binding directive 'v-bind' passing data to the component.
Add the piece of code below into 'app.js':
var cricketerComponent = Vue.component('circket-players',{
  props:['players'],
  template: `
  <div class="row">
        <template v-for="player in players">
          <div class="col-sm-4">
            <div class="card">
              <img src="player.jpg" class="card-img-top" />
              <div class="card-body">
                <h4 Card-title>{{player.firstName}} {{player.lastName}}</h4>
              </div>
              <ul class="list-group list-group-flush">
                <li class="list-group-item">
                  <div class="row">
                    <div class="col-sm-6">
                      Age
                    </div>
                    <div class="col-sm-6">
                      {{player.currentAge}}
                    </div>
                  </div>
                </li>
                <li class="list-group-item">
                  <div class="row">
                    <div class="col-sm-6">
                      Playing Role
                    </div>
                    <div class="col-sm-6">
                      {{player.playingRole}}
                    </div>
                  </div>
                </li>
                <li class="list-group-item">
                  <div class="row">
                    <div class="col-sm-6">
                      Batting Style
                    </div>
                    <div class="col-sm-6">
                      {{player.battingStyle}}
                    </div>
                  </div>
                </li>
                <li class="list-group-item">
                  <div class="row">
                    <div class="col-sm-6">
                      Bowling Style
                    </div>
                    <div class="col-sm-6">
                      {{player.bowlingStyle}}
                    </div>
                  </div>
                </li>
              </ul>
              <div class="card-body">
                <a href="#" class="btn btn-primary">Edit</a>
                <button class="btn btn-danger">Delete</button>
              </div>
            </div>
          </div>
        </template>
      </div>
  `
});
Now once again test the application, we can observe it work as previously.'methods' In Vue:
'methods' is an option passed to the Vue instance, it holds javascript object literal with functions as value to each property. These 'method' functions are a block of code used in splitting code, events functions, call back functions, etc.
Example:
var app = new Vue({
  el:"#app",
  methods:{
    add:function(){
      // do something
    },
    delete:function(){
      // do something
    }
  }
})
Events (v-on directive):
Listening to DOM events can be done with 'v-on' directive provided by Vue. To listen to an event, we need to bind function in 'methods'.
Example:
var app = new Vue({
  el:"#app",
  methods:{
    add:function(){
      // it get executed on  clicking add button
    },
  }
})
<div id="app">
  <button v-on:click="add()">Add</button>
</div>
Event Communication Between Child To Parent:
Most of the time we may encounter situations like sending data from Vue child component to parent component, to do that Vue provided an event emitter '$emit('event_name', 'data_to_pass_to_parent')'.
Example Child Component:
var studentComponent = Vue.component('student',{
  template:`
  <Button v-on:click="childClick1()">Child Button 1</Button>
  <Button v-on:click="childClick2()">Chilc Button 2</Button>
  `,
  methods:{
    childClick1:function(){
      this.$emit('parentClick1','naveen');
    },
    childClick2:function(){
      this.$emit('parentClick2',{name:'naveen',Id:1});
    }
  }
})
- In the example above created a 'student' child component. It has two-button, each listening to click events.
- 'childClick1' event emitting an event with two parameters, the first parameter represents the event name of the parent that is going to invoked and second passing string value.
- 'childClick2' also works as the first button, but data passing to the parent is an object, so to send multiple values to parent we need to use javascript object literal.
- Passing data to the parent component is not mandatory.
var app = Vue({
  el:"#app",
  methods:{
    onParenClick1:function(value){
      // consol.log(value)
      // prints 'naveen'
    },
    onParentClick2:function(value){
      //console.log(value)
      // prints {name:'naveen', Id:1}
    }
  }
})
<div id="app">
  <student
  v-on:parentClick1="onParenClick1"
  v-on:parentClick2="onParentClick2">
  </student>
</div>
- In example above <student> tag child component element.
- 'parentClick1', 'parentClick2' are custom events that are listening by parent Vue instance. 'onParentClick1', 'onParentClick2' call back functions for custom events on Vue instance, these get triggered when an event emitted from the child components.
- Custom events names on parent Vue instance must match with the event name emitted from the child component.
'v-model' Directive Or 2-way Binding:
'v-model' directive creates a 2-way binding on form input elements or components. 2-way binding works like a property from the data object assigned to the 'v-model' directive on the input element and the same property can be used in data binding on a div tag. If the value from the input element changes, on the fly the data on div tag gets changed.
Example:
var app = new Vue({
    el:"#app",
    data:{
        twoWayBidningProperty:`Hi, if any one chage me text
         box same value get reflected in where ever i binded in application`
    }
})
<div id="#app">
  <input type="text" id="egtxt" v-model="twoWayBidningProperty" />
  <div>
    {{twoWayBidningProperty}}
  </div>
</div>
Update Operation In Sample Application By Communicating Child To Parent:
Now from our sample application on clicking edit player button, which is a child component will emit an event to the parent component with player data. On receiving data parent Vue instance will open bootstrap modal popup represents edit player. Using the Axios post method sends player data to be updated to API.
Update child component in 'app.js':
Update child component in 'app.js':
var cricketerComponent = Vue.component("circket-players", {
  props: ["players"],
  methods: {
    edit: function(value) {
      this.$emit("edit", value);
    }
  },
  template: `
  <div class="row">
        <template v-for="player in players">
          <div class="col-sm-4">
            <div class="card">
              <img src="player.jpg" class="card-img-top" />
              <div class="card-body">
                <h4 Card-title>{{player.firstName}} {{player.lastName}}</h4>
              </div>
              <ul class="list-group list-group-flush">
                <li class="list-group-item">
                  <div class="row">
                    <div class="col-sm-6">
                      Age
                    </div>
                    <div class="col-sm-6">
                      {{player.currentAge}}
                    </div>
                  </div>
                </li>
                <li class="list-group-item">
                  <div class="row">
                    <div class="col-sm-6">
                      Playing Role
                    </div>
                    <div class="col-sm-6">
                      {{player.playingRole}}
                    </div>
                  </div>
                </li>
                <li class="list-group-item">
                  <div class="row">
                    <div class="col-sm-6">
                      Batting Style
                    </div>
                    <div class="col-sm-6">
                      {{player.battingStyle}}
                    </div>
                  </div>
                </li>
                <li class="list-group-item">
                  <div class="row">
                    <div class="col-sm-6">
                      Bowling Style
                    </div>
                    <div class="col-sm-6">
                      {{player.bowlingStyle}}
                    </div>
                  </div>
                </li>
              </ul>
              <div class="card-body">
                <a href="#" class="btn btn-primary" v-on:click="edit(player)">Edit</a>
                <button class="btn btn-danger">Delete</button>
              </div>
            </div>
          </div>
        </template>
      </div>
  `
});
- Here on the edit button registered a click event, where players data is passing as an input parameter.
- 'edit' function on triggered, emitting parent custom event as the first parameter and player data as the second parameter.
- Using '$emit()' child component communicating with parent Vue instance.
<div id="app">
  <circket-players
 v-bind:players="players"
 v-on:edit="edit"
  ></circket-players>
  <div
 class="modal fade"
 id="cricketModal"
 tabindex="-1"
 role="dialog"
 aria-labelledby="exampleModalLabel"
 aria-hidden="true"
  >
 <div class="modal-dialog" role="document">
   <div class="modal-content">
  <div class="modal-header">
    <h5 class="modal-title" id="cricketModalLabel">Cricket</h5>
  </div>
  <div class="modal-body">
    <form class="justify-content-center">
   <div class="form-group row">
     <label for="txtFirstName" class="col-sm-2 col-form-label"
    >FirstName</label
     >
     <div class="col-sm-8">
    <input
      type="text"
      class="form-control"
      id="txtFirstName"
      placeholder="First Name"
      v-model="updatePlayer.firstName"
    />
     </div>
   </div>
   <div class="form-group row">
     <label for="txtLastName" class="col-sm-2 col-form-label"
    >Last Name</label
     >
     <div class="col-sm-8">
    <input
      type="text"
      class="form-control"
      id="txtLastName"
      placeholder="Last Name"
      v-model="updatePlayer.lastName"
    />
     </div>
   </div>
   <div class="form-group row">
     <label for="txtCurrentAge" class="col-sm-2 col-form-label"
    >Current Age</label
     >
     <div class="col-sm-8">
    <input
      type="text"
      class="form-control"
      id="txtCurrentAge"
      placeholder="Current Age"
      v-model="updatePlayer.currentAge"
    />
     </div>
   </div>
   <div class="form-group row">
     <label for="txtTeams" class="col-sm-2 col-form-label"
    >Major Teams</label
     >
     <div class="col-sm-8">
    <input
      type="text"
      class="form-control"
      id="txtTeams"
      placeholder="Teams"
      v-model="updatePlayer.teams"
    />
     </div>
   </div>
   <div class="form-group row">
     <label for="txtPlayingRole" class="col-sm-2 col-form-label"
    >Playing Role</label
     >
     <div class="col-sm-8">
    <input
      type="text"
      class="form-control"
      id="txtPlayingRole"
      placeholder="Playing Role"
      v-model="updatePlayer.playingRole"
    />
     </div>
   </div>
   <div class="form-group row">
     <label for="txtBattingStyle" class="col-sm-2 col-form-label"
    >Batting Style</label
     >
     <div class="col-sm-8">
    <input
      type="text"
      class="form-control"
      id="txtBattingStyle"
      placeholder="Batting Style"
      v-model="updatePlayer.battingStyle"
    />
     </div>
   </div>
   <div class="form-group row">
     <label for="txtBowlingStyle" class="col-sm-2 col-form-label"
    >Bowling Style</label
     >
     <div class="col-sm-8">
    <input
      type="text"
      class="form-control"
      id="txtBowlingStyle"
      placeholder="Bowling style"
      v-model="updatePlayer.bowlingStyle"
    />
     </div>
   </div>

    </form>
  </div>
  <div class="modal-footer">
    <button
   type="button"
   class="btn btn-secondary"
   data-dismiss="modal"
    >
   Cancel
    </button>
    <button type="button" class="btn btn-primary" v-on:click="saveOrUpdate">Save</button>
  </div>
   </div>
 </div>
  </div>
</div>
Bootstrap model popup used here to edit the players and on save button register with a click event to call API to save data. On <cricket-player> we can observe custom events like 'v-on:edit' which will be triggered from child component '$emit()'. 'v-model' binding used to display the data on the modal popup.
Update Vue Instance in the 'app.js':
var app = new Vue({
  el: "#app",
  data: function() {
    return {
      players: [],
      updatePlayer: {
        id: 0,
        firstName: "",
        lastName: "",
        currentAge: 0,
        teams:
          "",
        playingRole: "",
        battingStyle: "",
        bowlingStyle: ""
      }
    };
  },
  mounted: function() {
    this.getAll();
  },
  methods: {
    getAll:function(){
      axios({
        method: "get",
        url: "https://localhost:44316/api/player/all"
      }).then(response => {
        this.players = response.data;
      });
    },
    updatePlayerData:function(){
      axios({
        method:"post",
        url:"https://localhost:44316/api/player/update",
        data:{...this.updatePlayer}
      }).then(resp => {
        $("#cricketModal").modal("hide");
        this.getAll();

      })
    },
    edit: function(value) {
      this.updatePlayer = value;
      $("#cricketModal").modal("show");
    },
    saveOrUpdate:function(){
     if(this.updatePlayer.id > 0){
       this.updatePlayerData();
     }
    }
  }
});
- Here 'edit' function invokes an event emitted by the child component, receives player data into it.
- 'updatePlayer' is a data object property in Vue instance and this property is used in a modal popup for 2-way binding.
- 'saverOrUpdate' function trigger on clicking save button on the modal popup, here if 'updatePlayer.id > 0' will call update API. Checking id greater than zero, because the same functionality will be used to add operation in later steps.
- On successfully updating again refreshing the list of data by calling get all API.

Create Operation:
Now we are going to do create-operation, here we will use some common code that used for the edit operation.
Update the following Html just above the child component tag as below:
<button type="button" class="btn btn-primary btn-lg" v-on:click="add()">Add Players</button>
<circket-players
  v-bind:players="players"
  v-on:edit="edit"
></circket-players>
Here add the button to create players. Button registered with the 'click' event to open the modal popup that shows an empty form to create a new player.
Update the 'app.js' as blow:
var app = new Vue({
  // note: existing code was remove for display puprpose
  methods: {

    savePlayerData:function(){
      axios({
        method:"post",
        url:"https://localhost:44316/api/player/save",
        data:{...this.updatePlayer}
      }).then(resp => {
        this.getAll();
        $("#cricketModal").modal("hide");
      })
    },

    saveOrUpdate:function(){
     if(this.updatePlayer.id > 0){
       this.updatePlayerData();
     }else{
       this.savePlayerData();
     }
    },
    add:function(){

      this.updatePlayer = {
        id: 0,
        firstName: "",
        lastName: "",
        currentAge: 0,
        teams:
          "",
        playingRole: "",
        battingStyle: "",
        bowlingStyle: ""
      }
      $("#cricketModal").modal("show");
    }
  }
});
- Here 'add' method invoked on clicking the 'Add Players' button.
- In the 'add' function we are resetting the 'updatePlayer' data object property because the same property is used in editing form, which is good to clear previously edited data while creating a new one.
- 'updatePlayer.id == 0' represents a new player so based on id value we are implementing either creating or editing of players.

Delete Operation:
Update child component in 'app.js' as below:
var cricketerComponent = Vue.component("circket-players", {
  // Note: hiding the existing code for display purpose
  methods: {
    deletePlayer:function(id){
      this.$emit("delete",id)
    }
  },
  template: `
   <button type="button" class="btn btn-danger" v-on:click="deletePlayer(player.id)">Delete</button>
  `
});
Here 'delete' button register with 'deletePlayer' function, this function emitting the first parameter as custom event name of the parent Vue instance and the second parameter is player id to delete.Add delete confirmation modal in index.html as below:
<div id="app">
  <circket-players
    v-bind:players="players"
    v-on:edit="edit"
    v-on:delete="onDelete"
  ></circket-players>
  <!-- Note: hide hidded here for display purpose -->
  <div
    class="modal fade"
    id="confirmationModal"
    tabindex="-1"
    role="dialog"
    aria-labelledby="exlabel"
    aria-hidden="true"
  >
    <div class="modal-dialog" role="document">
      <div class="modal-content">
        <div class="modal-header">
          <h5 class="modal-title" id="confirmModalLabel">Confrimation</h5>
        </div>
        <div class="modal-body">
          <h4>Are you sure you want to delete this player?</h4>
        </div>
        <div class="modal-footer">
          <button type="button" class="btn btn-secondary" data-dismiss="modal">
            Cancel
          </button>
          <button
            type="button"
            class="btn btn-primary"
            v-on:click="deletePlayerData()"
          >
            Delete
          </button>
        </div>
      </div>
    </div>
  </div>
</div>
- Here one more bootstrap modal added for delete confirmation.
- 'Delete' button on confirmation modal register with click event assign with 'deletePlayerData' function which calls API to Delete.
- On child component, Html element parent listening to custom event name 'delete' assigned to 'onDelete' function.
var app = new Vue({
  // note : code was hidden for display purpose
  el: "#app",
  data: function() {
    return {

      idToDelete:0
    };
  },
  methods: {
    deletePlayerData:function(){
      var url = 'https://localhost:44316/api/player/delete?id=' + this.idToDelete;
      axios({
        method:"delete",
        url:url
      }).then(resp => {
        this.getAll();
        $("#confirmationModal").modal("hide");
      })
    },
    onDelete:function(id){
      this.idToDelete = id;
      $("#confirmationModal").modal("show");
    }
  }

});
Now test the delete operation as below:
I really like Vue.js and it's one of my best programming experiences to work with Vue.
ReplyDeleteI made a restaurant management system with restaurant E-commerce with Vue + Firebase.
It's really inspiring for me if you check my work and make a little comments.
Restora - Restaurant Management Software with Restaurant E-commerce
Live Demo - https://bitly.com/2PKEwrM