
Angular:
Angular is a front-end framework that can be used to build a single-page application. Angular applications are built with components that make our code simple and clean.

- Angular components compose of 3 files like TypeScript(*.ts), HTML File(*.html), CSS File(*.css)
- Components typescript file and HTML file support 2-way binding which means data flow is bi-directional.
- The component typescript file listens for all HTML events from the HTML file.
Create Angular(16) Application:
Let's create the angular(16) application to accomplish our demo.
Now install the angular CLI command on our local machine. If your system already installed angular CLI to get the latest angular application just run the following command again so that angular CLI gets updated.
npm install -g @angular/cli
Run the below command to create an angular application.
ng new project_name
While creating the app CLI requires few inputs from us
- Add the angular routing
- Choose the 'CSS' styles sheet
- package.json - contains commands like build, run, test,etc. It also contains packages or library references that our angular application requires.
- angular.json - contains setup and configuration of angular.
- src/index.html - only HTML file of the angular application it contains the root angular component element like 'app-root' the area for the component to render.
- src/main.ts - entry file of our angular application to execute.
- src/app/app.module.ts - entry module.
- src/app/app-routing.modulet.ts - entry route module.
- app(folder or root component folder) - contains root component like 'AppComponent' that consist of files like 'app.component.ts', 'app.component.html', 'app.component.css'.
Install Angular Material Library:
Let's install the angular material library in our application.
ng add @angular/material
While installing library we have to give some inputs like:
- Would you like to proceed to install angular material library - click 'y'(yes)
- Choose default theme
- Choose angular default typography
- Choose angular material animations
Toolbar Material Component To Create Menu:
Let's use the angular material toolbar component to create a menu for our sample. So let's replace the HTML content in 'app.component.html'.
src/app/app.component.html:
<mat-toolbar color="primary">
  <span>Super Heroes</span>
</mat-toolbar>
<router-outlet></router-outlet>
- (Line: 1-3) Rendered our angular material toolbar component element.
- (Line: 5) The 'router-outlet' angular component element here routed component or page-level components get rendered.
src/app/app.appmodule.ts:
import {MatToolbarModule} from '@angular/material/toolbar';
// code hidden for display purpose
@NgModule({
  imports: [
    MatToolbarModule
  ]
})
export class AppModule { }
Setup Json Server:
Let's set up a fake API by setting up the JSON server in our local machine.
Run the below command to install the JSON server globally onto our local system
npm install -g json-server
Now go to our angular application and add a command to run the JSON server into the 'package.json' file.
"json-run":"json-server --watch db.json"

npm run json-run
After running the above command for the first time, a 'db.json' file gets created, so this file act as a database. So let's add some sample data into the file as below.
Now let's access the endpoint as 'http://localhost:3000/superHeroes'

Create Angular Component 'AllSuperHeroesComponent':
Let's create a new angular component like 'AllSuperHeroesComponent'.
ng generate component super-heroes/all-superheroes --skip-tests

Configure the 'AllSuperHeroesComponent' route in 'AppRoutingModule'
src/app/app-routing.module.ts:
import { AllSuperheroesComponent } from './super-heroes/all-superheroes/all-superheroes.component';
// existing code hidden for display purpose
const routes: Routes = [{
  path:'',
  component: AllSuperheroesComponent
}];
- Here empty path represents that is the home URL and is mapped to our 'AllSuperHeroesComponent'
Create API Response Model 'SuperHeroes':
Let's create an API response model like 'SuperHeroes'.
ng generate interface super-heroes/super-heroes

export interface SuperHeroes {
  id: number;
  name: string;
  imageUrl: string;
  franchise: string;
  gender: string;
}
Create Angular Service 'SuperHeroesService':
Let's create an angular service like 'SuperHeroesService', where we are going to write our API calls logic.
ng generate service super-heroes/super-heroes --skip-tests

Now inject the 'HttpClient' instance into the service constructor. The 'HttpClient' provides in-built methods for invoking the API calls.
src/app/super-heroes/super-heroes.service.ts:
import { Injectable } from '@angular/core';
import {HttpClient} from '@angular/common/http'
@Injectable({
  providedIn: 'root'
})
export class SuperHeroesService {
  constructor(private http:HttpClient) { }
}
Now import 'HttpClientModule' in 'AppModule'.src/app/app.module.ts:
import { HttpClientModule } from '@angular/common/http';
// existing code hidden for display purpose
@NgModule({
  imports: [
    HttpClientModule
  ]
})
export class AppModule { }
Implement Read Operation:
Let's implement the 'Read' operation by invoking the HTTP GET endpoint and then binding the API response to UI.
In the 'SuperHeroesService' let's implement the logic to call HTTP GET endpoint.
src/super-heroes/super-heroes.service.ts:
get(): Observable<SuperHeroes[]> {
  return this.http.get<SuperHeroes[]>('http://localhost:3000/superHeroes');
}
Let's add the CSS styles into the 'all-superheroes.component.css' file.src/app/super-heroes/all-superheroes/all-superheroes.component.css:
.example-card {
  max-width: 250px;
  margin: 10px;
  background-color: white;
}
.app-container {
  justify-content: center;
  display: flex;
  flex-direction: row;
  flex-wrap: wrap;
}
Let's add the following logic in to the 'all-superheroes.component.ts' filesrc/app/super-heroes/all-superheroes/all-superheroes.component.ts:
import { Component, OnInit } from '@angular/core';
import { SuperHeroes } from '../super-heroes';
import { SuperHeroesService } from '../super-heroes.service';

@Component({
  selector: 'app-all-superheroes',
  templateUrl: './all-superheroes.component.html',
  styleUrls: ['./all-superheroes.component.css'],
})
export class AllSuperheroesComponent implements OnInit {
  allSuperHeroes: SuperHeroes[] = [];
  constructor(private superHeroesService: SuperHeroesService) {}
  ngOnInit(): void {
    this.getApi();
  }
  getApi() {
    this.superHeroesService.get().subscribe((response) => {
      this.allSuperHeroes = response;
    });
  }
}
- (Line: 5-10) To make our 'AllSuperHeroesComponent' an angular component we have to decorate our class with '@Component' attribute that loads from the '@angular/core'. The 'selector' property defines the component HTML element tag. The 'templateUrl' property links the component HTML file.
- (Line: 11) The 'allSuperHeroes' variable to store the API response.
- (Line: 12) Injected our 'SuperHeroesService'.
- (Line: 16-20) Invoking the GET API call and API response stored to the 'allSuperHeroes' variable.
- (Line: 13-15) The 'ngOnInit' is an angular life cycle method that executes on component renders. So in this method, we invoke our 'getAPI' method.
src/app/super-heroes/all-superheroes/all-superheroes.component.ts:
<div class="app-container">
  <mat-card class="example-card" *ngFor="let item of allSuperHeroes">
    <mat-card-header>
      <div mat-card-avatar class="example-header-image"></div>
      <mat-card-title >{{ item.name }}</mat-card-title>
      <button
        mat-mini-fab
        matTooltip="Primary"
        color="primary"
        aria-label="Example mini fab with a heart icon"
      >
        {{ item.id }}
      </button>
    </mat-card-header>
    <img mat-card-image src="{{ item.imageUrl }}" alt="" />
    <mat-card-content>
      <p>Franchise - {{ item.franchise }}</p>
      <p>Gender - {{ item.gender }}</p>
    </mat-card-content>
  </mat-card>
</div>
- Here we are using an angular material card design to display the items.
- (Line: 2) Using the 'ngFor' directive looping the items.
- In angular for binding the data we use '{{}}'.
src/app/app.module.ts:
import { MatButtonModule } from '@angular/material/button';
import { MatCardModule } from '@angular/material/card';
// existing code hidden for display purpose
@NgModule({
  imports: [
    MatButtonModule,
    MatCardModule,
  ]
})
export class AppModule {}
Create Angular Component 'AddSuperHeroesComponent':
Let's create a new angular component like 'AddSuperHeroesComponent'
ng generate component super-heroes/add-superheroes --skip-tests

Let's configure 'AddSuperHeroesComponent' route in 'AppRouteMoudle'.
src/app/app-routing.module.ts:
import { AddSuperheroesComponent } from './super-heroes/add-superheroes/add-superheroes.component';
// existing code hidden for display purpose
const routes: Routes = [{
  path:'add',
  component: AddSuperheroesComponent
}];
Implement Create Operation:
Let's implement the 'Create' operation by invoking the HTTP POST API call to create an item in the 'SuperHeroesService'.
src/app/super-heroes/super-heroes.service.ts:
add(payload:SuperHeroes){
  return this.http.post('http://localhost:3000/superHeroes', payload);
}
- The 'HttpClient.post()' method invokes the HTTP Post endpoint to create an item.
Let's add the following logic into the 'add-superheroes.component.ts'.
src/app/super-heroes/add-superheroes/add-superheroes.component.ts:
import { Component } from '@angular/core';
import { FormBuilder } from '@angular/forms';
import { Router } from '@angular/router';
import { SuperHeroes } from '../super-heroes';
import { SuperHeroesService } from '../super-heroes.service';

@Component({
  selector: 'app-add-superheroes',
  templateUrl: './add-superheroes.component.html',
  styleUrls: ['./add-superheroes.component.css'],
})
export class AddSuperheroesComponent {
  constructor(
    private fb: FormBuilder,
    private superHeroService: SuperHeroesService,
    private router: Router
  ) {}

  addSuperHeroForm = this.fb.group({
    name: [''],
    imageUrl: [''],
    franchise: [''],
    gender: [''],
  });
  noImage =
    'add-preview-image.png';
  create() {
    this.superHeroService
      .add(this.addSuperHeroForm.value as SuperHeroes)
      .subscribe(() => {
        this.router.navigate(['/']);
      });
  }
}
- (Line: 14) Injected the 'FormBuilder' that loads from the '@angular/form'
- (Line: 15) Injected the 'SuperHeroService'
- (Line: 16) Injected the 'Router' service that loads from the '@angular/router'
- (Line: 19-24) The 'addSuperHeroForm' variable is assigned with the 'FormBuilder.group()'. Here we need to define all the form field variables with initial values.
- (Line: 25) Here 'noImage' variable to store the sample preview image.
- (Line: 27-33) The 'create()' method contains logic to invoke the HTTP Post.
src/app/super-heroes/add-superheroes/add-superheroes.component.css:
.card {
  width: 800px;
}
.card-container {
  display: flex;
  justify-content: center;
  margin-top: 14px;
  column-gap: 2em;
}
.form-container {
  display: flex;
  flex-direction: column;
}

.heading{
    display: flex;
    justify-content: center;
    align-items: center;
    margin-top: 14px;
}
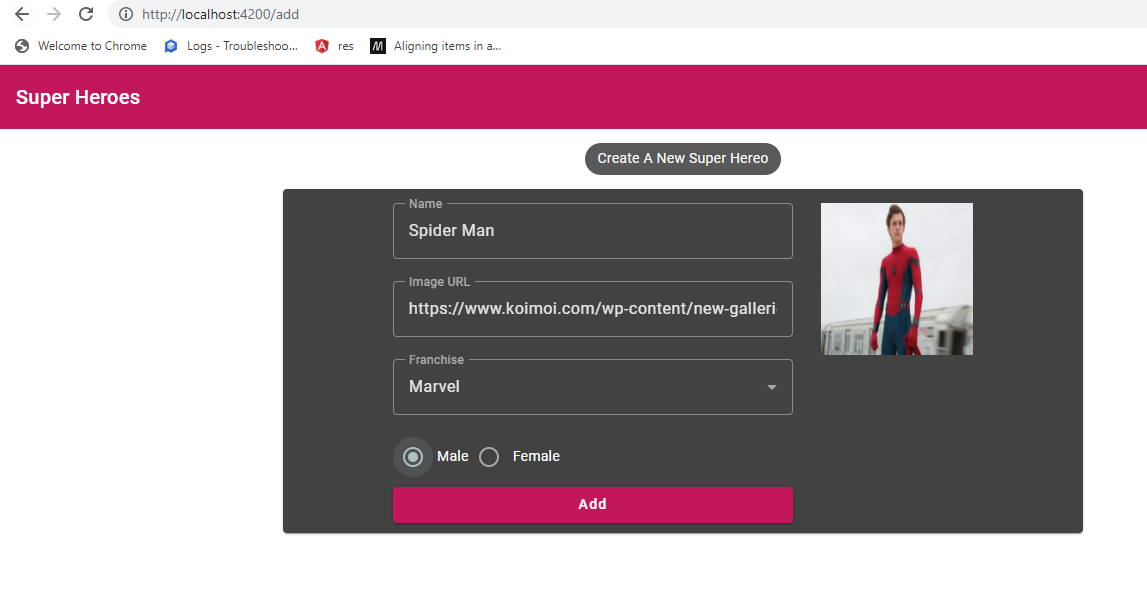
Let's add the following HTML 'add-superheroes.component.html'.src/app/super-heroes/add-superheroes/add-superheroes.component.html:
<div class="heading">
  <mat-chip color="primary"> Create A New Super Hereo </mat-chip>
</div>
<div class="card-container">
  <mat-card class="card">
    <div class="card-container">
      <form
        class="form-container"
        [formGroup]="addSuperHeroForm"
        (ngSubmit)="create()"
      >
        <mat-form-field appearance="outline" style="width: 400px">
          <mat-label>Name</mat-label>
          <input matInput formControlName="name" />
        </mat-form-field>
        <mat-form-field appearance="outline" style="width: 400px">
          <mat-label>Image URL</mat-label>
          <input matInput formControlName="imageUrl" />
        </mat-form-field>
        <mat-form-field appearance="outline" style="width: 400px">
          <mat-label>Franchise</mat-label>
          <mat-select formControlName="franchise">
            <mat-option value="marvel">Marvel</mat-option>
            <mat-option value="dc">DC</mat-option>
          </mat-select>
        </mat-form-field>
        <mat-radio-group aria-label="Select an option" formControlName="gender">
          <mat-radio-button value="male">Male</mat-radio-button>
          <mat-radio-button value="female">Female</mat-radio-button>
        </mat-radio-group>
        <button mat-raised-button color="primary" style="margin: 10px 0px">
          Add
        </button>
      </form>
      <div>
        <div>
          <img
            mat-card-lg-image
            src="{{
              this.addSuperHeroForm.get('imageUrl')?.value
                ? this.addSuperHeroForm.get('imageUrl')?.value
                : noImage
            }}"
          />
        </div>
      </div>
    </div>
  </mat-card>
</div>
- (Line: 9) Here [formGroup] attribute is assigned with our form variable like 'addSuperHeroForm'.
- (Line: 10) Here registered 'ngSubmit' event that gets fired on form submission. Here are form submit event is registered with the 'create()' method.
- Here each input field with registered with the 'formControlName' and its values should be the property name of the 'addSuperHeroForm'.
- (Line: 37- 44) Here conditionally display the image URL preview.
src/app/app.module.ts:
import { NgModule } from '@angular/core';
import { BrowserModule } from '@angular/platform-browser';

import { AppRoutingModule } from './app-routing.module';
import { AppComponent } from './app.component';
import { BrowserAnimationsModule } from '@angular/platform-browser/animations';

import {MatFormFieldModule} from '@angular/material/form-field';
import {MatChipsModule} from '@angular/material/chips';
import {MatInputModule} from '@angular/material/input';
import {MatSelectModule} from '@angular/material/select';
import {MatRadioModule} from '@angular/material/radio';
import { MatToolbarModule } from '@angular/material/toolbar';
import { MatButtonModule } from '@angular/material/button';
import { MatCardModule } from '@angular/material/card';
import { AllSuperheroesComponent } from './super-heroes/all-superheroes/all-superheroes.component';
import { HttpClientModule } from '@angular/common/http';
import { AddSuperheroesComponent } from './super-heroes/add-superheroes/add-superheroes.component';
import { ReactiveFormsModule } from '@angular/forms';

@NgModule({
  declarations: [AppComponent, AllSuperheroesComponent, AddSuperheroesComponent],
  imports: [
    BrowserModule,
    AppRoutingModule,
    BrowserAnimationsModule,
    MatToolbarModule,
    HttpClientModule,
    MatButtonModule,
    MatCardModule,
    MatFormFieldModule,
    MatInputModule,
    MatChipsModule,
    MatSelectModule,
    MatRadioModule,
    ReactiveFormsModule
  ],
  providers: [],
  bootstrap: [AppComponent],
})
export class AppModule {}
Navigate from the 'AllSuperHeroesComponent' to 'AddSuperHeroesComponent', let's add the anchor link button in 'AllSuperHeroesComponent'.src/app/super-heroes/all-superheroes/all-superheroes.component.ts:
<div class="app-container" style="margin-top: 5px;">
  <a mat-raised-button color="primary" routerLink="/add">Add</a>
</div>
(Step 1)
(Step 2)

Create Angular Component 'EditSuperHeroesComponent':
Let's create a new angular component like 'EditSuperHeroesComponent'.
ng generate component super-heroes/edit-superheroes --skip-tests

Now configure the route for 'EditSuperHeroesComponent' in 'AppRoutingModule'.
src/app/app-routing.module.ts:
import { EditSuperheroesComponent } from './super-heroes/edit-superheroes/edit-superheroes.component';
// existing code hidden for display purpose
const routes: Routes = [
  {
    path: 'edit/:id',
    component: EditSuperheroesComponent
  }
];
Implement Update Operation:
Let's implement the 'Update' operation by invoking the HTTP PUT API endpoint.
In the 'SuperHereosService' let's integrate API calls like HTTP GET by id and HTTP PUT endpoints.
src/app/super-heroes/super-heroes.service.ts:
getById(id: number): Observable<SuperHeroes> {
	return this.http.get<SuperHeroes>(
	  `http://localhost:3000/superHeroes/${id}`
	);
}

update(payload: SuperHeroes): Observable<SuperHeroes> {
	return this.http.put<SuperHeroes>(
	  `http://localhost:3000/superHeroes/${payload.id}`,
	  payload
	);
}
- (Line: 1-5) Here invoking the HTTP GET Endpoint by 'id' value which is the item to be edited.
- (Line: 7-12) The 'HttpClient.put()' method invokes updating the item.
src/app/super-heroes/edit-superheroes/edit-superheroes.component.css:
.card {
    width: 800px;
  }
  .card-container {
    display: flex;
    justify-content: center;
    margin-top: 14px;
    column-gap: 2em;
  }
  .form-container {
    display: flex;
    flex-direction: column;
  }

  .heading{
      display: flex;
      justify-content: center;
      align-items: center;
      margin-top: 14px;
}
Let's add the following logic in 'edit-superheroes.component.ts'.src/app/super-heroes/edit-superheroes/edit-superheroes.component.ts:
import { Component, OnInit } from '@angular/core';
import { FormBuilder } from '@angular/forms';
import { ActivatedRoute, Router } from '@angular/router';
import { SuperHeroes } from '../super-heroes';
import { SuperHeroesService } from '../super-heroes.service';

@Component({
  selector: 'app-edit-superheroes',
  templateUrl: './edit-superheroes.component.html',
  styleUrls: ['./edit-superheroes.component.css'],
})
export class EditSuperheroesComponent implements OnInit {
  constructor(
    private fb: FormBuilder,
    private superHeroeService: SuperHeroesService,
    private route: ActivatedRoute,
    private router: Router
  ) {}
  ngOnInit(): void {
    this.route.paramMap.subscribe((param) => {
      var id = Number(param.get('id'));
      this.getById(id);
    });
  }

  noImage =
    'previewImages.png';

  updateSuperHeroForm = this.fb.group({
    id: [0],
    name: [''],
    imageUrl: [''],
    franchise: [''],
    gender: [''],
  });

  getById(id: number) {
    this.superHeroeService.getById(id).subscribe((data) => {
      this.updateSuperHeroForm.setValue(data);
    });
  }

  update() {
    this.superHeroeService.update((this.updateSuperHeroForm.value as SuperHeroes))
    .subscribe(() => {
      this.router.navigate(["/"]);
    })
  }
}
- (Line: 14) Injected the 'FormBuilder' that loads from the '@angular/forms'.
- (Line: 15) Injected the 'SuperHeroesService'.
- (Line: 16) Injected the 'ActivatedRoute' that loads from the '@angular/router'.
- (Line: 17) Injected the 'Router' that loads from the '@angular/router'.
- (Line: 20-23) Here reading the item id from the URL.
- (Line: 29-35) Declared reactive form variable like 'updateSuperHeroForm'.
- (Line: 37-41) Invoking the HTTP GET by id API endpoint.
- (Line: 43-48) Invoking the HTTP PUT endpoint to update the record.
src/app/super-heroes/edit-superheroes.component.html:
<div class="heading">
  <mat-chip color="primary"> Update Super Hereo </mat-chip>
</div>
<div class="card-container">
  <mat-card class="card">
    <div class="card-container">
      <form
        class="form-container"
        [formGroup]="updateSuperHeroForm"
        (ngSubmit)="update()"
      >
        <mat-form-field appearance="outline" style="width: 400px">
          <mat-label>Name</mat-label>
          <input matInput formControlName="name" />
        </mat-form-field>
        <mat-form-field appearance="outline" style="width: 400px">
          <mat-label>Image URL</mat-label>
          <input matInput formControlName="imageUrl" />
        </mat-form-field>
        <mat-form-field appearance="outline" style="width: 400px">
          <mat-label>Franchise</mat-label>
          <mat-select formControlName="franchise">
            <mat-option value="marvel">Marvel</mat-option>
            <mat-option value="dc">DC</mat-option>
          </mat-select>
        </mat-form-field>
        <mat-radio-group aria-label="Select an option" formControlName="gender">
          <mat-radio-button value="male">Male</mat-radio-button>
          <mat-radio-button value="female">Female</mat-radio-button>
        </mat-radio-group>
        <button mat-raised-button color="primary" style="margin: 10px 0px">
          Update
        </button>
      </form>
      <div>
        <div>
          <img
            mat-card-lg-image
            src="{{
              this.updateSuperHeroForm.get('imageUrl')?.value
                ? this.updateSuperHeroForm.get('imageUrl')?.value
                : noImage
            }}"
          />
        </div>
      </div>
    </div>
  </mat-card>
</div>
Now configure the 'Edit' button on each item on the 'all-superheroes.component.html'.src/app/super-heroes/all-superheroes/all-superheroes.component.html:
<mat-card-actions>
  <a mat-raised-button color="primary" [routerLink]="['/edit', item.id]">Edit</a>
</mat-card-actions>
(Step 1)


Create Angular Component 'DeleteDialogSuperHeroComponent':
Let's create a new angular component like 'DeleteDialogSuperHeroComponent'.
ng generate component super-heroes/delete-dialog-superheroes --skip-tests

Implement Delete Operation:
Let's implement the 'Delete' operation by invoking the Http Delete API endpoint.
In the 'SuperHeroesService' let's add the logic to call the Delete API endpoint.
src/app/super-heroes/super-heroes.service.ts:
delete(id: number) {
  return this.http.delete(`http://localhost:3000/superHeroes/${id}`);
}
Let's add the following logic in 'delete-dialog-superheroes.component.ts'src/app/super-heroes/delete-dialog-superheroes/delete-diaog-superheroes.component.ts:
import { Component, Inject } from '@angular/core';
import { MatDialogRef, MAT_DIALOG_DATA } from '@angular/material/dialog';
import { SuperHeroesService } from '../super-heroes.service';

@Component({
  selector: 'app-delete-dialog-superheroes',
  templateUrl: './delete-dialog-superheroes.component.html',
  styleUrls: ['./delete-dialog-superheroes.component.css'],
})
export class DeleteDialogSuperheroesComponent {
  constructor(
    public dialogRef: MatDialogRef<DeleteDialogSuperheroesComponent>,
    @Inject(MAT_DIALOG_DATA) public data: any,
    private superHeroesService: SuperHeroesService
  ) {}

  confirmDelete() {
    this.superHeroesService.delete(this.data.id).subscribe(() => {
      this.dialogRef.close(this.data.id);
    });
  }
}
- (Line: 12) The 'MatDialogRef' loads from the '@angular/material/dilog'. The 'MatDialogRef' gives control over the dialog box inside of it.
- (Line: 13) The 'MAT_DIALOG_DATA' token reads the data from the parent component that invokes our dialog.
- (Line: 14) Injected our 'SuperHeroesService'
- (Line: 17-21) The 'confirmDelete' method invokes the HTTP DELETE API call. After API call completes we will close the dialog by using 'dialogRef.close()' method.
src/app/super-heroes/delete-dialog-superheroes/delete-diaog-superheroes.component.ts:
<h1 mat-dialog-title>Delete file</h1>
<div mat-dialog-content>
  Would you like to delete ?
</div>
<div mat-dialog-actions>
  <button mat-button mat-dialog-close>No</button>
  <button mat-button (click)="confirmDelete()" cdkFocusInitial>Confirm Delete</button>
</div>
- (Line: 7) Here registered with 'confirmDelete()' method.
src/app/app.module.ts:
import {MatDialogModule} from '@angular/material/dialog';
// existing code hidden for display purpose
@NgModule({
  imports: [
    MatDialogModule
  ]
})
export class AppModule {}
Let's add the delete logic in 'all-super-heroes.component.ts'src/app/super-heroes/all-superheroes/all-superheroes.component.ts:
import { Component, OnInit } from '@angular/core';
import { MatDialog } from '@angular/material/dialog';
import { DeleteDialogSuperheroesComponent } from '../delete-dialog-superheroes/delete-dialog-superheroes.component';
import { SuperHeroes } from '../super-heroes';
import { SuperHeroesService } from '../super-heroes.service';

@Component({
  selector: 'app-all-superheroes',
  templateUrl: './all-superheroes.component.html',
  styleUrls: ['./all-superheroes.component.css'],
})
export class AllSuperheroesComponent implements OnInit {
  allSuperHeroes: SuperHeroes[] = [];

  constructor(
    private superHeroesService: SuperHeroesService,
    public dialog: MatDialog
  ) {}
  ngOnInit(): void {
    this.getApi();
  }

  getApi() {
    this.superHeroesService.get().subscribe((response) => {
      this.allSuperHeroes = response;
    });
  }

  deleteItem(id: number) {
    const dialogRef = this.dialog.open(DeleteDialogSuperheroesComponent, {
      width: '250px',
      data: { id },
    });

    dialogRef.afterClosed().subscribe((result) => {
      if (result) {
        this.allSuperHeroes = this.allSuperHeroes.filter((_) => _.id !== id);
      }
    });
  }
}
- (Line: 17) Inject the 'MatDialog' that loads from the '@angular/material/dialog'.
- (Line: 30-33) Open the material dialog box and also we pass the item 'id' value that needs to be deleted.
- (Line: 35-39) The 'afterClosed()' method executes after closing the material dialog.
src/app/super-heroes/all-superheroes/all-superheroes.component.html:
<button mat-raised-button color="warn" (click)="deleteItem(item.id)">Delete</button>

Implement Sorting:
Let's change the HTTP GET API call in the 'SuperHeroService'.
src/app/super-heroes/super-heroes.service.ts:
get(sortColumn: string, sortType: string): Observable<SuperHeroes[]> {
	let url = "http://localhost:3000/superHeroes?"
	if(sortColumn && sortType){
	  url = `${url}_sort=${sortColumn}&_order=${sortType}`
	}
	return this.http.get<SuperHeroes[]>(url);
}
- Here we are adding query parameters like '_sort' and '_order' to our endpoint.
src/app/super-heroes/all-superheroes/all-superheroes.component.ts:
import { Component, OnInit } from '@angular/core';
import { FormControl } from '@angular/forms';
import { MatDialog } from '@angular/material/dialog';
import { DeleteDialogSuperheroesComponent } from '../delete-dialog-superheroes/delete-dialog-superheroes.component';
import { SuperHeroes } from '../super-heroes';
import { SuperHeroesService } from '../super-heroes.service';

@Component({
  selector: 'app-all-superheroes',
  templateUrl: './all-superheroes.component.html',
  styleUrls: ['./all-superheroes.component.css'],
})
export class AllSuperheroesComponent implements OnInit {
  sortingControl = new FormControl('');
  allSuperHeroes: SuperHeroes[] = [];

  constructor(
    private superHeroesService: SuperHeroesService,
    public dialog: MatDialog
  ) {}
  ngOnInit(): void {
    this.getApi('', '');
    this.sortingControl.valueChanges.subscribe((value) => {
      if (value) {
        this.doSorting(value);
      }
    });
  }

  doSorting(value: string) {
    let sortColumn: string = '';
    let sortType: string = '';
    if (value.toLowerCase() === 'id-by-desc') {
      sortColumn = 'id';
      sortType = 'desc';
    } else if (value.toLowerCase() === 'id-by-asc') {
      sortColumn = 'id';
      sortType = 'asc';
    } else if (value.toLowerCase() === 'franchise-by-desc') {
      sortColumn = 'franchise';
      sortType = 'desc';
    } else if (value.toLowerCase() === 'franchise-by-asc') {
      sortColumn = 'franchise';
      sortType = 'asc';
    } else if (value.toLowerCase() === 'gender-by-desc') {
      sortColumn = 'gender';
      sortType = 'desc';
    } else if (value.toLowerCase() === 'gender-by-asc') {
      sortColumn = 'gender';
      sortType = 'asc';
    }
    this.getApi(sortColumn, sortType);
  }

  getApi(sortColumn: string, sortType: string) {
    this.superHeroesService.get(sortColumn, sortType).subscribe((response) => {
      this.allSuperHeroes = response;
    });
  }

  deleteItem(id: number) {
    const dialogRef = this.dialog.open(DeleteDialogSuperheroesComponent, {
      width: '250px',
      data: { id },
    });

    dialogRef.afterClosed().subscribe((result) => {
      if (result) {
        this.allSuperHeroes = this.allSuperHeroes.filter((_) => _.id !== id);
      }
    });
  }
}
- (Line: 14) Declared 'sortingControl' variable of type 'FormControl'.
- (Line: 23-27) Here listening to the 'sortingControl' value change.
- (Line: 30-53)In 'doSorting()' method we are preparing the 'sortColumn' and 'sortType' values.
src/app/super-heroes/all-superheroes/all-superheroes.component.html:
<div class="filter-container">
  <mat-form-field appearance="fill" >
    <mat-label> -Sorting- </mat-label>
    <mat-select [formControl]="sortingControl">
      <mat-option value="">-select-</mat-option>
      <mat-option value="id-by-desc">Id By Desc</mat-option>
      <mat-option value="id-by-asc">Id By Asc</mat-option>
      <mat-option value="franchise-by-desc">Franchise By Desc</mat-option>
      <mat-option value="franchise-by-asc">Franchise By Asc</mat-option>
      <mat-option value="gender-by-desc">Gender By Desc</mat-option>
      <mat-option value="gender-by-asc">Gender By Asc</mat-option>
    </mat-select>
  </mat-form-field>
</div>
- Here we rendered our sorting dropdown
src/app/super-heroes/all-superheroes/all-superheroes.component.css:
.filter-container{
  display: flex;
  margin: 15px;
}
Implement Search Operation:
Let's implement the search operation. So let's update the HTTP GET API call.
src/app/super-heroes/super-heroes.service.ts:
get(
sortColumn: string,
sortType: string,
searchKey: string
): Observable<SuperHeroes[]> {
let url = 'http://localhost:3000/superHeroes?';
if (sortColumn && sortType) {
  url = `${url}_sort=${sortColumn}&_order=${sortType}`;
}

if (searchKey) {
  if (url.indexOf('&') > -1) {
	url = `${url}&q=${searchKey}`;
  } else {
	url = `${url}q=${searchKey}`;
  }
}
return this.http.get<SuperHeroes[]>(url);
}
- (Line: 11-17) Our JSON server supports text search by using the 'q' query parameter.
src/app/super-heroes/all-superheroes/all-superheroes.component.ts:
import { Component, OnInit } from '@angular/core';
import { FormControl } from '@angular/forms';
import { MatDialog } from '@angular/material/dialog';
import { DeleteDialogSuperheroesComponent } from '../delete-dialog-superheroes/delete-dialog-superheroes.component';
import { SuperHeroes } from '../super-heroes';
import { SuperHeroesService } from '../super-heroes.service';

@Component({
  selector: 'app-all-superheroes',
  templateUrl: './all-superheroes.component.html',
  styleUrls: ['./all-superheroes.component.css'],
})
export class AllSuperheroesComponent implements OnInit {
  sortingControl = new FormControl('');
  searchControl = new FormControl('');
  allSuperHeroes: SuperHeroes[] = [];

  constructor(
    private superHeroesService: SuperHeroesService,
    public dialog: MatDialog
  ) {}
  ngOnInit(): void {
    this.getApi('', '','');
    this.sortingControl.valueChanges.subscribe((value) => {
      if (value) {
        let sortResult = this.doSorting(value);
        this.getApi(sortResult.sortColumn, sortResult.sortType, '');
      }
    });
  }

  doSorting(value: string) {
    let sortColumn: string = '';
    let sortType: string = '';
    if (value.toLowerCase() === 'id-by-desc') {
      sortColumn = 'id';
      sortType = 'desc';
    } else if (value.toLowerCase() === 'id-by-asc') {
      sortColumn = 'id';
      sortType = 'asc';
    } else if (value.toLowerCase() === 'franchise-by-desc') {
      sortColumn = 'franchise';
      sortType = 'desc';
    } else if (value.toLowerCase() === 'franchise-by-asc') {
      sortColumn = 'franchise';
      sortType = 'asc';
    } else if (value.toLowerCase() === 'gender-by-desc') {
      sortColumn = 'gender';
      sortType = 'desc';
    } else if (value.toLowerCase() === 'gender-by-asc') {
      sortColumn = 'gender';
      sortType = 'asc';
    }
    return {
      sortColumn,
      sortType,
    };
  }

  textSearch() {
    let sortResult = this.doSorting(this.sortingControl.value ?? '');
    this.getApi(
      sortResult.sortColumn,
      sortResult.sortType,
      this.searchControl.value ?? ''
    );
  }

  getApi(sortColumn: string, sortType: string, search: string) {
    this.superHeroesService
      .get(sortColumn, sortType, search)
      .subscribe((response) => {
        this.allSuperHeroes = response;
      });
  }

  deleteItem(id: number) {
    const dialogRef = this.dialog.open(DeleteDialogSuperheroesComponent, {
      width: '250px',
      data: { id },
    });

    dialogRef.afterClosed().subscribe((result) => {
      if (result) {
        this.allSuperHeroes = this.allSuperHeroes.filter((_) => _.id !== id);
      }
    });
  }
}
- (Line: 15) Declared variable like 'searchControl' of type 'FormControl'.
- (Line: 60-67) Added a method like 'textSearch()' where we invoke GET API call with the search keyword.
src/app/super-heroes/all-superheroes/all-superheroes.component.html:
<mat-form-field class="example-form-field" style="margin: 0px 6px;">
<mat-label>Search...</mat-label>
<input matInput type="text"  [formControl]="searchControl">
<button  matSuffix mat-icon-button aria-label="Clear" (click)="textSearch()">
  <mat-icon>search</mat-icon>
</button>
</mat-form-field>
Let's add the 'MatIconModule' in the 'AppModule'.
src/app/app.module.ts
import {MatIconModule} from '@angular/material/icon';
// code hidden for display purpose
@NgModule({
  imports: [
    MatIconModule
  ],
})
export class AppModule {}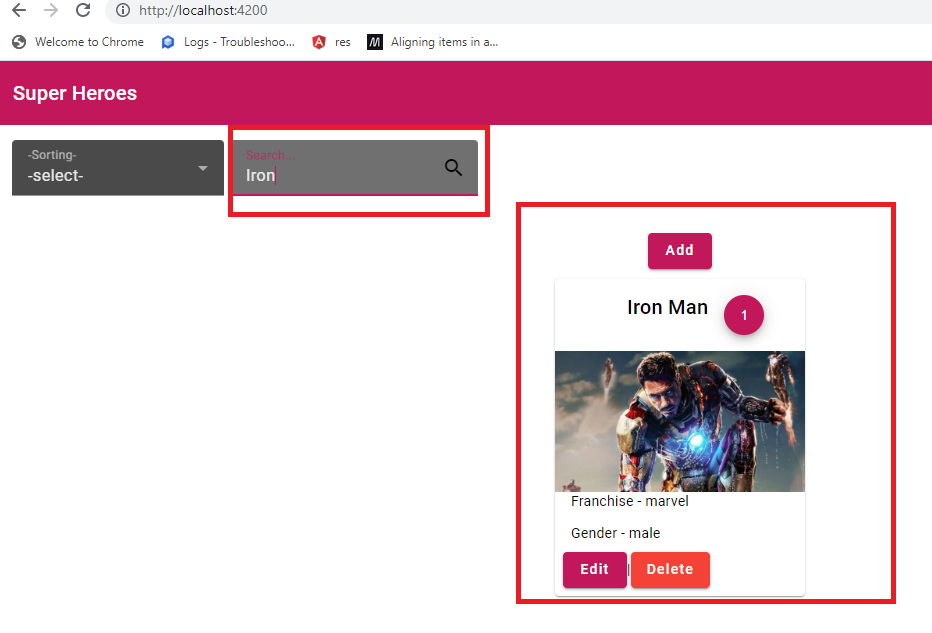
Implementing Pagination:
Let's change our HTTP GET API call to support the pagination.
src/app/super-heroes/super-heroes.service.ts:
import { Injectable } from '@angular/core';
import { HttpClient, HttpResponse } from '@angular/common/http';
import { Observable } from 'rxjs';
import { SuperHeroes } from './super-heroes';
// existing code hidden for display purpose
@Injectable({
  providedIn: 'root',
})
export class SuperHeroesService {
  constructor(private http: HttpClient) {}

  get(
    sortColumn: string,
    sortType: string,
    searchKey: string,
    currentPage: number,
    pageSize: number
  ): Observable<HttpResponse<any>> {
    let url = `http://localhost:3000/superHeroes?_page=${currentPage}&_limit=${pageSize}`;
    if (sortColumn && sortType) {
      url = `${url}&_sort=${sortColumn}&_order=${sortType}`;
    }

    if (searchKey) {
      url = `${url}&q=${searchKey}`;
    }
    return this.http.get<HttpResponse<any>>(url, { observe: 'response' });
  }
}
- (Line:19) Here added our pagination query parameters like '_pages' & '_limit'.
src/app/super-heroes/all-superheroes/all-superheroes.component.ts:
import { Component, OnInit } from '@angular/core';
import { FormControl } from '@angular/forms';
import { MatDialog } from '@angular/material/dialog';
import { DeleteDialogSuperheroesComponent } from '../delete-dialog-superheroes/delete-dialog-superheroes.component';
import { SuperHeroes } from '../super-heroes';
import { SuperHeroesService } from '../super-heroes.service';
import { PageEvent } from '@angular/material/paginator';

@Component({
  selector: 'app-all-superheroes',
  templateUrl: './all-superheroes.component.html',
  styleUrls: ['./all-superheroes.component.css'],
})
export class AllSuperheroesComponent implements OnInit {
  sortingControl = new FormControl('');
  searchControl = new FormControl('');
  allSuperHeroes: SuperHeroes[] = [];
  totalRecords: number = 0;
  pageIndex = 0;
  pageSize = 5;

  constructor(
    private superHeroesService: SuperHeroesService,
    public dialog: MatDialog
  ) {}
  ngOnInit(): void {
    this.getApi('', '', '');
    this.sortingControl.valueChanges.subscribe((value) => {
      if (value) {
        let sortResult = this.doSorting(value);
        this.pageIndex = 0;
        this.pageSize = 5;
        this.getApi(sortResult.sortColumn, sortResult.sortType, '');
      }
    });
  }

  doSorting(value: string) {
    let sortColumn: string = '';
    let sortType: string = '';
    if (value.toLowerCase() === 'id-by-desc') {
      sortColumn = 'id';
      sortType = 'desc';
    } else if (value.toLowerCase() === 'id-by-asc') {
      sortColumn = 'id';
      sortType = 'asc';
    } else if (value.toLowerCase() === 'franchise-by-desc') {
      sortColumn = 'franchise';
      sortType = 'desc';
    } else if (value.toLowerCase() === 'franchise-by-asc') {
      sortColumn = 'franchise';
      sortType = 'asc';
    } else if (value.toLowerCase() === 'gender-by-desc') {
      sortColumn = 'gender';
      sortType = 'desc';
    } else if (value.toLowerCase() === 'gender-by-asc') {
      sortColumn = 'gender';
      sortType = 'asc';
    }
    return {
      sortColumn,
      sortType,
    };
  }

  textSearch() {
    let sortResult = this.doSorting(this.sortingControl.value ?? '');
    this.pageIndex = 0;
    this.pageSize = 5;
    this.getApi(
      sortResult.sortColumn,
      sortResult.sortType,
      this.searchControl.value ?? ''
    );
  }

  getApi(sortColumn: string, sortType: string, search: string) {
    this.superHeroesService
      .get(sortColumn, sortType, search, this.pageIndex + 1, this.pageSize)
      .subscribe((response) => {
        this.allSuperHeroes = response.body as SuperHeroes[];
        this.totalRecords = response.headers.get('X-Total-Count')
          ? Number(response.headers.get('X-Total-Count'))
          : 0;
      });
  }

  deleteItem(id: number) {
    const dialogRef = this.dialog.open(DeleteDialogSuperheroesComponent, {
      width: '250px',
      data: { id },
    });

    dialogRef.afterClosed().subscribe((result) => {
      if (result) {
        this.allSuperHeroes = this.allSuperHeroes.filter((_) => _.id !== id);
      }
    });
  }

  handlePageEvent(e: PageEvent) {

    this.pageIndex = e.pageIndex ;
    this.pageSize = e.pageSize;
    let sortResult = this.doSorting(this.sortingControl.value ?? '');
    this.getApi(
      sortResult.sortColumn,
      sortResult.sortType,
      this.searchControl.value ?? ''
    );
  }
}
- (Line: 18) To do pagination we are required to know the total number of records on the server.
- So we declared a variable like 'totalRecords' to store the total count of items.
- (Line: 19) Defined the variable like 'pageIndex' to maintain the value of the current page number of the pagination.
- (Line: 101-112) Here defined the method like 'handlePageEvent' which gets executed for the pagination change.
src/app/super-heroes/all-superheroes/all-superheroes.component.html:
<div style="margin: 0px 6px">
    <mat-paginator
      [length]="totalRecords"
      [pageSize]="pageSize"
      [pageSizeOptions]="[5, 10, 25, 100]"
      [pageIndex]="pageIndex"
      (page)="handlePageEvent($event)"
      aria-label="Select page"
    >
    </mat-paginator>
</div>
Add the pagination module in 'app.module.ts'src/app/app.module.ts:
import {MatPaginatorModule} from '@angular/material/paginator';

@NgModule({
  imports: [
    MatPaginatorModule
  ]
})
export class AppModule {}

Support Me!
Buy Me A Coffee
PayPal Me
Video Session:
Wrapping Up:
Hopefully, I think this article delivered some useful information on Angular 16 CRUD using the Angular Material UI library. using I love to have your feedback, suggestions, and better techniques in the comment section below.
Apprciate you vision to help
ReplyDelete