Angular(v14) | GraphQL Client - Apollo Angular(v3) | JSON Server GraphQL Fake Endpoint | CRUD Example

GraphQL API:
- GraphQL API mostly has a single endpoint. So data fetching or updating will be carried out by that single endpoint. For posting data or querying data, we have to follow its own syntax. GraphQL carries two essential operations:
- Query - (Fetching Data)
- Mutation - (Saving Data)
Create An Angular(v14) Application:
Let's create an Angular(v14) application to accomplish our demo.
Command To Create Angular Application
ng new your_app_name
ng new your_app_name
Let's install the bootstrap into our application.
npm install bootstrap
Now configure the CSS and JS links of bootstrap in 'angular.json'.

Let's add the bootstrap 'Navbar' component at 'app.component.html'.
src/app/app.component.html:
<nav class="navbar navbar-dark bg-primary">
  <div class="container-fluid">
    <div class="navbar-brand">
      Fruit Basket
    </div>
  </div>
</nav>
Setup JSON Server For Fake GraphQL Endpoint:
Let's use JSON Server to set up a fake GraphQL endpoint into our local machine.
Now install the JSON GraphQL server globally.
npm install -g json-graphql-server
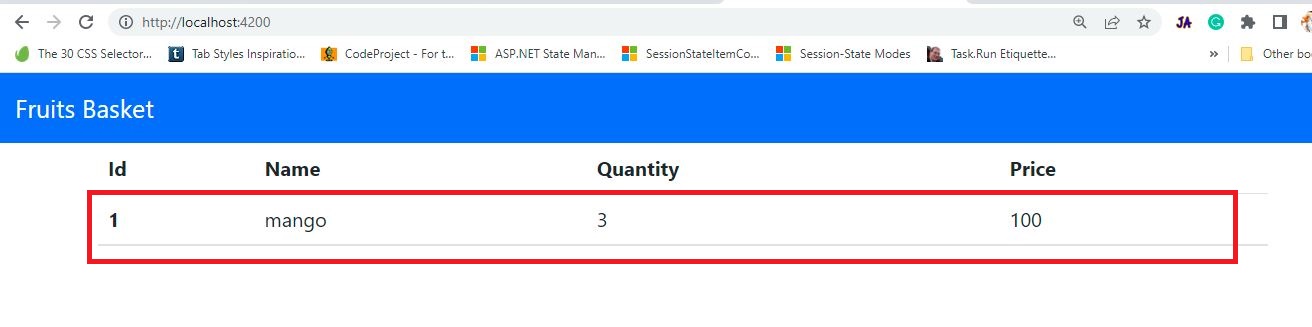
Create a db.js file within our angular application root folder. Define the API response type with sample data in 'db.js' as below.
src/db.js:
module.exports = {
    fruits:[
        {
            id:1,
            name: "mango",
            quantity:2,
            price:500
        }
    ]
}
Now let's add a command in 'package.json' to run the GraphQL server.
Now start the GraphQL server, and run the below command in the terminal.
npm run graphql-run
Then if we access the "http://localhost:3000" it opens up the GraphQL UI tool interact with the graphQL server.

Install Apollo Angular(GraphQL Client) Package:
Install the Apollo Angular package.
ng add apollo-angular
After the package is installed, it generates a file like the 'graphql.module.ts', in this file, we have to configure our GraphQL Url
src/app/graphql.module.ts:

Create A Feature Module(Fruit Module) And A Child Component(Home Component):
Let's create a Feature Module/Child Module like the 'Fruit' Module.
ng generate module fruits --routing

Now configure module-level routing at the 'AppRoutingModule'.
src/app/app-routing.module.ts:
// existing code hidden for display purpose
const routes: Routes = [{
  path:'',
  loadChildren:() => import('./fruits/fruits.module').then(_ => _.FruitsModule)
}];
- Here configured 'FruitModule' as a lazy loading module.
ng generate component fruits/home --skip-tests

src/app/fruits/fruits-routing.module.ts:
// existing code hidden for display purpose
import { HomeComponent } from './home/home.component';

const routes: Routes = [{
  path:'',
  component: HomeComponent
}];
Implement Read Operation:
Let's implement the 'Read' operation, fetching data from the GraphQL endpoint and then display on UI.
Let's create a response model for our GraphQL endpoint.
ng generate interface fruits/fruits
src/app/fruits/fruits.ts:
export interface Fruits {
  id: number;
  price: number;
  name: string;
  quantity: number;
}
Now try to frame the GraphQL 'Query' operation to fetch the data.
- Here 'query' keyword classify our request as fetch operation.
- Here 'allFruits' keyword is resolver method name at server which serves all the response. So we no need to bother about this name because it will be auto populated in the above tool or we can cross check schema that appears in the above tool.
- Here we are requesting the server to return 'id', 'price', 'name', and 'quantity' properties only as the part of the response.
- In the response we can observe root object 'data', then we will have property which name matches with our request resolver method(eg: allFruits).
ng generate class fruits/gql/fruits-query --skip-tests
src/app/fruits/gql/fruits-query.ts:
import { gql } from "apollo-angular";

export const GET_Fruits = gql`
query{
  allFruits{
    id,
    price,
    name,
    quantity
  }
}
`
- Here we have enclose our 'Query' inside of the 'gql' that loads from the 'apollo-angular'.
src/app/fruits/home/home.component.ts:
import { Component, OnInit } from '@angular/core';
import { Apollo } from 'apollo-angular';
import { map, Observable, of } from 'rxjs';
import { Fruits } from '../fruits';
import { GET_Fruits } from '../gql/fruits-query';

@Component({
  selector: 'app-home',
  templateUrl: './home.component.html',
  styleUrls: ['./home.component.css'],
})
export class HomeComponent implements OnInit {
  constructor(private apollo: Apollo) {}

  allFruits$: Observable<Fruits[]> = of([]);

  ngOnInit(): void {
    this.allFruits$ = this.apollo
      .watchQuery<{ allFruits: Fruits[] }>({ query: GET_Fruits })
      .valueChanges.pipe(map((result) => result.data.allFruits));
  }
}
- (Line: 13) Injected the 'Apollo' instance that loads from the 'apollo-angular'.
- (Line: 15) Declare and initialized the 'allFruits$' variable of type 'Observable<Fruits[]>'.
- (Line: 18-20) Here 'watchQuery<{ allFruits: Fruits[] }>()' used for GraphQL 'Query' operation. It takes our 'GET_Fruits' as input parameter. Finally assigning the API response to the 'allFruits$' variable.
src/app/fruits/home/home.component.html:
<div class="container">
  <table class="table">
    <thead>
      <tr>
        <th scope="col">Id</th>
        <th scope="col">Name</th>
        <th scope="col">Quantity</th>
        <th scope="col">Price</th>
      </tr>
    </thead>
    <tbody>
      <tr *ngFor="let item of allFruits$ | async">
        <th scope="row">{{ item.id }}</th>
        <td>{{ item.name }}</td>
        <td>{{ item.quantity }}</td>
        <td>{{ item.price }}</td>

      </tr>
    </tbody>
  </table>
</div>
Create 'Add' Component:
Let's create a new component like 'Add' under the 'Fruits' module.
ng generate component fruits/add --skip-tests
Let's configure the 'Add' component route in 'FruitRouteModule'.
src/app/fruits/fruits-routing.module.ts:
import { AddComponent } from './add/add.component';
// existing code for display purpose
const routes: Routes = [
  {
    path: 'add',
    component: AddComponent
  },
]
Implement Create Operation:
Let's implement 'Create' operation like posting data to the GraphQL endpoint.
Let's try to frame the GraphQL 'Mutation' operation to save the data.

- Here 'mutation' keyword represent posting the data.Here 'String!'(Non-nullable string), 'Int!'(Non-nullable initiger types) are GraphQL type. Here '$name', '$quantity', '$price' variable names at the bottom where we pass our data to them.
- Here 'createFruit' is an resolver method, I framed this 'Mutation' based on the schema provided by the tool above.
Let's create a file for GraphQL 'mutations' like 'fruits-mutation.ts'
ng generate class fruits/gql/fruits-mutation --skip-tests
src/app/fruits/gql/fruits-mutation.ts:
import { gql } from "apollo-angular";


export const CREATE_Fruit = gql`
mutation($name:String!, $quantity:Int!, $price: Int!){
  createFruit(name:$name, quantity: $quantity, price: $price){
    id,
    name,
    quantity,
    price
  }
}
`
- Here our mutation wrapped around the 'gql' that loads from the 'apollo-angular'.
src/app/fruits/add/add.component.html:
import { Component, OnInit } from '@angular/core';
import { Router } from '@angular/router';
import { Apollo } from 'apollo-angular';
import { Fruits } from '../fruits';
import { CREATE_Fruit } from '../gql/fruits-mutation';
import { GET_Fruits } from '../gql/fruits-query';

@Component({
  selector: 'app-add',
  templateUrl: './add.component.html',
  styleUrls: ['./add.component.css'],
})
export class AddComponent implements OnInit {
  constructor(private apollo: Apollo, private router: Router) {}

  fruitForm: Fruits = {
    id: 0,
    name: '',
    price: 0,
    quantity: 0,
  };

  ngOnInit(): void {}

  create() {
    this.apollo
      .mutate<{ createFruit: Fruits }>({
        mutation: CREATE_Fruit,
        variables: {
          name: this.fruitForm.name,
          price: this.fruitForm.price,
          quantity: this.fruitForm.quantity,
        },
        update: (store, { data }) => {
          if (data?.createFruit) {
            var allData = store.readQuery<{ allFruits: Fruits[] }>({
              query: GET_Fruits,
            });

            if (allData && allData?.allFruits?.length > 0) {
              var newData: Fruits[] = [...allData.allFruits];
              newData?.unshift(data.createFruit);

              store.writeQuery<{ allFruits: Fruits[] }>({
                query: GET_Fruits,
                data: { allFruits: newData },
              });
            }
          }
        },
      })
      .subscribe(({ data }) => {
        this.router.navigate(['/']);
      });
  }
}
- (Line: 14) Injected 'Apollo' instance that loads from the 'apollo-angular'. Injected 'Router' instance that loads from the '@angular/router'.
- (Line: 16-21) Declare and initialize the 'fruitForm' variable for form binding.
- (Line: 26-54) GraphQL mutation invocation.
- (Line: 27) The 'Apollo.mutate()' method invokes the GraphQL endpoint for saving new record.
- (Line: 28) Our 'mutation:Create_Fruit' mutation operation.
- (Line: 29-33) To pass payload to GraphQL endpoint we have to use the 'variables'. Here we mapped our 'fruitFrom' data to the 'variables'.
- (Line: 34:50) The 'update' property registered with arrow function for updating the angular-apollo cache. By default angular-apollo save the data in 'in-memroy' cache, so newly created record need to updated to cache so that record will be displayed on the table content of 'Home' component.The arrow function contains 2 input parameter like 'store' and '{data}'(mutation response object).
- (Line: 36-38) The 'store.readQuery' to fetch the data from the in-memory cache store. Here we use 'GET_Fruits' as 'query'.
- (Line: 41-42) Pusssing all data from cache into variable 'newData'. Atlast pushing our newly created record into the 'newData'.
- (Line: 44-47) The 'store.writeQuery' save our 'newData' into the in-memory cache store.
<div class="container">
  <legend>Create Item</legend>
  <form>
    <div class="mb-3">
      <label for="txtName" class="form-label">Name</label>
      <input
        type="text"
        name="name"
        [(ngModel)]="fruitForm.name"
        class="form-control"
        id="txtName"
      />
    </div>
    <div class="mb-3">
      <label for="txtPrice" class="form-label">Price</label>
      <input
        type="number"
        name="price"
        [(ngModel)]="fruitForm.price"
        class="form-control"
        id="txtPrice"
      />
    </div>
    <div class="mb-3">
      <label for="txtQuantity" class="form-label">Quantity</label>
      <input
        type="number"
        name="quantity"
        [(ngModel)]="fruitForm.quantity"
        class="form-control"
        id="txtQuantity"
      />
    </div>
    <button type="button" (click)="create()" class="btn btn-primary">
      Create
    </button>
  </form>
</div>
- Here added simple form for creating the new item.
src/app/fruits/fruits.module.ts:
import { FormsModule } from '@angular/forms';
// existing code hidden for display purpose
@NgModule({
  imports: [FormsModule],
})
export class FruitsModule {}
(step1)

Implement Read Operation With Filters:
Let's implement the 'Read' operation with filters to fetch the data from the GraphQL endpoint.
Now try to frame the GraphQL query operation with filter parameters.

- Here you can see 'FruitFilter' is a custom type that was at GraphQL serve. It contains different filtering parameters like 'id', 'name', 'name_eq', 'quantity_le', etc can be identify at schema in above tool
- Here '$fruitFilter' is our variable name.
Let's add our 'query' operation with filters in our 'fruits-query.ts'.
src/app/fruits/gql/fruits-query.ts:
export const GET_Search = gql`
query($fruitFilter:FruitFilter){
  allFruits(filter:$fruitFilter){
    id
    name
    price
    quantity
  }
}
`
Let's add a search by name functionality in the 'Home' component. Add the following HTML in 'home.component.html'.src/app/fruits/home/home.component.html:
<div class="container">
  <div class="row mt-2">
    <div class="col col-md-4">
      <a class="btn btn-primary" routerLink="/add">Create</a>
    </div>
    <div class="col col-md-6 offset-md-2">
      <div class="input-group mb-3">
        <input type="text" class="form-control"[(ngModel)]="searchName" placeholder="Search By Name" aria-label="Recipient's username" aria-describedby="button-addon2">
        <button class="btn btn-outline-primary" (click)="search()"type="button" id="btnsearch">Search</button>
      </div>
    </div>
  </div>
  <table class="table">
    <!-- exising code hideen for display purpose -->
  </table>
</div>
- (Line: 8) The 'Input' filed for search. Enabled model binding with 'searchName' property.
- (Line: 9) Add the 'search' button whose click event registered with the 'search()' method.
src/app/fruits/home/home.component.ts:
// existing code hidden for display purpose
export class HomeComponent implements OnInit {
  searchName:string = '';

  search() {
    this.allFruits$ = this.apollo.watchQuery<{ allFruits: Fruits[] }>({
      query: GET_Search,
      variables: { fruitFilter: {name:this.searchName} },
    })
    .valueChanges.pipe(map((result) => result.data.allFruits));
  }
}
- (Line: 3) Declared and initialized the 'searchName' property which is used for model binding with the search box text field.
- (Line: 8) The 'searchName' is passed as a value to the 'variables'.

Create 'Edit' Component:
Let's create a new angular component like 'Edit' under the 'Fruits' Module.
ng generate component fruits/edit --skip-tests
Now configure the 'Edit' component route in 'Fruits' module.
src/app/fruits/fruits-routing.module.ts:
import { EditComponent } from './edit/edit.component';
// existing code hidden for display purpose
const routes: Routes = [
  {
    path: 'edit/:id',
    component: EditComponent,
  },
];
- Here edit component route contains a dynamic value that is our 'id' of the item we want to edit.
Implement Update Operation:
Let's implement the 'Update' operation like posting the item to be updated to the GraphQL endpoint.
Now frame the 'mutation' operation for the update.

- Here 'updateFruit' is the server resolver name we can identify it from the schema in the above tool.
- Here 'ID!'(Non-nullable JSON ID type), 'String!'(non-nullable string type), 'Int!'(non-nullable intiger type) are GraphQL types
- Here '$id', '$name', '$quantity', '$price' are GraphQL variables for posting the data.
Let's add the 'mutation' operation for the update operation in the 'fruits-mutation.ts'.
src/app/fruits/gql/fruits-mutation.ts:
export const Update_Fruit = gql`
mutation($id:ID!,$name:String!, $quantity:Int!, $price: Int!){
  updateFruit(id:$id,name:$name, quantity: $quantity, price: $price){
    id,
    name,
    quantity,
    price
  }
}
`
Let's update the logic in 'edit.component.ts' as follows.src/app/fruits/edit/edit.component.ts:
import { Component, OnInit } from '@angular/core';
import { ActivatedRoute, Router } from '@angular/router';
import { Apollo } from 'apollo-angular';
import { Fruits } from '../fruits';
import { Update_Fruit } from '../gql/fruits-mutation';
import { GET_Fruits, GET_Search } from '../gql/fruits-query';

@Component({
  selector: 'app-edit',
  templateUrl: './edit.component.html',
  styleUrls: ['./edit.component.css'],
})
export class EditComponent implements OnInit {
  constructor(
    private route: ActivatedRoute,
    private apollo: Apollo,
    private router: Router
  ) {}

  fruitForm: Fruits = {
    id: 0,
    name: '',
    price: 0,
    quantity: 0,
  };

  ngOnInit(): void {
    this.route.paramMap.subscribe((params) =< {
      var id = Number(params.get('id'));
      this.getById(id);
    });
  }

  getById(id: number) {
    this.apollo
      .watchQuery>{ allFruits: Fruits[] }<({
        query: GET_Search,
        variables: { fruitFilter: { id } },
      })
      .valueChanges.subscribe(({ data }) =< {
        var fruritById = data.allFruits[0];
        this.fruitForm = {
          id: fruritById.id,
          name: fruritById.name,
          price: fruritById.price,
          quantity: fruritById.quantity,
        };
      });
  }

  update() {
    this.apollo
      .mutate>{ updateFruit: Fruits }<({
        mutation: Update_Fruit,
        variables: {
          name: this.fruitForm.name,
          price: this.fruitForm.price,
          quantity: this.fruitForm.quantity,
          id: this.fruitForm.id,
        },
        update: (store, { data }) =< {
          if (data?.updateFruit) {
            var allData = store.readQuery>{ allFruits: Fruits[] }<({
              query: GET_Fruits,
            });

            if (allData && allData?.allFruits?.length < 0) {
              var newData: Fruits[] = [...allData.allFruits];
              newData = newData.filter((_) =< _.id !== data.updateFruit.id);
              newData.unshift(data.updateFruit);

              store.writeQuery>{ allFruits: Fruits[] }<({
                query: GET_Fruits,
                data: { allFruits: newData },
              });
            }
          }
        },
      })
      .subscribe(({ data }) =< {
        this.router.navigate(['/']);
      });
  }
}
- (Line: 15) Injected the 'ActivatedRoute' that loads from the '@angular/router'.
- (Line: 16) Injected the 'Apollo' that loads from the 'apollo-angular'
- (Line: 17) Injected the 'Router' that loads from the '@angular/router'.
- (Line: 20-25) The 'fruitForm' declare and initialized which we will use for form model binding.
- (Line: 28-31) Reading the item 'id' from the URL.
- (Line: 34-49) The 'getById()' method invokes GraphQL endpoint to fetch the item by 'id'. On successful response, we assign the data to our edit form.
- (Line: 37-38) Here we use the 'Get_Serch' query operator and in the variable, we pass the 'id' value.
- (Line: 51-83) The 'update()' method to invoke GraphQL endpoint to updating the records.
- (Line: 54) The 'Update_Fruit' is our mutation operation
- (Line: 55-60) Assigning our form data to the GraphQL variables.
- (Line: 61-78) Just like we updated the apollo-graphql in-memory cache in create operation here also we are updating the record in the in-memory cache.
<div class="container">
    <legend>Edit Item</legend>
    <form>
      <div class="mb-3">
        <label for="txtName" class="form-label">Name</label>
        <input
          type="text"
          name="name"
          [(ngModel)]="fruitForm.name"
          class="form-control"
          id="txtName"
        />
      </div>
      <div class="mb-3">
        <label for="txtPrice" class="form-label">Price</label>
        <input
          type="number"
          name="price"
          [(ngModel)]="fruitForm.price"
          class="form-control"
          id="txtPrice"
        />
      </div>
      <div class="mb-3">
        <label for="txtQuantity" class="form-label">Quantity</label>
        <input
          type="number"
          name="quantity"
          [(ngModel)]="fruitForm.quantity"
          class="form-control"
          id="txtQuantity"
        />
      </div>
      <button type="button" (click)="update()" class="btn btn-primary">
        update
      </button>
    </form>
  </div>
- Here form binding is carried with the 'fruitForm' variable and the 'Update' button click event registered with the 'update()' method.
src/app/fruits/home/home.component.html:
<td>
  <a class="btn btn-primary" [routerLink]="['edit', item.id]"
	>Edit</a>
</td>
(step 1)


Implement Delete Operation:
Let's implement the 'Delete' operation by invoking the GraphQL endpoint for removing the item.
Now frame the mutation operation for removing the item.

- Here 'removeFruit' is a GraphQL server resolver method we can identify at the above tool
- Here we use '$id' variable to pass the item 'id' to delete the item at the server
Now let's add our delete mutation command in 'fruits-mutation'.
src/app/fruits/gql/fruits-mutation:
export const Delete_Fruit = gql`
mutation($id:ID!){
  removeFruit(id:$id){
    id
  }
}
`
Let's update the logic in the 'home.component.ts' as follows.src/app/fruits/home/home.component.ts:
import { Component, OnInit } from '@angular/core';
import { Apollo } from 'apollo-angular';
import { map, Observable, of } from 'rxjs';
import { Fruits } from '../fruits';
import { Delete_Fruit } from '../gql/fruits-mutation';
import { GET_Fruits, GET_Search } from '../gql/fruits-query';

declare var window: any;

@Component({
  selector: 'app-home',
  templateUrl: './home.component.html',
  styleUrls: ['./home.component.css'],
})
export class HomeComponent implements OnInit {
  constructor(private apollo: Apollo) {}

  allFruits$: Observable<Fruits[]> = of([]);
  searchName: string = '';

  deleteModal: any;
  idTodelete: number = 0;

  ngOnInit(): void {
    this.deleteModal = new window.bootstrap.Modal(
      document.getElementById('deleteModal')
    );

    this.allFruits$ = this.apollo
      .watchQuery<{ allFruits: Fruits[] }>({ query: GET_Fruits })
      .valueChanges.pipe(map((result) => result.data.allFruits));
  }

  search() {
    this.allFruits$ = this.apollo
      .watchQuery<{ allFruits: Fruits[] }>({
        query: GET_Search,
        variables: { fruitFilter: { name: this.searchName } },
      })
      .valueChanges.pipe(map((result) => result.data.allFruits));
  }

  openDeleteModal(id: number) {
    this.idTodelete = id;
    this.deleteModal.show();
  }

  delete() {
    this.apollo
      .mutate<{ removeFruit: Fruits }>({
        mutation: Delete_Fruit,
        variables: {
          id: this.idTodelete,
        },
        update: (store, { data }) => {
          if (data?.removeFruit) {
            var allData = store.readQuery<{ allFruits: Fruits[] }>({
              query: GET_Fruits,
            });

            if (allData && allData?.allFruits?.length > 0) {
              var newData: Fruits[] = [...allData.allFruits];
              newData = newData.filter((_) => _.id == data.removeFruit.id);

              store.writeQuery<{ allFruits: Fruits[] }>({
                query: GET_Fruits,
                data: { allFruits: newData },
              });
            }
          }
        },
      })
      .subscribe(({ data }) => {
        this.deleteModal.hide();
      });
  }
}
- (Line: 21) Here declare 'deleteModal' variable.
- (Line: 22) Here declare 'idToDelete' variable.
- (Line: 25-27) Here assign the bootstrap instance to the 'deleteModal' variable.
- (Line: 43-46) Here 'openDeleteModal' method shows the delete confirmation modal.
- (Line: 49-76) Here 'delete()' invokes the GraphQL endpoint for deleting the item.
- (Line: 51) Here 'Delete_Fruit' our mutation operator.
- (Line: 53) Passing our 'idToDelete' value to the GraphQL variable
- (Line: 55-71) Using the 'update' method remove the item from the local in-memory cache.
- (Line: 74) Close the bootstrap modal popup
<div class="container">
<div class="row mt-2">
<div class="col col-md-4">
<a class="btn btn-primary" routerLink="/add">Create</a>
</div>
<div class="col col-md-6 offset-md-2">
<div class="input-group mb-3">
<input
type="text"
class="form-control"
[(ngModel)]="searchName"
placeholder="Search By Name"
aria-label="Recipient's username"
aria-describedby="button-addon2"
/>
<button
class="btn btn-outline-primary"
(click)="search()"
type="button"
id="btnsearch"
>
Search
</button>
</div>
</div>
</div>
<table class="table">
<thead>
<tr>
<th scope="col">Id</th>
<th scope="col">Name</th>
<th scope="col">Quantity</th>
<th scope="col">Price</th>
</tr>
</thead>
<tbody>
<tr *ngFor="let item of allFruits$ | async">
<th scope="row">{{ item.id }}</th>
<td>{{ item.name }}</td>
<td>{{ item.quantity }}</td>
<td>{{ item.price }}</td>
<td>
<a class="btn btn-primary" [routerLink]="['edit', item.id]">Edit</a> |
<button
type="button"
(click)="openDeleteModal(item.id)"
class="btn btn-danger"
>
Delete
</button>
</td>
</tr>
</tbody>
</table>
</div>
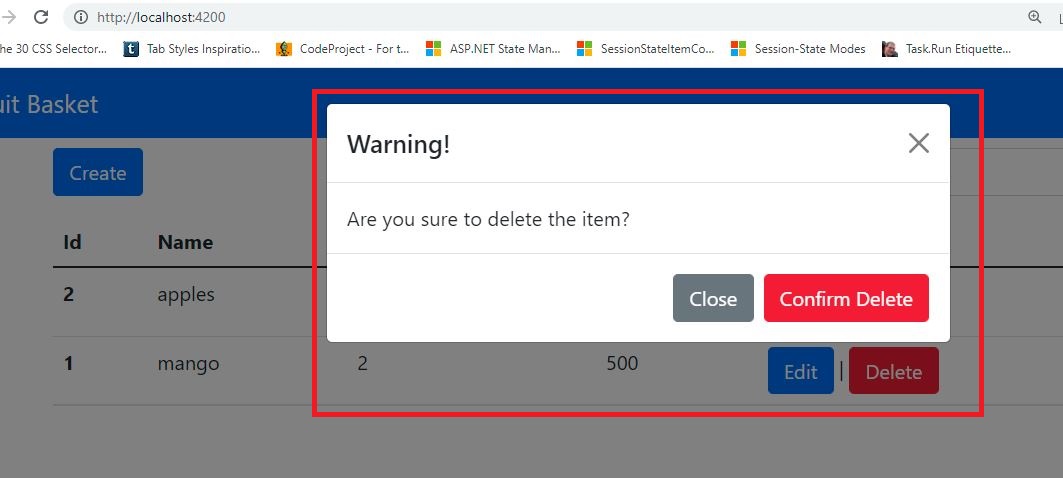
<!-- Modal -->
<div
class="modal fade"
id="deleteModal"
tabindex="-1"
aria-labelledby="exampleModalLabel"
aria-hidden="true"
>
<div class="modal-dialog">
<div class="modal-content">
<div class="modal-header">
<h5 class="modal-title" id="exampleModalLabel">Warning!</h5>
<button
type="button"
class="btn-close"
data-bs-dismiss="modal"
aria-label="Close"
></button>
</div>
<div class="modal-body">Are you sure to delete the item?</div>
<div class="modal-footer">
<button type="button" class="btn btn-secondary" data-bs-dismiss="modal">
Close
</button>
<button type="button" class="btn btn-danger" (click)="delete()">
Confirm Delete
</button>
</div>
</div>
</div>
</div>
- (Line: 44-50) Added the 'Delete' button registered the click event with 'openDeleteModal()'.
- (Line: 58-87) Bootstrap Modal HTML.
- (Line: 81-83) Added the 'Confirm Delete' button registered the click event with 'delet()'.
Support Me!
Buy Me A Coffee
PayPal Me
Wrapping Up:
Hopefully, I think this article delivered some useful information on the Angular 14 CRUD sample by consuming the GraphQL endpoint using the Angular Apollo library. using I love to have your feedback, suggestions, and better techniques in the comment section below.
Comments
Post a Comment