
NgRx Store For State Management:
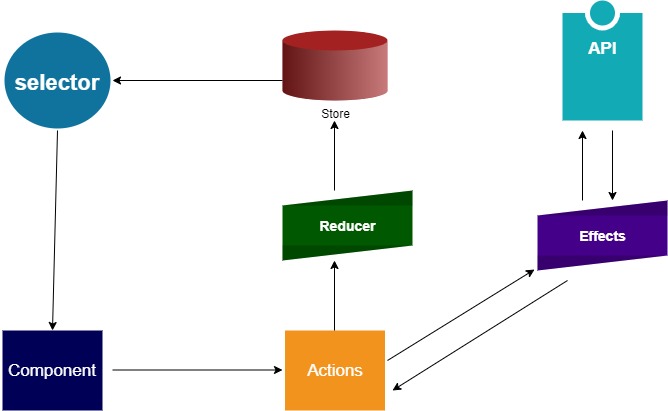
NgRx Store provides state management for creating maintainable, explicit applications through the use of a single state and actions in order to express state changes. The main building blocks for the NgRx store are:
- Actions
- Reducers
- Selectors

- Angular components trigger the API call and fetch the response data.
- Angular component raises events through actions. Component passes the API response to the Actions.
- Reducers are logical functions that listen for action changes. Reducers update the store state based on actions and the payload carried by the actions.
- Selectors are consumed by angular components. Selectors serve the data from the store to angular components.
Create An Angular Application:
To start our demo let's create a sample angular application.
Install Angular CLI:
npm install -g @angular/cli
npm install -g @angular/cli
Command To Create Angular Application:
ng new your-project-name
ng new your-project-name
Install Bootstrap And Configure Bootstrap Menu:
npm install bootstrap

In the 'angular.json' file include Bootstrap CSS and js files like below.
angular.json:

Now add the Bootstrap menu into our application.
src/app/app.component.html:
<nav class="navbar navbar-expand-lg bg-dark">
  <div class="container-fluid">
    <a href="#" class="navbar-brand text-white"> Gallery </a>
  </div>
</nav>
Install @ngrx/store:
npm install @ngrx/store --save

Create API Response Model:
The testing API we will use is "https://jsonplaceholder.typicode.com/photos". It's response looks as below:

src/app/gallery/gallery.model.ts:
export interface GalleryModel {
albumId: number;
id: number;
title: string;
url: string;
thumbnailUrl: string;
}
Add NgRx Actions:
Actions are one of the main building blocks in NgRx. Actions express unique events that happen in your application like user interaction with the page, external interaction by network request, and direct interaction with device APIs, etc.
Actions are also the data carries to the store. So now in our sample, I want to create an action that going to be invoked by our API to store the response data into the store. Add a new folder like 'store' inside of the 'app' folder. Add a file like 'gallery.action.ts' inside of the 'store' folder.
src/app/store/gallery.action.ts:
import { createAction, props } from '@ngrx/store';
import { GalleryModel } from '../gallery/gallery.model';

export const retrievedGalleryList = createAction(
    "[Gallery API] Gallery API Success",
    props<{allGallery:GalleryModel[]}>()
);
- Here actions like 'retrievedGalleryList' invoked by API success to save the response data into the store.
- The 'createAction' loads from the '@ngrx/store'.
- Here actions name can be any string but the standard is like '[Source] Event'. So [Gallery API] equals to [Source] and 'Gallery API Success' equals to 'Event'.
- So pass input parameters to actions need to use 'props' loads from '@ngrx/store'.
Add NgRx Reducer:
Reducers are pure functions in that they produce the same output for a given input. They are without side effects and handle each state transition synchronously. Each reducer function takes the latest Action dispatched, the current state, and determines whether to return a newly modified state or the original state.
Now in the 'store' folder, let's create a new file like 'gallery.reducer.ts'.
src/app/store/gallery.reducer.ts:
import { createReducer, on } from '@ngrx/store';
import { GalleryModel } from '../gallery/gallery.model';
import { retrievedGalleryList } from './gallery.action';

export const initialState: ReadonlyArray<GalleryModel> = [];

const _galleryReducer = createReducer(
  initialState,
  on(retrievedGalleryList, (state, { allGallery }) => {
    return [...allGallery];
  })
);

export function galleryReducer(state: any, action: any) {
  return _galleryReducer(state, action);
}
- (Line: 5) The initial state of our application store.
- (Line: 7-12) Reducer function that contains all our actions like 'retrievedGalleryList'. This function updates data into the store.
- To register action we need to use the 'on' method loads from the '@ngrx/store'. The second parameter of the 'on' method is the function that updates store state and this function has input parameters like 'state' and 'javascript object literal'. The 'state' variable value is injected by the store automatically. The 'javascript object literal' contains action method variables(eg: allGallery).
- (Line: 10) We know the state is immutable, so instead of updating the existing creating the new state with new data using the spread operator.
Add Application State Model:
Inside the 'store' folder let's create our 'AppState' interface. This model represents our application model state.
src/app/store/app.state.ts:
import { GalleryModel } from '../gallery/gallery.model';

export interface AppState {
  gallery: GalleryModel[];
}
Add NgRx Selector:
Selectors are pure functions used for obtaining the parts or slices of the store state. The '@ngrx/store' provide is 2 main selector methods like 'createSelector' and 'createFeatureSelector'.
The 'createSelector' can be used to select some data from the state based on several slices of the same state.
The 'createFeatureSelector' is a method for returning a top-level feature state. It returns a typed selector function for a feature slice of the state.
Now inside the 'store' folder let's add a new file like 'gallery.selector.ts'
src/app/store/gallery.selector.ts:
import { createSelector } from '@ngrx/store';
import { GalleryModel } from '../gallery/gallery.model';

import { AppState } from './app.state';

export const gallerySelector =(state: AppState) => state.gallery;

export const uniqueAlbumIds = createSelector(
  gallerySelector,
  (gallery: GalleryModel[]) => {
    return [...new Set(gallery.map((_) => _.albumId))];
  }
);

export const albumCollectionByAlbumId = (albumId:number) => createSelector(
    gallerySelector,
    (gallery:GalleryModel[]) => {
        if(albumId == -1){
            return gallery;
        }
        return gallery.filter(_ => _.albumId == albumId);
    }
)
- (Line: 6) Selecting the root level property data from the 'AppState'.
- (Line: 8-13) This selector's job is to return the unique 'albumId' collection. So it is a slice of a deeper state so we used 'createSelector'. So 'createSelector' is an overloaded method, here we used one of them where its first input parameter is the root property of the state and the second input parameter is a method that returns our required data slice from the state.
- (Line: 15-23) Here is another selector we created its job is to fetch the gallery collection based on the 'albumId'.
Register StoreModule:
In 'AppModule' we have to register our 'StoreModule'. The 'StoreModule.forRoot({})' contains javascript object literal as input parameter where we need to register our reducers inside of it. So in the module-based application that uses lazy loading, in that case, we need to register 'StoreModule.forFeature({})' in each module.
src/app/app.module.ts:
import { StoreModule } from '@ngrx/store';
import { galleryReducer } from './store/gallery.reducer';
// code hidden for display purpose

@NgModule({
  imports: [
    StoreModule.forRoot({ gallery: galleryReducer })
  ]
})
export class AppModule { }
Add Angular Service To Invoke API Call:
Let's add an angular service file like 'gallery.service.ts' in the 'gallery' folder.
src/app/gallery/gallery.service.ts:
import { Injectable } from '@angular/core';
import { HttpClient } from '@angular/common/http';
import { map } from 'rxjs/operators';

@Injectable()
export class GalleryService {
  constructor(private http: HttpClient) {}

  loadGallery() {
    return this.http
      .get('https://jsonplaceholder.typicode.com/photos')
      .pipe(map((albums) => albums || []));
  }
}
Now register 'HttpClientModule' and 'GalleryService' into the 'AppModule' file.src/app/app.module.ts:
import { HttpClientModule } from '@angular/common/http';
import { GalleryService } from './gallery/gallery.service';
// code hidden for display purpose

@NgModule({
  imports: []
    HttpClientModule
  ],
  providers: [GalleryService],
})
export class AppModule {}
Add Angular Sample Component:
Let's add our angular component to consume our newly created NgRx store.
app/src/gallery.component.ts:
import { Component, OnInit } from '@angular/core';
import { Store, select } from '@ngrx/store';
import { GalleryService } from './gallery.service';
import { retrievedGalleryList } from '../store/gallery.action';
import {
  uniqueAlbumIds,
  albumCollectionByAlbumId,
} from '../store/gallery.selector';
import { GalleryModel } from './gallery.model';

@Component({
  templateUrl: './gallery.component.html',
  selector: 'gallery',
})
export class GalleryComponent implements OnInit {
  selectedAlbumId = -1;
  albumIds$ = this.store.pipe(select(uniqueAlbumIds));
  allGallery$ = this.store.pipe(
    select(albumCollectionByAlbumId(this.selectedAlbumId))
  );
  constructor(
    private store: Store<{ gallery: GalleryModel[] }>,
    private galleryService: GalleryService
  ) {}

  ngOnInit(): void {
    this.galleryService.loadGallery().subscribe((gallery) => {
      console.log(gallery);
      this.store.dispatch(
        retrievedGalleryList({ allGallery: gallery as GalleryModel[] })
      );
    });
  }
  albumChange(event:number) {
    this.allGallery$ = this.store.pipe(select(albumCollectionByAlbumId(event)));
  }
}
- (Line: 16) Variable to bind to the 'albumId' dropdown.
- (Line: 17) The 'albumId$' is an observable type variable, that loads a slice of data from our store. So here we are going to load a collection of unique 'albumId' from the store and bind the options to the dropdown list.
- (Line: 18-20) The 'allGallery$' is an observable type variable, that loads all gallery data from the store by filtering with 'albumId'.
- (Line: 22) Injected our store.
- (Line: 26-33) Invoking the API call on component load by using the 'ngOnIt' life cycle method. On API success invoking the 'retrievedGalleryList' action method and passing the API response to that action method.
- (Line: 34-36) The 'albumChange' method registers with a dropdown, so it will filter or fetches the data from the store based on the 'albumId'.
<div class="container">
    <div class="row justify-content-center">
      <select
        class="form-select form-select-md mt-3 w-50"
        aria-label=".form-select-lg example"
        [ngModel]="selectedAlbumId"
        (ngModelChange)="albumChange($event)"
      >
        <option value="-1">Select Gallery Categroy</option>

        <option *ngFor="let id of albumIds$ | async" [value]="id">
          {{ id }}
        </option>
      </select>
    </div>
    <div class="row">
      <div *ngFor="let item of allGallery$ | async" class="card m-3" style="width: 18rem;">
        <img src="{{item.thumbnailUrl}}" class="card-img-top" alt="..." style="height: 150px;">
        <div class="card-body">
          <h5 class="card-title">{{item.title}}</h5>
          <div>Album Categroy Id {{item.albumId}}</div>
        </div>
      </div>
    </div>
  </div>
- (Line: 3-8) Added dropdown and registered it with angular change event.
- (Line: 16-24) Binding all gallery data.
src/app/app.module.ts:
import { FormsModule } from '@angular/forms';
import { GalleryComponent } from './gallery/gallery.component';
// code hidden for display purpose
@NgModule({
  declarations: [
    AppComponent,
    GalleryComponent
  ],
  imports: [
    FormsModule,
  ],
})
export class AppModule { }

Effects:
In a service-based angular application, components are responsible for interacting with external resources directly through services. Instead, effects provide a way to interact with those services and isolate them from the components. Effects are where you handle tasks such as fetching data, long-running tasks that produce multiple events, and other external interactions where our components don't need explicit knowledge of these interactions.
Implement Effects:
Let's create a new action method that invokes API(effects class will be created in the next steps) in the effects class.
src/app/store/gallery.action.ts:
export const invokeGalleryAPI = createAction('[Gallery API] Invoke API');
Now install effects library
npm install @ngrx/effects --save
Let's create our effects service file like 'gallery.effect.ts'
src/app/gallery/gallery.effect.ts:
import { Injectable } from '@angular/core';
import { Actions, createEffect, ofType } from '@ngrx/effects';
import { map, mergeMap } from 'rxjs/operators';
import { GalleryService } from './gallery.service';

@Injectable()
export class GalleryEffect {
  constructor(
    private actions$: Actions,
    private galleryService: GalleryService
  ) {}

  loadgallery$ = createEffect(() =>
    this.actions$.pipe(
      ofType('[Gallery API] Invoke API'),
      mergeMap(() =>
        this.galleryService
          .loadGallery()
          .pipe(map((data) => ({ type: '[Gallery API] Gallery API Success', allGallery: data })))
      )
    )
  );
}
- (Line: 9)Injecting type Actions loads from the '@ngrx/effects'.
- (Line: 13) The 'createEffect' method loads from the '@ngrx/effects' help to create an ngrx effect.
- (Line: 15) Checking the action name if it matches then the next line of code executes.
- (Line: 17&18) Invoking our Gallery API.
- (Line: 19) On receiving a response invoking the action with the name '[Gallery API] Gallery API Success' and passing it data to it.
src/app/app.module.ts:
import { EffectsModule } from '@ngrx/effects';
import { GalleryEffect } from './gallery/gallery.effect';
// code hidden for display purpose
@NgModule({
  imports: [
    EffectsModule.forRoot([GalleryEffect])
  ]
})
export class AppModule { }
Since our API is calling in effects, now we need to update our component like as belowsrc/app/gallery/gallery.component.ts:
import { Component, OnInit } from '@angular/core';
import { Store, select } from '@ngrx/store';
import { GalleryService } from './gallery.service';
import { retrievedGalleryList, invokeGalleryAPI } from '../store/gallery.action';
import {
  uniqueAlbumIds,
  albumCollectionByAlbumId,
} from '../store/gallery.selector';
import { GalleryModel } from './gallery.model';

@Component({
  templateUrl: './gallery.component.html',
  selector: 'gallery',
})
export class GalleryComponent implements OnInit {
  selectedAlbumId = -1;
  albumIds$ = this.store.pipe(select(uniqueAlbumIds));
  allGallery$ = this.store.pipe(
    select(albumCollectionByAlbumId(this.selectedAlbumId))
  );
  constructor(
    private store: Store<{ gallery: GalleryModel[] }>,
    private galleryService: GalleryService
  ) {}

  ngOnInit(): void {
    this.store.dispatch(invokeGalleryAPI());
    // this.galleryService.loadGallery().subscribe((gallery) => {
    //   console.log(gallery);
    //   this.store.dispatch(
    //     retrievedGalleryList({ allGallery: gallery as GalleryModel[] })
    //   );
    // });
  }
  albumChange(event:number) {
    this.allGallery$ = this.store.pipe(select(albumCollectionByAlbumId(event)));
  }
}
- (Line: 27) Here invoking our new action method 'invokeGalleryAPI'. This action method will execute our logic in the effects class.
- (Line: 28-33)Commented our old API invocation logic from the component.
Video Session:
Support Me!
Buy Me A Coffee
PayPal Me
Wrapping Up:
Hopefully, I think this article delivered some useful information on Ngrx(Version 12). I love to have your feedback, suggestions, and better techniques in the comment section below.
I tried this code. I found there is an issue in passing the data from the Effects module to the "[Gallery API] Gallery API Success" action. This "[Gallery API] Gallery API Success" has no props. Is it to possible to transfer data without props?
ReplyDeleteHi it has props i defined at the begining of the blog once check agian.
DeleteTo pass data to action must use props.
Hi Naveen, How to implement same for multiple lazy loaded modules ? suppose in my app i have more than 3 modules (gallery, users, account, department). Please help or guige me.
ReplyDelete