
GraphQL:
GraphQL is an open-source data query and manipulation and language for APIs. It is a query language for your API and a server-side runtime for executing queries by using a type system you define for your data. GraphQL can be integrated into any framework like .Net, Java, NestJS, etc and it isn't tied to any specific database or storage engine and instead backed by your existing code and data.
GraphQL 2 main operations:
- Query(fetching data)
- Mutation(saving or updating data)
An Overview On GraphQL SDL(Schema Definition Language):
In GraphQL queries or mutations made up of Schema Definition Language. This SDL syntax looks similar to a javascript object. But as a c# developer no need to learn this SDL, Hot Chocolate library makes our learning path very easy in this case. So this section is to get the basic idea of the SDL.
GraphQL schema objects are created by using the 'type' keyword. So comparing with object-oriented programing 'type' keyword equals the 'class' keyword. GraphQL schema object posses scalar types like 'Int', 'String' etc.
type Person{
Id: Int,
Name: String
}
- The 'Person' is GraphQL SDL object type. It contains properties is like 'Id' of type 'Int' and 'Name' of type 'String'.
type Query{
 person:Person
}
- The 'Query' type is an entry to fetch the data. It contains all resolvers(methods to fetch data)
- Here we defined 'person: Person' means on requesting a 'person' query, we get the response of a single object type of 'Person'.
type Mutation{
 create(person:PersonInput):Person
}
- The 'Mutation' type is an entry to save or update the data. It contains all resolvers(methods to save or update the data).
- The 'create' is the resolver that saves the data to the database.
type Schema{
 query: Query,
 mutation: Mutation
}
- Schema is the root type in GraphQL where 'Query' and 'Mutation' registered.
Hot Chocolate GraphQL:
Hot Chocolate is an open-source GraphQL server that is compliant with the newest GraphQL latest specs. It is the wrapper library of the original .Net GraphQL library. Hot Chocolate takes the complexity away from building a fully-fledged GraphQL server.
Hot Chocolate provides 3 different techniques:
Schema Fist: This approach fully involve writing GraphQL SDL.- Schema First
- Code First
- Pure Code First
Code First: No schema writing, but every plain c# class should have mapping GraphQL c# class.
Click the below links to know more about the code first implementation.
Pure Code First: No schema writing, no GraphQL c# classes, only plain c# classes are enough. This approach is very simple, schema generation is taken care of by the GraphQL server behind the scenes.
Create A .Net5 Web API Application:
Now to begin our sample, we have to create .Net5 Web API application, then we will configure the GraphQL server. For development any IDE can be used, the most recommended are Visual Studio 2019(Version 16.8.* that supports .Net5) and Visual Studio Code.
Install Hot Chocolate GraphQL Library:
Package Manager Command:
Install-Package HotChocolate.AspNetCore -Version 11.0.9
.Net CLI Command:
dotnet add package HotChocolate.AspNetCore --version 11.0.9
Register GraphQL Server And Endpoint:
In 'Startup.cs' we have to register the GraphQL server.
Startup.cs:(ConfigureService Method)
services.AddGraphQLServer();In 'Startup.cs' we have to register the GraphQL endpoint. By default GraphQL endpoint provides a default path like '/graphQL'. The path of the GraphQL endpoint can be overridden if needed.
Startup.cs:(Configure Method)
app.UseEndpoints(endpoints =>
{
	endpoints.MapGraphQL();
	endpoints.MapControllers();
});
Configure EntityFrameworkCore Database Context:
Let's integrate entity framework database context into our sample application to deal with data from the database.
let's install an entity framework NuGet package
Package Manager Command:
Install-Package Microsoft.EntityFrameworkCore -Version 5.0.4
.Net CLI Command:
dotnet add package Microsoft.EntityFrameworkCore --version 5.0.4
Now install entity framework core SQL server extension Nuget.
Package Manager Command:
Install-Package Microsoft.EntityFrameworkCore.SqlServer -Version 5.0.4
.Net CLI Command:
dotnet add package Microsoft.EntityFrameworkCore.SqlServer --version 5.0.4
I have table 'Gadgets' in my local SQL server. So here I'm going to use code first with the existing database.So let's create a folder like 'Data/Entities' where we can create all the POCO classes for SQL server tables. Now create a class like 'Gadgets.cs' in the 'Data/Entities' folder.
Data/Entities/Gadget.cs:
namespace GQL.PureCodeFirst.Data.Entities
{
    public class Gadgets
    {
        public int Id { get; set; }
        public string ProductName { get; set; }
        public string Brand { get; set; }
        public decimal Cost { get; set; }
        public string Type { get; set; }
    }
}
Create a class to define the database context inside the 'Data' folder.Data/MyWorldDbContext.cs:
using GQL.PureCodeFirst.Data.Entities;
using Microsoft.EntityFrameworkCore;

namespace GQL.PureCodeFirst
{
    public class MyWorldDbContext : DbContext
    {
        public MyWorldDbContext(DbContextOptions<MyWorldDbContext> options) : base(options)
        {

        }
        public DbSet<Gadgets> Gadgets { get; set; }
    }
}
Add connection string inside the app settings file.appsettings.Development.json:
"ConnectionStrings":{
  "MyWorldDbConnection":"Your_database_Connection_String"
}
Register database context(MyWorldDbContext.cs) in startup fileStartup.cs:
services.AddDbContext<MyWorldDbContext>(options =>
{
	options.UseSqlServer(Configuration.GetConnectionString("MyWorldDbConnection"));
});
Create A GraphQL Query Resolver:
Now let's create a Query class like 'QueryResolver.cs'. This file will have all resolvers or methods to fetch data.
Resolvers/QueryResolver.cs:
using System.Linq;
using GQL.PureCodeFirst.Data.Entities;
using HotChocolate;


namespace GQL.PureCodeFirst.Resolvers
{
    public class QueryResolver
    {

        public Gadgets FirstGadget([Service] MyWorldDbContext context)
        {
            return context.Gadgets.FirstOrDefault();
        }
    }
}
- The 'QueryResolver' class represents GraphQL 'Query' type.
- The 'FirstGadget' is our resolver or method that returns an object of type 'Gadgets'.
- The 'HotChocolate.Service' attributes help to inject any kind of service. Here we injecting our 'MyWorldDbContext'.
Now we need to register our 'QueryResolver' in 'Startup.cs' with GraphQL server using the 'AddQueryType' extension method.
Startup.cs:
services.AddGraphQLServer()
.AddQueryType<QueryResolver>();
So on runtime GraphQL server will generate Query SDL like:
type Query{
  firstGadget: Gadgets
}

type Gadgets{
   id,
   productName,
   brand,
   cost,
   type
}
- In c# our resolver method name is like 'FirstGadget', GraphQL on schema generation resolver method names follow pascal case, so it generates like 'firstGadget'. The client should use pascal case names while invoking the endpoint.
- The c# 'Gadgets' will be generated as 'Gadgets' but its fields will be generated as in pascal case notation.
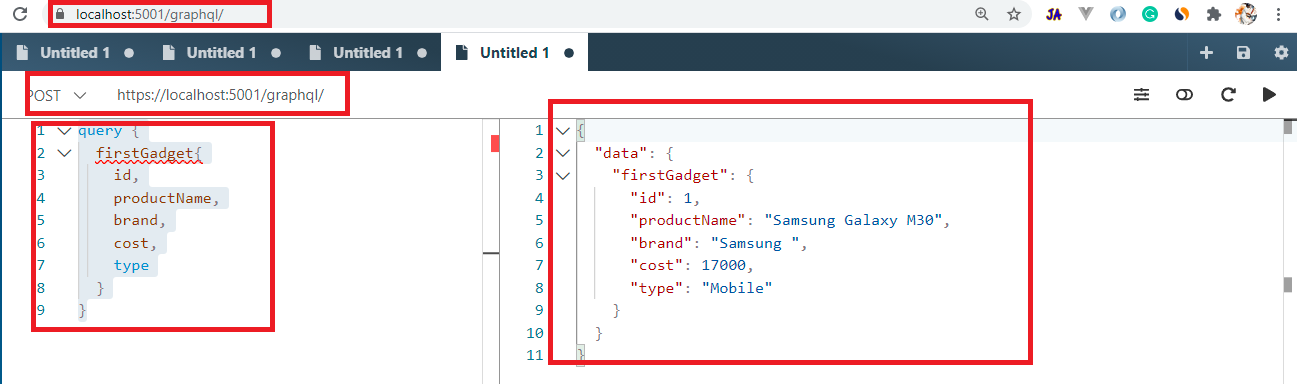
query {
  firstGadget{
    id,
    productName,
    brand,
    cost,
    type
  }
}
- Here 'query' keyword represents the type of the operation.
- The 'firstGadget' is the name of the resolver name but should be in pascal casing.
- The beauty of GraphQL is we can request only the required properties. In response, will contains only those props
Create Query Method To Fetch Multiple Records:
Now let's add a new resolver method that will return a collection of records.
Resolvers/QueryResolver.cs:
public List<Gadgets> FetchAllGadgets([Service] MyWorldDbContext context)
{
	return context.Gadgets.ToList();
}
On runtime, GraphQL generates SDL like:
Now let's test this resolver with few props in the request to understand how Graphql will make the response body very light with only the requested propstype Query{
firstGadget: Gadgets
fetchAllGadgets:[Gadgets]
}

Aliases:
By default, GraphQL uses the resolver name from the query request to return the response with the property of the same name. If we carefully observe the previous response object you can find property names like 'fetchAllGadgets', 'firstGadget'. So to override the property name in the response object we can use the 'Aliases' concept in the Graphql.
Let's frame GraphQL query with aliases.
query {
  Gadgets:fetchAllGadgets{
    id,
    productName
  }
}
Here 'Gadgets' will be the alias name for the original 'fetchALLGadgets'.
Query Arguments To Filter Data:
Create a new resolver to return the filtered data.
Resolvers/QueryResolver.cs:
public List<Gadgets> FilterByBrand([Service]MyWorldDbContext context, string brand)
{
	if (string.IsNullOrEmpty(brand))
	{
		return new List<Gadgets>();
	}
	return context.Gadgets.Where(_ => _.Brand.ToLower() == brand.ToLower()).ToList();
}
On runtime Query schema generated like:type Query{
firstGadget: Gadgets,
fetchAllGadgets:[Gadgets],
filterByBrand(brand:String):[Gadgets]
}
Now let's frame the query to consume the resolver with an input filter.Query:
query($brandQuery:String){
  filterByBrand(brand:$brandQuery){
    id,
    productName
  }
}
- Here '$brandQuery' means GraphQL variable type. GraphQL variable type always starts with '$'.
- The 'String' represents the type of value holds by the '$brandQuery'.
- The 'brand' name should match with the input parameter name of the resolver method.
{
  "brandQuery":"One Plus"
}
- The GraphQL variables are used to pass the data dynamically to the GrphQL query. Here property name should be matched with variable type in query excluding the '$'.

Comparison Query And Fragment Query:
Fetching the data for comparison is very simple in GrapQL
Let's frame query to fetch comparison data without using 'Fragments'
Query:
query($brandQuery:String,$brandQuery2:String){
 Gadget1: filterByBrand(brand:$brandQuery){
    id,
    productName
  }
 Gadget2: filterByBrand(brand:$brandQuery2){
    id,
    productName
  }
}
- Here we invoking resolver 2 times from the single 'Query'. So the server will respond with two results sets in the JSON.
{
  "brandQuery":"One Plus",
  "brandQuery2":"Samsung"
}
Now test our comparison query.
So to resolve these duplicate fields, GraphQL provided an option called fragments, a set of the similar fields will be grouped to set.
Let's frame the client comparison query using fragments.
Query:
query($brandQuery:String,$brandQuery2:String){
 Gadget1: filterByBrand(brand:$brandQuery){
    ...props
  }
 Gadget2: filterByBrand(brand:$brandQuery2){
    ...props
  }
}

fragment props on Gadgets{
  id,
  productName
}
- Here keyword 'fragment defines our query fields are grouped by fragment query. Following the 'fragment' keyword we have to specify the name of our grouped properties like 'props(this name can be your choice). Next, we need to define the original type of those grouping properties like 'Gadgets'. Inside 'fragment needs to define all properties we want to group.
- Now in Query type instead of defining each property multiple times, we can define the name of the fragment like 'props', but this 'props' name should be prefixed with triple dots(...props).
{
  "brandQuery":"One Plus",
  "brandQuery2":"Samsung"
}
Create Mutation Resolvers:
In GraphQL mutations are to save or update the data. So let's create a new file like 'MutationResolver.cs' in the 'Resolvers' folder.
Resolvers/MutationResolver.cs:
using GQL.PureCodeFirst.Data.Entities;
using HotChocolate;

namespace GQL.PureCodeFirst.Resolvers
{
    public class MutationResolver
    {
        public Gadgets Save([Service]MyWorldDbContext context, Gadgets model)
        {
            if(model == null){
                return null;
            }
            context.Gadgets.Add(model);
            context.SaveChanges();
            return model;
        }
    }
}
Now we have to register our 'MutationResolver.cs' in 'startup.cs' file with GraphQL server using 'AddMutationType' extension method.Startup.cs:
services.AddGraphQLServer()
.AddQueryType<QueryResolver>()
.AddMutationType<MutationResolver>();
Now on runtime GraphQL server generate Mutation schema like:
type Mutation{
	save(model:GadgetsInput):Gadgets
}
- Here if we can observe in our MutationResolver class 'Save' method has the same object as 'Gadgets' for input payload and return type. But in schema generation, the input type generates as 'GadgetsInput'. GraphQL by default appends the 'Input' string to the name of the class(ex: GadgetsInput) to generate the payload object name.
Mutation:
mutation ($myGadgets:GadgetsInput){
  save(model: $myGadgets){
    id,
    productName,
    brand,
    cost,
    type
  }
}
Variable:
{
  "myGadgets":{
    "productName":"Samsung Galaxy F62",
    "brand":"Samsung",
    "cost":10000,
    "type":"mobile"
  }
}
Let's test mutation operation to save data.
Video Session:
Support Me!
Buy Me A Coffee
PayPal Me
Wrapping Up:
Hopefully, I think this article delivered some useful information Pure Code First technique in Hot Chocolate GraphQL. I love to have your feedback, suggestions, and better techniques in the comment section below.
I want to dynamically create the QueryType as in when user add new table/change schema.
ReplyDeleteDo you know any idea on how to do this via hotchocoloate.I am unable to find the reference.
Sry, don't know about it
DeleteHi Naveen,
ReplyDeleteYour blogs are very helpful, Thanks for it. I have one issue in my project.
Am unable to make db connection on second time hit when am using Resolver Class with GraphQL Type. On first time Resolver class constructor is invoking so am able to make connection where as next time constructor is not invoking. How can we handle this issue?
Hi
DeleteDon't inject at constructor level
Inject per resolver , check my blog i did same
Thanks for reply,
ReplyDeleteYes if I added in method level like ABC([Service] IMyRepo myRepo) its working but I dont want pass/inject that to each method in the resolver class.
Hi
Deleteyes it won't work constructor injection because AddQueryType scope is singleton , and our dbcontext default registration 'scoped'(means per request) so from 2nd request dbcontext will empty because 'YourQueryResolver' is singleton(means once object created it won't be destroyed untill application stopes)
So HotChocolate GraphQL recomend us to us inject dbcontext at method levels
but if you still want constructor level
The do like this
AddScoped().
AddQueryType ()
so here we explicitly registering our 'YourQueryResolver' class as 'Scoped' means it new object will be created for every user request
Official doc
https://chillicream.com/docs/hotchocolate/api-reference/dependency-injection
0
ReplyDeleteHow i can implement the Hot Chocolate GraphQL method versioning similar like to REST, i.e. /graphql/v1 or using request header. i don't want to use Deprecating fields because there is no any change in input or out param but i have change in method implementation(business wise).