
Ionic & Vue Sample Application Using Vuex State Management

In this article, we are going to create a sample application of Ionic & Vue our main target is to implement Vuex State Management.

Create A Sample App Of Ionic5 Using Vue :

To begin to create an Ionic application, we should have the Ionic CLI installed in our system environment.
Command to install latest Ionic CLI:
npm install -g @ionic/cli@latest
Now run the following command to create Ionic5 using the Vue application.
Command to create Ionic Vue application
ionic start your_app_name blank --type vue
Now run the following command to install Vuex into our Ionic&Vue app.
Vuex Command
npm install vuex@next --save

TypeScript Or Javascript:

By default Ionic sample created with the support of TypeScript in any library like angular, react, and vue. Typescript can be chosen to develop our application. But in the case of Vue most of the developers or preferred to choose javascript syntax instead of Typescript for application development. So to make our Ionic Vue application use javascript we need to remove few Typescript references, so follow the below steps.
  • Remove TypeScript dependencies.
command to unistall the typescript dependencies
npm uninstall --save typescript @types/jest @typescript-eslint/eslint-plugin @typescript-eslint/parser @vue/cli-plugin-typescript @vue/eslint-config-typescript
  • We need to change the file extensions from ".ts" to ".js", we mostly have 2 '.ts files' like 'main.ts' and 'router/index.ts'.
  • In the '.eslintrc.js' file needs to remove the '@vue/typescript/recommended' from the 'extends' array property and next need to remove the @typescript-eslint/no-explicit-any': 'off' property from the rules object.
  • Now remove the 'Array<RouteRecordRaw>' type in 'router/index.js'.
  • Delete the 'shims-vue.d.ts' file.
  • Remove the 'lang="ts"' attribute on script tag in our '.vue' files like 'App.vue' and 'view/Home.vue'.

Create Pages Vue Component:

Before creating our pages vue component let's restructure our project template like:
  • Delete the 'views/Home.vue' and 'views' folder.
  • Remove the 'Home.vue' route and its configuration from the 'router/index.js' file.
Now let's create a page vue component like 'Users.vue'.
pages/Users.vue:
<template>
  <div>
    <h4>My Users Page</h4>
  </div>
</template>
<script>
export default {};
</script>
Configure route to our 'Users.vue' component.
src/router/index.js:
import { createRouter, createWebHistory } from "@ionic/vue-router";
import Users from "../pages/Users.vue";

const routes = [
  {
    path: "/",
    redirect: "/users",
  },
  {
    path: "/users",
    component: Users,
  },
];

const router = createRouter({
  history: createWebHistory(process.env.BASE_URL),
  routes,
});

export default router;

Add Master Layout Vue Component:

Now we have to define a master template for our application which will be applied for all the pages. The core ionic components to define the layout vue component are like:
  • IonPage
  • IonHeader
  • IonContent
  • IonTitle
  • IonToolbar
Let's create a master layout for our sample.
src/components/MasterLayout.vue:
<template>
  <ion-page>
    <ion-header>
      <ion-toolbar>
        <ion-title>{{ pageTitle }}</ion-title>
      </ion-toolbar>
    </ion-header>
    <ion-content>
      <slot> </slot>
    </ion-content>
  </ion-page>
</template>
<script>
import {
  IonPage,
  IonHeader,
  IonContent,
  IonToolbar,
  IonTitle
} from "@ionic/vue";
export default {
  components: {
    IonPage,
    IonHeader,
    IonContent,
    IonToolbar,
    IonTitle,
  },
  props: ["pageTitle"],
  
};
</script>
<style scoped>
ion-toolbar{
    --background: var(--ion-color-primary);
    --color: var(--ion-color-primary-contrast)
}
</style>
  • Here we have defined our master template using the Ionic core components. 
  • The '<slot>' tag is the area in which our routed page content will be rendered. 
  • The page title of each page will be passed dynamically using the input properties using the 'props'.
  • Applied some styles to our 'ion-toolbar' component.
Now let's register our 'MasterLayout.vue' globally in the main.js file
src/main.js:
import MasterLayout from './components/MasterLayout.vue';
// code hidden for display purpose
app.component('master-layout',MasterLayout);  
Now update our 'Users.vue' component to use 'MasterLayout.vue'.
src/pages/Users.vue:
<template>
  <master-layout pageTitle="Users">
    <div>
      <h4>My Users Page</h4>
    </div>
  </master-layout>
</template>
<script>
export default {};
</script>

Vuex Core Building Blocks:

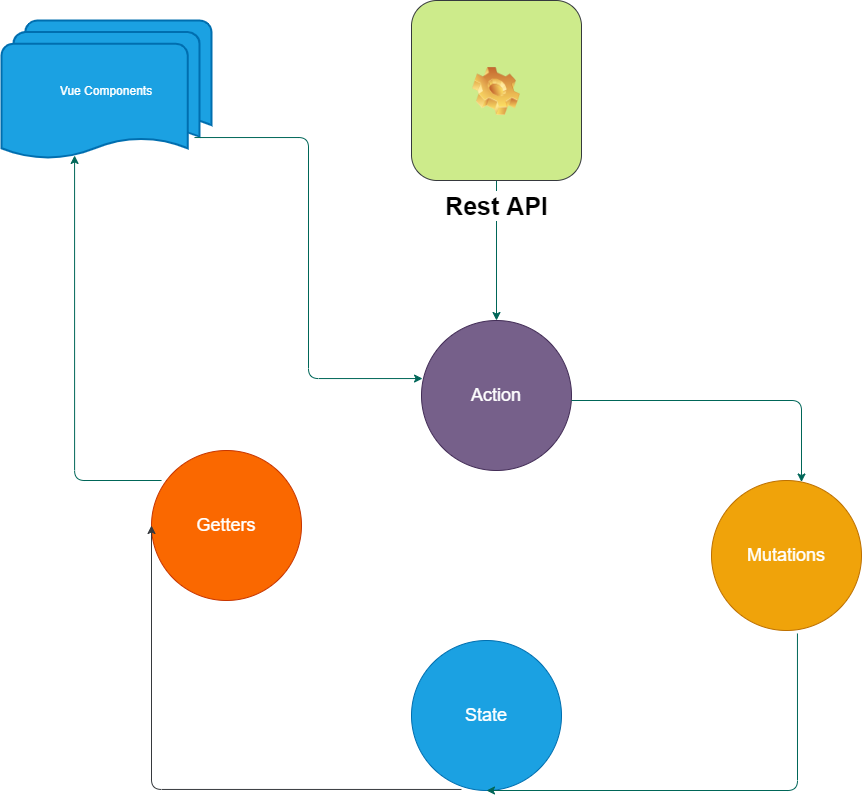
Actions: Actions are task performers which have the capabilities to do either synchronous or asynchronous operations. In Vuex actions are used to invoke the rest API's to fetch the data and then actions call mutations to change the store state. To invoke mutations actions use a command called 'commit'. This 'commit' command invokes appropriate mutation and receives the rest API data as input to save into the store state.

Mutations: Mutations are to perform mutable operations. In Vuex the only option to change the state of the store is to use mutations. So the only way to add or update the data of the Vuex store is done by mutations.

State: State is a simple javascript object literal. A Vuex store saves or holds the data in the state object.

Getters: Getters are to perform tasks to retrieve the data from the Vuex store state. Getters are helped to retrieve data and then we can bind the data to components. So using these Getters in n-number of Vue Components can share the same data from the Vuex store.

Setup Vuex Store:

Let's begin to set up the vuex store into our sample application where all data will be provided from this store to our application.
Our store folder structure looks as below
Let's create a store module for our users as below:
src/store/modules/user.js:

const state = () => ({

});

const getters = {};

const actions = {};

const mutations = {};

export default{
    namespaced: true,
    state,
    getters,
    actions,
    mutations
}
  • (Line: 1-3) The 'state' stores all data.
  • (Line: 5) The 'getters' contains all the functions are methods to fetch the data from the 'state'.
  • (Line: 7) The 'actions' are to perform async jobs like calling API.
  • (Line: 9) The 'mutations' contain a function that has the capability to modify the 'state'.
  • (Line: 12) Enabled namespace for our store while invoking 'getters' or 'actions' or 'mutations' we need specify the namespace. This namespace value is equal to the property name of the module where our store will register in upcoming steps.
Now register our 'users' store as one of the store modules.
src/store/index.js:
import userModule from './modules/users';
import {createStore} from 'vuex';

const store = createStore({
    modules:{
        users: userModule
    }
});

export default store;
  • Here we registering our store as a module to the property 'users'. Theis 'users' property name will be used as a namespace.
Now integrate our store into the vue instance pipeline in main.js file.
src/main.js:
import store from './store/index';
// code hidden for display purpose
app.use(store);

Rest API:

In our sample for displaying some users data, I will be going to consume free rest API like "https://jsonplaceholder.typicode.com/users".

Its response result looks as below:

Create Store Action That Going To Invoke Endpoint:

First, install the 'Axios' library for consuming the rest calls.
Command To Install Axios
npm install axios
Now let's create an action method that will consume the rest API.
src/store/modules/user.js: 
const actions = {
    async fetchUsers(){
       var response =  await axios.get("https://jsonplaceholder.typicode.com/users");
       console(response.data);
    }
};

Create a Store Mutation To Update Store State:

Let's create a property to hold the data in the store state.
src/store/modules/users.js:
const state = () => ({
    users:[]
});
Now create a mutation method to update the store state.
src/store/modules/users.js:
const mutations = {
    saveAllUsers(state, payload){
        state.users = payload;
    }
};
  • Here first parameter 'state' automatically passed by the framework, second parameter 'payload' data to store the data into the store.
Now update our action method to invoke the mutation method.
src/store/modules/users.js:
const actions = {
    async fetchUsers({commit}){
       var response =  await axios.get("https://jsonplaceholder.typicode.com/users");
       commit('saveAllUsers', response.data);
    }
};
  • Here 'commit' input parameter automatically passed to the action method by the vuex. The 'commit' command is used to invoke the mutation. The first input parameter is the name of the mutation method and the second method is to save the payload.

Create A Getter Method To Fetch Users:

Now let's implement a 'getter' method to fetch all users from the store state as below.
src/store/modules/users.js:
const getters = {
    allUsers(state){
        return state.users;
    }
};

Users Page Access Data From The Store:

Now on our user's page, we need to display the data by accessing it from the store.
src/pages/Users.vue:(Html Part)
<template>
  <master-layout pageTitle="Users">
    <div>
      <ion-button expand="full" @click="showUsers()">Show Users</ion-button>
      <ion-card v-for="user in allUsers" :key="user.id">
        <ion-card-content>
          <ion-card-title>{{user.name}}</ion-card-title>
        </ion-card-content>
        <ion-item>
          <ion-label>Email</ion-label>{{user.email}}
        </ion-item>
      </ion-card>
    </div>
  </master-layout>
</template>
  • (Line: 4) The button invokes the method for calling the rest API.
  • (Line: 5-12) The ion-card' component displays the user's data.
src/pages/Users.vue:(Script Part)
<script>
import {mapGetters,mapActions} from 'vuex';
import {IonButton, IonCard, IonCardContent, IonCardTitle, IonItem, IonLabel} from '@ionic/vue';
export default {
  components:{
    IonButton,
    IonCard,
    IonCardContent,
    IonCardTitle,
    IonItem,
    IonLabel
  },
  computed:{
    ...mapGetters('users',{
      allUsers:'allUsers'
    })
    
  },
  methods:{
    ...mapActions('users',{
      fetchUsers:'fetchUsers'
    }),
    async showUsers(){
      await this.fetchUsers();
    }
  }
};
</script>
  • (Line: 2) Importing the 'mapGetters' and 'mapActions' from 'Vuex'.
  • (Line: 3) Imported all required ionic components for our page display.
  • (Line: 14-16) Using the 'mapGetters' method registering the store getter method. Since getters are to fetch the data, so getters should be registered inside of the 'computed' properties which listen for the latest changes. Here the first parameter of 'mapGetters' is namespace('users' is namespace).
  • (Line: 20-22) Using the 'mapActions' method registering the store action method. Since actions are to invoke the API call, so getters can be registered inside of the 'methods' property.
  • (Line: 23-25) Triggering the action method on clicking the button.

Create Store Action And Mutation For Create User:

Now let's create action and mutation for the create user to our sample
src/store/modules/users.js:
const actions = {
    async addUser({commit}, payload){
        // since our rest api only support get
        // here we simply update the store state
        commit('addUser', payload);
    },

};

const mutations = {
   
    addUser(state,payload){
	// this line of code is fake , when we have save no nedd to write this line
        payload.id = (state.users.length + 1);
        state.users.unshift(payload);
    }
};
  • (Line: 2-6) Action method for creating a new user. Here we don't have a post endpoint so for demo purposes we just going to store data to the state.
  • (Line: 12-16) Mutation to adding our new record to 'users' state.

Create A Store Getters, Actions, And Mutations To Update User:

let's write some logic for store getters, actions, and mutations to update the records.
src/store/modules/user.js:
const getters = {
    userById(state){
        return (id) => {
            return state.users.find(u => u.id == id);
        }
    }
};

const actions = {
    async updateUser({commit}, payload){
         // since our rest api only support get
        // here we simply update the store state
        commit('updateUser', payload);
    }
};

const mutations = {
    updateUser(state, payload){
        let filteredUsers = state.users.filter(u => u.id !== payload.id);
        filteredUsers.unshift(payload);
        state.users = filteredUsers;
    }
};
  • (Line: 2-6) The getter method to fetch the filtered user. This getter will be used for updating the record.
  • (Line: 10-14)The action method needs to trigger the update API and then invoke mutation to store the latest data(For our sample we don't have API to update).
  • (Line: 18-22) The mutation method of updating our new data into the store.

Add Or Update Page Vue Component:

Now we will create a page vue component that will be used for both add or update the user based on the route that contains the user's id. If in the route users id we got '0' then we need to consider it for adding the new record else if the user id we got greater than the '0' then we need to consider it for updating the record.
src/pages/AddOrUpdateUsers.vue:(Html Part)
<template>
  <master-layout :pageTitle="pageTitle">
    <ion-card>
      <ion-card-header>
        <ion-card-title></ion-card-title>
      </ion-card-header>
      <ion-card-content v-if="userInfo">
        <ion-item>
          <ion-label position="floating">User Name</ion-label>
          <ion-input v-model="userInfo.name"></ion-input>
        </ion-item>
        <ion-item>
          <ion-label position="floating">Email</ion-label>
          <ion-input v-model="userInfo.email"></ion-input>
        </ion-item>
        <ion-button expand="full" @click="saveorupdate()">{{
          btnText
        }}</ion-button>
      </ion-card-content>
    </ion-card>
  </master-layout>
</template>
  • (Line: 2) The 'pageTitle' property of dynamic value which will display different page title on rendering.
  • Here we created a small form inside of the 'ion-card' this form will be used for both adding and editing the user records.
  • The property 'userInfo' is used for the model binding.
  • The 'saveorupdate()' callback method registered for the button.
  • (Line: 17) Displaying button text dynamically.
src/pages/AddOrUpdateUser.vue:
<script>
import { mapActions, mapGetters } from "vuex";
import {
IonCard,IonCardHeader,IonCardTitle,IonCardContent,IonItem,IonLabel,IonInput,IonButton,
} from "@ionic/vue";
export default {
  components: {
    IonCard,IonCardHeader,IonCardTitle,IonCardContent,IonItem,IonLabel,IonInput,IonButton,
  },
  data() {
    return {
      userInfo: null,
      routeId: this.$route.params.id,
      btnText: "",
      pageTitle: ""
    };
  },
  computed: {
    ...mapGetters("users", {
      userById: "userById",
    }),
  },
  mounted() {
    if (this.routeId == 0) {
      this.userInfo = {
        id: 0,
        name: "",
        emai: "",
      };
      this.btnText = "Add User";
      this.pageTitle = "Create A User";
    } else {
      this.userInfo = this.userById(this.routeId);
      this.btnText = "Update User";
      this.pageTitle = "Update A User";
    }
  },
  methods: {
    ...mapActions("users", {
      addUser: "addUser",
      updateUser: "updateUser",
    }),
    saveorupdate() {
      if (this.userInfo.id == 0) {
        this.addUser(this.userInfo);
        this.$router.push("/users");
      } else {
        this.updateUser(this.userInfo);
        this.$router.push("/users");
      }
    },
  },
};
</script>
  • (Line: 13) Fetching the user id from the route.
  • (Line: 19-21) Registered the 'userById' getter method.
  • (Line: 23-36) If the new user that is user 'id' is zero then just assign empty data to the 'userInfo' object and also assign 'pageTitle', 'btnText' values that represent adding record. If the user 'id' greater than zero means updating the record then we will assign 'userInfo' object data from the 'userById' getter method.
  • (Line: 39-42) Registering the action methods like 'addUser' and 'updateUser'.
  • (Line: 43-51)Logic to invoke 'addUser' or 'updateUser'.
Now configure the route.
src/router/index.js:
import AddOrUpdateUser from "../pages/AddOrUpdateUser";

const routes = [
  {
    path: "/add-or-update/:id",
    component: AddOrUpdateUser
  },
];

Buttons Like Add, Edit, And Delete:

Now let's add buttons in our User.vue page component.
src/pages/User.vue:(Html Part)
<template>
  <master-layout pageTitle="Users">
    <div>
      <ion-button expand="full" @click="showUsers()">Show Users</ion-button>
      <ion-card v-for="user in allUsers" :key="user.id">
        <ion-card-content>
          <ion-card-title>{{ user.name }}</ion-card-title>
        </ion-card-content>
        <ion-item> <ion-label>Email</ion-label>{{ user.email }} </ion-item>
         <ion-item> 
           <ion-buttons>
             <ion-icon @click="edit(user.id)" :icon="create" slot="end"></ion-icon>
             <ion-icon :icon="trash" slot="end"></ion-icon>
           </ion-buttons>
        </ion-item>
      </ion-card>
    </div>
    <template v-slot:footerdata>
      <ion-fab vertical="bottom" horizontal="end">
        <ion-fab-button routerLink="/add-or-update/0">
          <ion-icon :icon="add"></ion-icon>
        </ion-fab-button>
      </ion-fab>
    </template>
  </master-layout>
</template>
  • (Line: 12) Edit button on each card registered with the 'edit' callback method.
  • (Line: 18-24) Added template with slot based rendering on the MasterLayout.vue. This template contains 'ion-fab-button' that will navigate us to 'AddOrUpdateUser.vue' with the user id in the URL as '0'.
src/pages/User.vue:(Script Part)
<script>
import { mapGetters, mapActions } from "vuex";
import {
  IonButton,IonCard,IonCardContent,IonCardTitle,IonItem,IonLabel,IonFab,IonFabButton,IonIcon,IonButtons
} from "@ionic/vue";
import { add, create,trash } from "ionicons/icons";
export default {
  components: {
    IonButton,IonCard,IonCardContent,IonCardTitle,IonItem,IonLabel,IonFab,IonFabButton,IonIcon,IonButtons
  },
  computed: {
    ...mapGetters("users", {
      allUsers: "allUsers",
    }),
  },
  methods: {
    ...mapActions("users", {
      fetchUsers: "fetchUsers",
    }),
    async showUsers() {
      await this.fetchUsers();
    },
    edit(id){
      this.$router.push(`/add-or-update/${id}`);
    }
  },
  data() {
    return {
      add,
      create,
      trash
    };
  },
  
};
</script>
  • (Line: 23-25) Navigating to the update page by passing user-id dynamic value.
  • (Line: 27-33) Loading the 'ion-icons'
Now in the master layout add 'ion-footer' and inside of creating slot to render our 'ion-fab-button'.
src/components/MasterLayout.vue:
// code hidden for display purpose
<template>
  <ion-page>
    <ion-footer>
        <slot name="footerdata"></slot>
    </ion-footer>
  </ion-page>
</template>
<script>
import {
} from "@ionic/vue";
export default {
  components: {
    IonFooter
  }
</script>


Create Action And Mutation For Deleting User:

Now let's create store action and mutation for deleting the user.
src/store/modules/user.js:
const actions = {

    async deleteUser({commit}, id){
         // since our rest api only support get
        // here we simply update the store state
        commit('deleteUser', id);
    }
};

const mutations = {
    deleteUser(state, id){
        state.users = state.users.filter(u => u.id !== id);
    }
};
  • The action method needs to call API and then invoke the mutation to update the state.
  • Mutation here removing the item match for the 'id' value from the state.

Update User.vue Delete Button:

Now in our User.vue page component update delete logic.
src/pages/User.vue:
// code hidden for the display purpose
<ion-icon @click="edit(user.id)" :icon="create" slot="end"></ion-icon>
<script>

export default {
  methods: {
    ...mapActions("users", {
      fetchUsers: "fetchUsers",
      deletUserAction: "deleteUser"
    }),
    deleteUser(id){
      this.deletUserAction(id);
    }
  },

};
</script>
  • Registered 'deleteUser' store action method and used inside of the delete callback method to remove the item from the state.

Test In Android Emulator:


Few sample screenshots of our sample from the android emulator.


That's all about the Ionic&Vue sample application using the Vuex state-management.

Support Me!
Buy Me A Coffee PayPal Me 

Wrapping Up:

Hopefully, I think this article delivered some useful information about Vuex State Management with int the Ionic&Vue Application. I love to have your feedback, suggestions, and better techniques in the comment section below.

Refer:

Follow Me:

Comments

Popular posts from this blog

Angular 14 Reactive Forms Example

In this article, we will explore the Angular(14) reactive forms with an example. Reactive Forms: Angular reactive forms support model-driven techniques to handle the form's input values. The reactive forms state is immutable, any form filed change creates a new state for the form. Reactive forms are built around observable streams, where form inputs and values are provided as streams of input values, which can be accessed synchronously. Some key notations that involve in reactive forms are like: FormControl - each input element in the form is 'FormControl'. The 'FormControl' tracks the value and validation status of form fields. FormGroup - Track the value and validate the state of the group of 'FormControl'. FormBuilder - Angular service which can be used to create the 'FormGroup' or FormControl instance quickly. Form Array - That can hold infinite form control, this helps to create dynamic forms. Create An Angular(14) Application: Let'

.NET 7 Web API CRUD Using Entity Framework Core

In this article, we are going to implement a sample .NET 7 Web API CRUD using the Entity Framework Core. Web API: Web API is a framework for building HTTP services that can be accessed from any client like browser, mobile devices, and desktop apps. In simple terminology API(Application Programming Interface) means an interface module that contains programming functions that can be requested via HTTP calls either to fetch or update data for their respective clients. Some of the Key Characteristics of API: Supports HTTP verbs like 'GET', 'POST', 'PUT', 'DELETE', etc. Supports default responses like 'XML' and 'JSON'. Also can define custom responses. Supports self-hosting or individual hosting, so that all different kinds of apps can consume it. Authentication and Authorization are easy to implement. The ideal platform to build the REST full services. Install The SQL Server And SQL Management Studio: Let's install the SQL server on our l

ReactJS(v18) JWT Authentication Using HTTP Only Cookie

In this article, we will implement the ReactJS application authentication using the HTTP-only cookie. HTTP Only Cookie: In a SPA(Single Page Application) Authentication JWT token either can be stored in browser 'LocalStorage' or in 'Cookie'. Storing the JWT token inside of the cookie then the cookie should be HTTP Only. The HTTP-ONly cookie nature is that it will be only accessible by the server application. Client apps like javascript-based apps can't access the HTTP-Only cookie. So if we use the authentication with HTTP-only JWT cookie then we no need to implement the custom logic like adding authorization header or storing token data, etc at our client application. Because once the user authenticated cookie will be automatically sent to the server by the browser on every API call. Authentication API: To authenticate our client application with JWT HTTP-only cookie, I developed a NetJS(which is a node) Mock API. Check the GitHub link and read the document on G

.NET6 Web API CRUD Operation With Entity Framework Core

In this article, we are going to do a small demo on AspNetCore 6 Web API CRUD operations. What Is Web API: Web API is a framework for building HTTP services that can be accessed from any client like browser, mobile devices, desktop apps. In simple terminology API(Application Programming Interface) means an interface module that contains a programming function that can be requested via HTTP calls to save or fetch the data for their respective clients. Some of the key characteristics of API: Supports HTTP verbs like 'GET', 'POST', 'PUT', 'DELETE', etc. Supports default responses like 'XML' and 'JSON'. Also can define custom responses. Supports self-hosting or individual hosting, so that all different kinds of apps can consume it. Authentication and Authorization are easy to implement. The ideal platform to build REST full services. Create A .NET6 Web API Application: Let's create a .Net6 Web API sample application to accomplish our

Angular 14 State Management CRUD Example With NgRx(14)

In this article, we are going to implement the Angular(14) state management CRUD example with NgRx(14) NgRx Store For State Management: In an angular application to share consistent data between multiple components, we use NgRx state management. Using NgRx state helps to avoid unwanted API calls, easy to maintain consistent data, etc. The main building blocks for the NgRx store are: Actions - NgRx actions represents event to trigger the reducers to save the data into the stores. Reducer - Reducer's pure function, which is used to create a new state on data change. Store - The store is the model or entity that holds the data. Selector - Selector to fetch the slices of data from the store to angular components. Effects - Effects deals with external network calls like API. The effect gets executed based the action performed Ngrx State Management flow: The angular component needs data for binding.  So angular component calls an action that is responsible for invoking the API call.  Aft

Angular 14 Crud Example

In this article, we will implement CRUD operation in the Angular 14 application. Angular: Angular is a framework that can be used to build a single-page application. Angular applications are built with components that make our code simple and clean. Angular components compose of 3 files like TypeScript File(*.ts), Html File(*.html), CSS File(*.cs) Components typescript file and HTML file support 2-way binding which means data flow is bi-directional Component typescript file listens for all HTML events from the HTML file. Create Angular(14) Application: Let's create an Angular(14) application to begin our sample. Make sure to install the Angular CLI tool into our local machine because it provides easy CLI commands to play with the angular application. Command To Install Angular CLI npm install -g @angular/cli Run the below command to create the angular application. Command To Create Angular Application ng new name_of_your_app Note: While creating the app, you will see a noti

Unit Testing Asp.NetCore Web API Using xUnit[.NET6]

In this article, we are going to write test cases to an Asp.NetCore Web API(.NET6) application using the xUnit. xUnit For .NET: The xUnit for .Net is a free, open-source, community-focused unit testing tool for .NET applications. By default .Net also provides a xUnit project template to implement test cases. Unit test cases build upon the 'AAA' formula that means 'Arrange', 'Act' and 'Assert' Arrange - Declaring variables, objects, instantiating mocks, etc. Act - Calling or invoking the method that needs to be tested. Assert - The assert ensures that code behaves as expected means yielding expected output. Create An API And Unit Test Projects: Let's create a .Net6 Web API and xUnit sample applications to accomplish our demo. We can use either Visual Studio 2022 or Visual Studio Code(using .NET CLI commands) to create any.Net6 application. For this demo, I'm using the 'Visual Studio Code'(using the .NET CLI command) editor. Create a fo

Part-1 Angular JWT Authentication Using HTTP Only Cookie[Angular V13]

In this article, we are going to implement a sample angular application authentication using HTTP only cookie that contains a JWT token. HTTP Only JWT Cookie: In a SPA(Single Page Application) Authentication JWT token either can be stored in browser 'LocalStorage' or in 'Cookie'. Storing JWT token inside of the cookie then the cookie should be HTTP Only. The HTTP-Only cookie nature is that it will be only accessible by the server application. Client apps like javascript-based apps can't access the HTTP-Only cookie. So if we use authentication with HTTP only JWT cookie then we no need to implement custom logic like adding authorization header or storing token data, etc at our client application. Because once the user authenticated cookie will be automatically sent to the server by the browser on every API call. Authentication API: To implement JWT cookie authentication we need to set up an API. For that, I had created a mock authentication API(Using the NestJS Se

ReactJS(v18) Authentication With JWT AccessToken And Refresh Token

In this article, we are going to do ReactJS(v18) application authentication using the JWT Access Token and Refresh Token. JSON Web Token(JWT): JSON Web Token is a digitally signed and secured token for user validation. The JWT is constructed with 3 important parts: Header Payload Signature Create ReactJS Application: Let's create a ReactJS application to accomplish our demo. npx create-react-app name-of-your-app Configure React Bootstrap Library: Let's install the React Bootstrap library npm install react-bootstrap bootstrap Now add the bootstrap CSS reference in 'index.js'. src/index.js: import 'bootstrap/dist/css/bootstrap.min.css' Create A React Component 'Layout': Let's add a React component like 'Layout' in 'components/shared' folders(new folders). src/components/shared/Layout.js: import Navbar from "react-bootstrap/Navbar"; import { Container } from "react-bootstrap"; import Nav from "react-boot

A Small Guide On NestJS Queues

NestJS Application Queues helps to deal with application scaling and performance challenges. When To Use Queues?: API request that mostly involves in time taking operations like CPU bound operation, doing them synchronously which will result in thread blocking. So to avoid these issues, it is an appropriate way to make the CPU-bound operation separate background job.  In nestjs one of the best solutions for these kinds of tasks is to implement the Queues. For queueing mechanism in the nestjs application most recommended library is '@nestjs/bull'(Bull is nodejs queue library). The 'Bull' depends on Redis cache for data storage like a job. So in this queueing technique, we will create services like 'Producer' and 'Consumer'. The 'Producer' is used to push our jobs into the Redis stores. The consumer will read those jobs(eg: CPU Bound Operations) and process them. So by using this queues technique user requests processed very fastly because actually