
What Is JSON Web Token?:
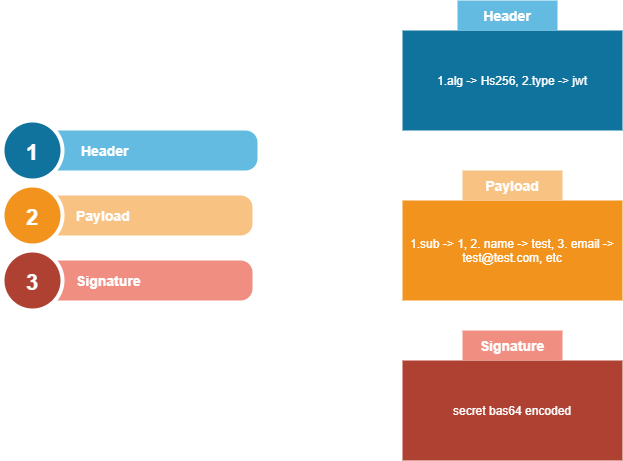
JSON Web Token is a digitally signed and secured token for user validation. The jwt is constructed with 3 informative parts:
- Header
- Payload
- Signature
Create A Sample Angular Application:
Let's begin by creating a sample application in which we are going to implement JWT authentication.
Command To Install Angular CLI:
npm install -g @angular/cli
Command To Create Angular App:
ng new your_app_nameCommand To Install Angular Material:
ng add @angular/material
Angular JWT Library:
JWT library to decrypt the user info within the JWT access token.
Command To Run Angular JWT Library:
npm install @auth0/angular-jwt
Integrate Login Module:
Let's create all login files like the below structure.

import { NgModule } from '@angular/core';
import { Routes, RouterModule } from '@angular/router';
import { LoginComponent } from './login.component';

const routes: Routes = [{
  path:'',
  component: LoginComponent
}];

@NgModule({
  imports: [RouterModule.forChild(routes)],
  exports: [RouterModule]
})
export class LoginRouteModules {}
src/app/login/login.module.ts:
import { NgModule } from "@angular/core";
import { LoginComponent } from './login.component';
import { LoginRouteModules } from './login-route.module';

@NgModule({
  declarations:[
   LoginComponent
  ],
  imports:[
   LoginRouteModules
  ]
})
export class LoginModule{}
- (Line: 7) Imported 'LoginComponent' into the declaration array.
- (Line: 10) Impored 'LoginRouteModules'.
src/app/app-routing.module.ts:
import { NgModule } from '@angular/core';
import { Routes, RouterModule } from '@angular/router';

const routes: Routes = [{
  path:'',
  loadChildren:() => import('./login/login.module').then(_ => _.LoginModule)
}];

@NgModule({
  imports: [RouterModule.forRoot(routes)],
  exports: [RouterModule]
})
export class AppRoutingModule { }
Create Login Form:
src/app/login/login.component.html:
<form class="my-form">
  <h3>Login Form</h3>
  <mat-form-field class="my-fields">
   <mat-label>User Name</mat-label>
   <input matInput [(ngModel)]="loginForm.username" name="username">
  </mat-form-field>
  <mat-form-field class="my-fields">
   <mat-label>Password</mat-label>
   <input matInput type="password"  [(ngModel)]="loginForm.password" name="password">
  </mat-form-field>
  <button mat-raised-button color="primary" (click)="userLogin()">Login</button>
</form>
- Create a login form, here we used the form model binding to capture the data. The 'Login' button registered with 'userLogin' method for form submission.
import { Component, OnInit } from '@angular/core';
@Component({
  templateUrl: 'login.component.html',
  styleUrls: ['login.component.css'],
})
export class LoginComponent implements OnInit {
  loginForm = {
    username: '',
    password: '',
  };

  ngOnInit(): void {}

  userLogin() {
      console.log(JSON.stringify(this.loginForm))
  }
}
Import the angular mater modules like below in the 'LoginModule'.src/app/login/login.module.ts:
import { NgModule } from "@angular/core";
import { LoginComponent } from './login.component';
import { LoginRouteModules } from './login-route.module';
import { MatInputModule } from '@angular/material/input';
import { MatFormFieldModule } from '@angular/material/form-field';
import {FormsModule} from '@angular/forms';
import {MatButtonModule} from '@angular/material/button';

@NgModule({
  declarations:[
   LoginComponent
  ],
  imports:[
   FormsModule,
   MatInputModule,
   MatFormFieldModule,
   MatButtonModule,
   LoginRouteModules
  ]
})
export class LoginModule{}
- Imported modules into 'LoginModule' are 'FormsModule', 'MatInputModule', 'MatFormFieldModule', 'MatButtonModule'.
Mock JWT Access Token:
As a front end developer no need to spend more time onto work on JWT authentication API (using nodejs, .net, java server programs). So let's use a sample JWT token by mocking it in a constant variable in our application, latter we will make a dynamic API call for fetching the Jwt token at the end section of this article.
A sample jwt token:
eyJhbGciOiJIUzI1NiIsInR5cCI6IkpXVCJ9.eyJ1c2VybmFtZSI6IlRlc3QiLCJzdWIiOjIsImlhdCI6MTYwNDMwOTc0OSwiZXhwIjoxNjA0MzA5ODA5fQ.jHez9kegJ7GT1AO5A2fQp6Dg9A6PBmeiDW1YPaCQoYs
Create AuthService:
Now let's create an AuthService file that contains logic about user login/logout API calls of our angular application.
Let's define AuthService with basic configurations as below.
src/app/services/auth.service.ts:
import { Injectable } from '@angular/core';
import { BehaviorSubject, Observable, of } from 'rxjs';
import { map } from 'rxjs/operators';
import { JwtHelperService } from '@auth0/angular-jwt';

@Injectable()
export class AuthService {
  userInfo = new BehaviorSubject(null);
  jwtHelper = new JwtHelperService();
  constructor(){}
}
- (Line: 8) The 'userInfo' variable to store the user info decoded from the JWT access token. It's a type defined as 'BehaviorSubject' that loads from the 'rxjs' library.
- (Line: 9) The 'jwtHelper' variable defines 'JwtHelperService' type that loads from '@auth0/angular-jwt' library.
src/app/services/auth.service.ts:
userLogin(login:any):Observable<boolean>{
  if(login &&
  login.username &&
  login.password){
   const sampleJWT = "eyJhbGciOiJIUzI1NiIsInR5cCI6IkpXVCJ9.eyJ1c2VybmFtZSI6IlRlc3QiLCJzdWIiOjIsImlhdCI6MTYwNDMwOTc0OSwiZXhwIjoxNjA0MzA5ODA5fQ.jHez9kegJ7GT1AO5A2fQp6Dg9A6PBmeiDW1YPaCQoYs";

   return of(sampleJWT).pipe(
   map((token) => {
	if(!token){
		return false;
	}
	localStorage.setItem("access_token", token);
	const decodedUser = this.jwtHelper.decodeToken(token);
	this.userInfo.next(decodedUser);
	return true;
   }));
  }
  return of(false);
}
- (Line: 1) The 'userLogin' method returns boolean of observable type.
- (Line: 5) The JWT mock token assigned to a constant variable.
- For the mock JWT token process, we used the 'of' operator to make observable type because when we change the logic to API code that needs to be rewrite will be very less.
- (Line: 12) For a single-page application common approach to store, the token is in browser local storage.
- (Line: 13) Decoding the user info from the JWT access token.
Since AuthService needs to be globally accessed by the application, we need to import it in AppModule.
src/app/app.module.ts:
import { AuthService } from './services/auth.service';
// code hidden for display purpose
@NgModule({
  providers: [AuthService]
})
export class AppModule {}
Now update the 'LoginComponent' to invoke the login logic in the AuthServcie file.src/app/login/login.component.ts:
import { Component, OnInit } from '@angular/core';
import {AuthService} from '../services/auth.service';

@Component({
  templateUrl: 'login.component.html',
  styleUrls: ['login.component.css'],
})
export class LoginComponent implements OnInit {
  loginForm = {
   username: '',
   password: '',
  };
  constructor(private authService:AuthService){}
  ngOnInit(): void {}

  userLogin() {
   this.authService.userLogin(this.loginForm)
   .subscribe(
   (value) => {
    if(value){
     alert('success');
    }else{
     alert('failed');
    }
    },
   (error)=>{
	 alert('failed error');
    }
   );
  }
}
- (Line: 13) Injected AuthService into the LoginComponent.
- Invoked AuthService login logic into our component 'userLogin' method.


Integrate User Dashboard Module:
Now in our sample application after login, we will navigate the user to his dashboard. Let's create dashboard files in the following structure.

import { Component, OnInit } from '@angular/core';
import { AuthService } from '../services/auth.service';

@Component({
  templateUrl:'dashboard.component.html'
})
export class DashboardComponent implements OnInit{
  userName:string = ''
  constructor(private authService:AuthService){}
  ngOnInit(): void {
   this.authService.userInfo.subscribe(value => {
	if(value){
	 this.userName = value.username;
	}
   })
  }
}
- (Line: 9) The 'AuthService' injected
- (Line: 11) Subscribe to 'userInfo' is a behavior subject variable in AuthService which contains jwt token decoded userInfo. Assigning the username value to the component variable to display in the header of the dashboard page.
<h3>Welcome {{userName}} !</h3>
src/app/dashboard/dashboard-routing.module.ts:
import { NgModule } from '@angular/core';
import { RouterModule, Routes } from '@angular/router';
import { DashboardComponent } from './dashboard.component';

const routes: Routes =[{
  path:'',
  component: DashboardComponent
}]

@NgModule({
  imports:[RouterModule.forChild(routes)],
  exports:[RouterModule]
})
export class DashboardRoutingModule {}
src/app/dashboard/dashboard.module.ts:
import { NgModule } from '@angular/core';
import { DashboardRoutingModule } from './dashboard-routing.module';
import { DashboardComponent } from './dashboard.component';

@NgModule({
  imports:[
   DashboardRoutingModule
  ],
  declarations:[
   DashboardComponent
  ]
})
export class DashboardModule {}
- Registered 'DashboardRoutingModule', 'DashboardComponent' in our 'DashboardModule'.
src/app/app-routing.module.ts:(Update Routes Array)
const routes: Routes = [{
  path:'',
  loadChildren:() => import('./login/login.module').then(_ => _.LoginModule)
},{
  path:'dashboard',
  loadChildren:() => import('./dashboard/dashboard.module').then(_ => _.DashboardModule)
}];
The final step to using the router we have to navigate the user to the dashboard page on successful login.src/app/login/login.component.ts:
import { Router } from '@angular/router';
constructor(private router:Router){}
- Inject 'Router' instance into the 'LoginComponent'
this.authService.userLogin(this.loginForm)
.subscribe(
  (value) => {
  if(value){
   this.router.navigate(["/dashboard"]);
  }else{
   alert('failed');
  }
  },
  (error)=>{
   alert('failed error');
  }
)
- (Line: 5) On successful login navigate the user to 'dashboard'.

Create A Route Guard:
Now we need to protect our routes using angular guards like users not logged in then show only login page and if the user logged in then we can show pages like the dashboard.
Before creating route guard, here we are going to implement 2 more steps like
- Redirect based URL to login URL in AppRouting Module, this will give more flexibility in route guards for navigating to the login page.
- Another thing is like in the AuthService file constructor we need to load the user information fetching jwt token from the browser localStorage this makes when the app closes and reopens then route guards work without any issues.
const routes: Routes = [{
  path:'',
  redirectTo:'login',
  pathMatch: 'full'
},{
  path:'login',
  loadChildren:() => import('./login/login.module').then(_ => _.LoginModule),

},{
  path:'dashboard',
  loadChildren:() => import('./dashboard/dashboard.module').then(_ => _.DashboardModule)
}];
- Here I'm redirecting my base URL to the 'login' URL. (Note: This not a mandatory step based on your application requires you may skip this redirection step)
// code hidden for disply purpose
export class AuthService {
  constructor() {
    this.loadUserInfo();
  }
  loadUserInfo() {
  let userdata = this.userInfo.getValue();
  if (!userdata) {
   const access_token = localStorage.getItem('access_token');
   if (access_token) {
	userdata = this.jwtHelper.decodeToken(access_token);
	this.userInfo.next(userdata);
   }
  }
  }
}
- Here loading the user information by fetching the 'access_token' from local storage and decrypting and assigning the user information to the 'userInfo' variable. This 'userInfo' variable will be used by the route guard to verify the user is login or not. Because if an application closes and reopens all variables will be empty if that the case route guard unable to read the user information which makes our application authentication process inconsistent. So it is a mandatory step to load the user information in the 'AuthService' constructor.
src/app/guards/auth.guard.ts:
import { Injectable } from '@angular/core';
import { CanActivate, ActivatedRouteSnapshot, RouterStateSnapshot, UrlTree, Router } from '@angular/router';
import { Observable } from 'rxjs';
import { AuthService } from '../services/auth.service';

@Injectable()
export class AuthGuard implements CanActivate{
  constructor(
   private authService:AuthService,
   private router:Router){}
  canActivate(
   route: ActivatedRouteSnapshot,
   state: RouterStateSnapshot)
   : boolean
   | UrlTree
   | Observable<boolean
   | UrlTree>
   | Promise<boolean
   | UrlTree> {
   let userData = this.authService.userInfo.getValue();
   if(userData && userData.sub){ // sub represents user id value
	if(state.url.indexOf("/login") != -1){
	 // loggin user trying to access login page
	 this.router.navigate(["/dashboard"]);
	 return false;
	}
	else{
	 return true;
	}
   }else{
	if(state.url.indexOf("/login") == -1){
	 // not logged in users only navigate to login page
	 this.router.navigate(["/login"]);
	 return false;
	}
	else{
	 return true;
	}
   }
  }
}
- (Line: 6) The guards are also providers, so to make them consume by other entities they need to be decorated with an 'Injectable' decorator.
- (Line: 9-10) Injected 'AtuhService' and 'Router' instance.
- (Line: 11) The 'canActivate' is a guard method which gets automatically executed on the invocation of guard by the application routes.
- (Line: 20) Fetching user information from the 'userInfo' variable in the AuthService.
- So now if a user is logged in then the user can access any page other than the login page and suppose if not logged in then always redirect to the login page.
src/app/app-routing.modulet.ts:(Update Route Array)
const routes: Routes = [{
  path:'',
  redirectTo:'login',
  pathMatch: 'full'
},{
  path:'login',
  loadChildren:() => import('./login/login.module').then(_ => _.LoginModule),
  canActivate: [AuthGuard]
},{
  path:'dashboard',
  loadChildren:() => import('./dashboard/dashboard.module').then(_ => _.DashboardModule),
  canActivate:[AuthGuard]
}];
Now register our AuthGuard in AppModule providers array.src/app/app.module.ts:
import { AuthGuard } from './guards/auth.guard';
// code hidden for display purpose
@NgModule({
  providers: [AuthGuard]
})
export class AppModule {}
Now you can test by access the routes with and without login to check guard protection.NestJS(Nodejs) Server JWT API:
I have created a NestJS jwt mock API, where you can clone or download my git repository After downloading the repo run the following commands.
Command To Install NestJS CLI:
npm i -g @nestjs/cli
Next, go to the root folder of the repo and run the command to install all the package
Command To Install ALL Packages In our Repository application:
npm install
That's all we have set up a JWT API in our local system for testing, now run the following command to start the application.
Command To Start NestJS APP:
npm run start:dev
Our jwt token endpoint
Url:- http://localhost:3000/auth/login
Payload:-
{
	"username":"test",
	"password":"1234"
}

note:- payload should be same as above, variable name 'username' and 'password'
don't change them, they are even case sensitive. credentials also use as above

Integrate JWT NetsJS API Endpoint:
Till now we have used a mocked JWT access token now in this section we are going to replace that with a real API endpoint(Nestjs endpoint).
Now let's register angular HttpClientModule in the AppModule.
src/app/app.module.ts:
import {HttpClientModule} from '@angular/common/http';
// code hidden for display purpose
@NgModule({
  imports: [HttpClientModule]
})
export class AppModule {}
Now load and inject the HttpClient instance into the AuthService.src/app/services/auth.service.ts:
import { HttpClient } from '@angular/common/http';
// code hidden for display purpose
@Injectable()
export class AuthService {
  constructor(private http:HttpClient) {
    this.loadUserInfo();
  }
}
The final step is to update 'userLogin' method to use the API endpoint for user login in the AuthService.src/app/services/auth.service.ts:
userLogin(login: any): Observable<boolean> {
  if (login && login.username && login.password) {
  return this.http.post("http://localhost:3000/auth/login",login).pipe(
   map((data: any) => {
    if (!data) {
	 return false;
    }
    localStorage.setItem('access_token', data.access_token);
    const decodedUser = this.jwtHelper.decodeToken(data.access_token);
    this.userInfo.next(decodedUser);
    return true;
    })
  );
  }
  return of(false);
}
Support Me!
Buy Me A Coffee
PayPal Me
Wrapping Up:
Hopefully, I think this article delivered some useful information on the JWT authentication in angular application. I love to have your feedback, suggestions, and better techniques in the comment section below.
Comments
Post a Comment