
VueJS Sample To Generate QR Code Using VueQrcode

In this article, we are going to explore the 'vue-qrcode' plugin by integrating it into our sample VueJS application.

Create A Vue Sample App:

Let's use the following command to create a VueJS application.
Command To Install Vue CLI Globally On Your System:

npm run -g @vue/cli
Command To Create Vue App:

vue create your_application_name
After creating a sample application run the following command to start the application.
Command To Run Vue App:

npm run serve

Install vue-qrcode NPM Package:

Run the following npm package commands to install QRcode packages
Command For VueQRCode:

npm install vue-qrcode
Command For QRCode(VueQRCode depends on QRCode package)

npm install qrcode
After installing npm packages references will be added to package.json

vue-qrcode Key Properties:

The 'vue-qrcode' provides a configurable vue component to render the QR Code. The following key properties:
  • errorCorrectionLevel
  • margin
  • scale
  • width
  • color
  • type
  • value
  • color

Import VueQrCode Component:

Configuring the QR Code component involves fairly simple steps as follow:
src/components/HelloWorld.vue:
<template>
  <div>
    <vue-qrcode v-bind:value="qrValue" />
  </div>
</template>

<script>
import VueQrcode from 'vue-qrcode'
export default {
  name: 'HelloWorld',
  components:{
   VueQrcode
  },
  data(){
    return{
      qrValue : "My secret value"
    }
  }
}
</script>
  • (Line: 3) '<vue-qrcode>' Qrcode template HTML. The 'value' property is the heart of the VueQrcode component where we have to pass our sensitive data that will be generated as Qr Code.
  • (Line: 8) 'VueQrcode' plugin component imported.
  • (Line: 12) registered 'VueQrcode' component.
  • (Line: 16) our custom property 'qrValue' this will be passed as input value to 'value' property of the '<vue-qrcode>' component.
Now run the application, then QR Code renders as below:

Now scan the barcode using our mobile devices, if your mobile doesn't have an inbuilt scanner there are so many free scanners can be download. The output of the scanned QR Code as below.

errorCorrectionLevel Input Parameter:

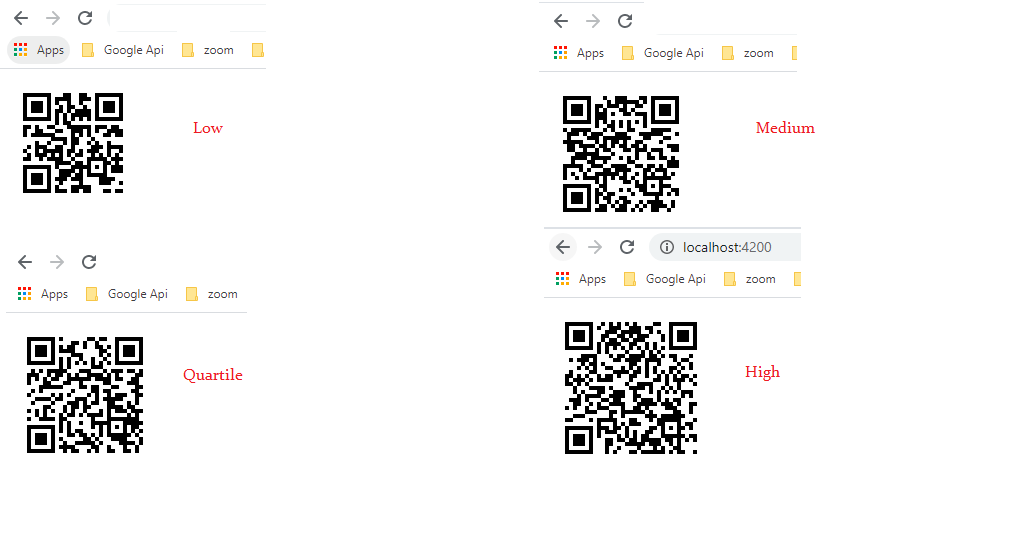
QR Codes in the physical environment is their ability to sustain "damage" and continue to function even when the part of the QR Code image is obscured, defaced, or removed. So we can determine or set the QR Code image to work with a range of parameters using the 'error correction level'.

There are 4 error correction levels used for QR codes, with each one adding different amounts of "backup" data depending on how much damage the QR code is expected to suffer in its intended environment, and hence how much error correction may be required.
  • Level L- up to 7% damage.
  • Level M - up to 15% damage.
  • Level Q - up to 25% damage.
  • Level H - up to 30% damage.
src/components/HelloWord.vue:
<template>
  <div>
    <vue-qrcode 
    v-bind:value="qrValue"
    v-bind:errorCorrectionLevel="correctionLevel" />
  </div>
</template>
<script>
export default {
  // code hidden for display purpose
  data(){
    return{
      qrValue : "My secret value",
      correctionLevel:"H"
    }
  } 
}
</script>
  • (Line: 5) 'errorCorrectionLevel' is the VueQrcode component input parameter.
  • (Line: 14) "H" represents a "High" level of error correction.

margin Input Property:

Margin to left by the QR Code on rendering. Its default margin value is '4'.
src/components/HelloWorld.vue:
<template>
  <div>
    <vue-qrcode 
    v-bind:value="qrValue"
    v-bind:errorCorrectionLevel="correctionLevel"
    v-bind:margin="qrMargin" />
  </div>
</template>

<script>
// code hidden for display purpose
import VueQrcode from 'vue-qrcode'
export default {
  data(){
    return{
      qrMargin: 100
    }
  }
}
</script>
  • (Line: 6) 'margin' input property of the VueQrcode component.

scale Input Property:

The 'scale' property to define the size of lines or scales of the QR Code. Its default value is '4'.
src/component/HelloWorld.vue:
<template>
  <div>
    <vue-qrcode 
    v-bind:value="qrValue"
    v-bind:scale="qrScale"/>
  </div>
</template>

<script>
import VueQrcode from 'vue-qrcode'
export default {
  data(){
    return{
      qrValue : "My secret value",
      qrScale: 15
    }
  } 
}
</script>

color InputProperty:

The 'color' input property of the VueQrCode component accepts an object with two props like 'dark' and 'light'. The 'dark' property is to change the color of the lines of QR Code and the 'light' property is to change the color of the background.
src/component/HelloWorld.vue:
<template>
  <div>
    <vue-qrcode 
    v-bind:value="qrValue"
    v-bind:color="qrColor"/>
  </div>
</template>

<script>
export default {
  data(){
    return{
      qrValue : "My secret value
      qrColor:{
        dark:"#8DFF33",
        light:"#00FFFF"
      }
    }
  }
}
</script>

Support Me!
Buy Me A Coffee PayPal Me

Wrapping Up:

Hopefully, I think this article delivered some useful information on creating a QR Code generator in the VueJS application. I love to have your feedback, suggestions, and better techniques in the comment section below.

Follow Me:

Comments

Post a Comment

Popular posts from this blog

Angular 14 Reactive Forms Example

In this article, we will explore the Angular(14) reactive forms with an example. Reactive Forms: Angular reactive forms support model-driven techniques to handle the form's input values. The reactive forms state is immutable, any form filed change creates a new state for the form. Reactive forms are built around observable streams, where form inputs and values are provided as streams of input values, which can be accessed synchronously. Some key notations that involve in reactive forms are like: FormControl - each input element in the form is 'FormControl'. The 'FormControl' tracks the value and validation status of form fields. FormGroup - Track the value and validate the state of the group of 'FormControl'. FormBuilder - Angular service which can be used to create the 'FormGroup' or FormControl instance quickly. Form Array - That can hold infinite form control, this helps to create dynamic forms. Create An Angular(14) Application: Let'

.NET 7 Web API CRUD Using Entity Framework Core

In this article, we are going to implement a sample .NET 7 Web API CRUD using the Entity Framework Core. Web API: Web API is a framework for building HTTP services that can be accessed from any client like browser, mobile devices, and desktop apps. In simple terminology API(Application Programming Interface) means an interface module that contains programming functions that can be requested via HTTP calls either to fetch or update data for their respective clients. Some of the Key Characteristics of API: Supports HTTP verbs like 'GET', 'POST', 'PUT', 'DELETE', etc. Supports default responses like 'XML' and 'JSON'. Also can define custom responses. Supports self-hosting or individual hosting, so that all different kinds of apps can consume it. Authentication and Authorization are easy to implement. The ideal platform to build the REST full services. Install The SQL Server And SQL Management Studio: Let's install the SQL server on our l

ReactJS(v18) JWT Authentication Using HTTP Only Cookie

In this article, we will implement the ReactJS application authentication using the HTTP-only cookie. HTTP Only Cookie: In a SPA(Single Page Application) Authentication JWT token either can be stored in browser 'LocalStorage' or in 'Cookie'. Storing the JWT token inside of the cookie then the cookie should be HTTP Only. The HTTP-ONly cookie nature is that it will be only accessible by the server application. Client apps like javascript-based apps can't access the HTTP-Only cookie. So if we use the authentication with HTTP-only JWT cookie then we no need to implement the custom logic like adding authorization header or storing token data, etc at our client application. Because once the user authenticated cookie will be automatically sent to the server by the browser on every API call. Authentication API: To authenticate our client application with JWT HTTP-only cookie, I developed a NetJS(which is a node) Mock API. Check the GitHub link and read the document on G

.NET6 Web API CRUD Operation With Entity Framework Core

In this article, we are going to do a small demo on AspNetCore 6 Web API CRUD operations. What Is Web API: Web API is a framework for building HTTP services that can be accessed from any client like browser, mobile devices, desktop apps. In simple terminology API(Application Programming Interface) means an interface module that contains a programming function that can be requested via HTTP calls to save or fetch the data for their respective clients. Some of the key characteristics of API: Supports HTTP verbs like 'GET', 'POST', 'PUT', 'DELETE', etc. Supports default responses like 'XML' and 'JSON'. Also can define custom responses. Supports self-hosting or individual hosting, so that all different kinds of apps can consume it. Authentication and Authorization are easy to implement. The ideal platform to build REST full services. Create A .NET6 Web API Application: Let's create a .Net6 Web API sample application to accomplish our

Angular 14 State Management CRUD Example With NgRx(14)

In this article, we are going to implement the Angular(14) state management CRUD example with NgRx(14) NgRx Store For State Management: In an angular application to share consistent data between multiple components, we use NgRx state management. Using NgRx state helps to avoid unwanted API calls, easy to maintain consistent data, etc. The main building blocks for the NgRx store are: Actions - NgRx actions represents event to trigger the reducers to save the data into the stores. Reducer - Reducer's pure function, which is used to create a new state on data change. Store - The store is the model or entity that holds the data. Selector - Selector to fetch the slices of data from the store to angular components. Effects - Effects deals with external network calls like API. The effect gets executed based the action performed Ngrx State Management flow: The angular component needs data for binding.  So angular component calls an action that is responsible for invoking the API call.  Aft

Angular 14 Crud Example

In this article, we will implement CRUD operation in the Angular 14 application. Angular: Angular is a framework that can be used to build a single-page application. Angular applications are built with components that make our code simple and clean. Angular components compose of 3 files like TypeScript File(*.ts), Html File(*.html), CSS File(*.cs) Components typescript file and HTML file support 2-way binding which means data flow is bi-directional Component typescript file listens for all HTML events from the HTML file. Create Angular(14) Application: Let's create an Angular(14) application to begin our sample. Make sure to install the Angular CLI tool into our local machine because it provides easy CLI commands to play with the angular application. Command To Install Angular CLI npm install -g @angular/cli Run the below command to create the angular application. Command To Create Angular Application ng new name_of_your_app Note: While creating the app, you will see a noti

Unit Testing Asp.NetCore Web API Using xUnit[.NET6]

In this article, we are going to write test cases to an Asp.NetCore Web API(.NET6) application using the xUnit. xUnit For .NET: The xUnit for .Net is a free, open-source, community-focused unit testing tool for .NET applications. By default .Net also provides a xUnit project template to implement test cases. Unit test cases build upon the 'AAA' formula that means 'Arrange', 'Act' and 'Assert' Arrange - Declaring variables, objects, instantiating mocks, etc. Act - Calling or invoking the method that needs to be tested. Assert - The assert ensures that code behaves as expected means yielding expected output. Create An API And Unit Test Projects: Let's create a .Net6 Web API and xUnit sample applications to accomplish our demo. We can use either Visual Studio 2022 or Visual Studio Code(using .NET CLI commands) to create any.Net6 application. For this demo, I'm using the 'Visual Studio Code'(using the .NET CLI command) editor. Create a fo

Part-1 Angular JWT Authentication Using HTTP Only Cookie[Angular V13]

In this article, we are going to implement a sample angular application authentication using HTTP only cookie that contains a JWT token. HTTP Only JWT Cookie: In a SPA(Single Page Application) Authentication JWT token either can be stored in browser 'LocalStorage' or in 'Cookie'. Storing JWT token inside of the cookie then the cookie should be HTTP Only. The HTTP-Only cookie nature is that it will be only accessible by the server application. Client apps like javascript-based apps can't access the HTTP-Only cookie. So if we use authentication with HTTP only JWT cookie then we no need to implement custom logic like adding authorization header or storing token data, etc at our client application. Because once the user authenticated cookie will be automatically sent to the server by the browser on every API call. Authentication API: To implement JWT cookie authentication we need to set up an API. For that, I had created a mock authentication API(Using the NestJS Se

ReactJS(v18) Authentication With JWT AccessToken And Refresh Token

In this article, we are going to do ReactJS(v18) application authentication using the JWT Access Token and Refresh Token. JSON Web Token(JWT): JSON Web Token is a digitally signed and secured token for user validation. The JWT is constructed with 3 important parts: Header Payload Signature Create ReactJS Application: Let's create a ReactJS application to accomplish our demo. npx create-react-app name-of-your-app Configure React Bootstrap Library: Let's install the React Bootstrap library npm install react-bootstrap bootstrap Now add the bootstrap CSS reference in 'index.js'. src/index.js: import 'bootstrap/dist/css/bootstrap.min.css' Create A React Component 'Layout': Let's add a React component like 'Layout' in 'components/shared' folders(new folders). src/components/shared/Layout.js: import Navbar from "react-bootstrap/Navbar"; import { Container } from "react-bootstrap"; import Nav from "react-boot

A Small Guide On NestJS Queues

NestJS Application Queues helps to deal with application scaling and performance challenges. When To Use Queues?: API request that mostly involves in time taking operations like CPU bound operation, doing them synchronously which will result in thread blocking. So to avoid these issues, it is an appropriate way to make the CPU-bound operation separate background job.  In nestjs one of the best solutions for these kinds of tasks is to implement the Queues. For queueing mechanism in the nestjs application most recommended library is '@nestjs/bull'(Bull is nodejs queue library). The 'Bull' depends on Redis cache for data storage like a job. So in this queueing technique, we will create services like 'Producer' and 'Consumer'. The 'Producer' is used to push our jobs into the Redis stores. The consumer will read those jobs(eg: CPU Bound Operations) and process them. So by using this queues technique user requests processed very fastly because actually