
Vuex is a state management pattern or state management library. Vuex makes data management easy and more maintainable in the application. Vuex main target of integration with Vue.js library.
In simple words, Vuex is a data store that supplies or provide data to Vue components with much consistently, more efficiently by making code more simple. Transferring of data between the component can be done effectively using Vuex when comparing with the traditional way(Vue.js passing data by input parameters). Vuex pattern is similar to Redux, Flux existing libraries for state management.
Vuex Core Building Blocks:
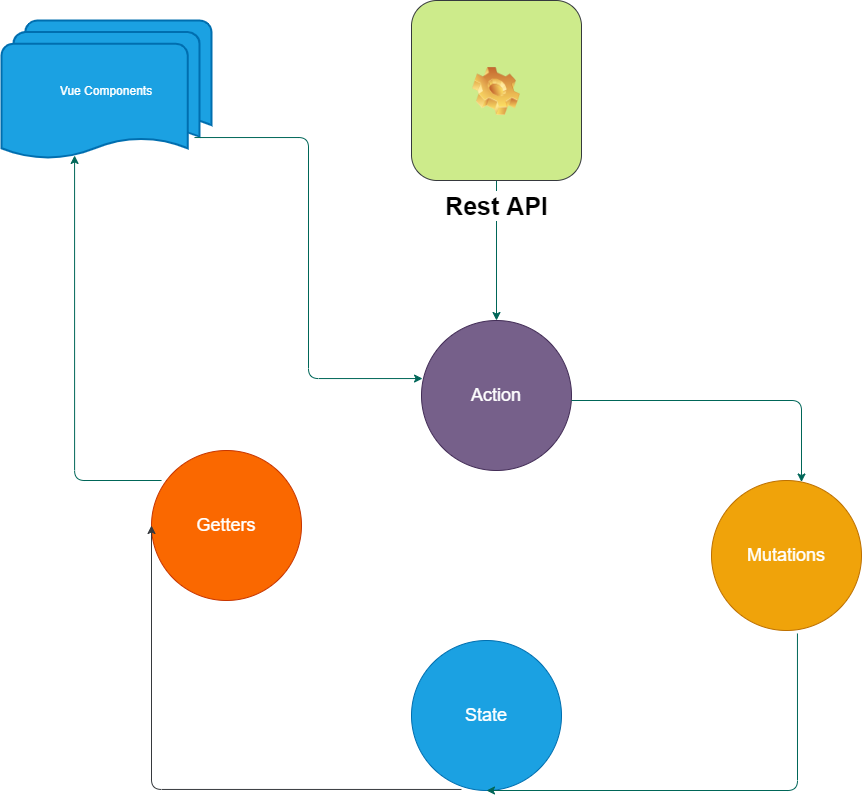
Actions: Actions are task performers which have the capabilities to do either synchronous or asynchronous operations. In Vuex actions are used to invoke the rest API's to fetch the data and then actions call mutations to change the store state. To invoke mutations actions use a command called 'commit'. This 'commit' command invokes appropriate mutation and receives the rest API data as input to save into the store state.
Mutations: Mutations are to perform mutable operations. In Vuex the only option to change the state of the store is to use mutations. So the only way to add or update the data of the Vuex store is done by mutations.
State: State is a simple javascript object literal. A Vuex store saves or holds the data in the state object.
Getters: Getters are to perform tasks to retrieve the data from the Vuex store state. Getters are helped to retrieve data and then we can bind the data to components. So using these Getters in n-number of Vue Components can share the same data from the Vuex store.
Create A Sample Vue App:
Command To Install Vue CLI Globally On Your System:

npm run -g @vue/cli
Command To Create Vue App:
vue create your_application_name
After creating sample application run the following command to start the application.
Command To Run Vue App:

npm run serve
After the application starts then output shows as below.
Test API:
Dummy Rest API Example
http://dummy.restapiexample.com/
Sample dummy rest API output shows as below(screenshot to understand JSON response structure and it's property name that we going to bind in our sample app)
Install Vuex And Axois:
Command To Install Vuex Package

npm install Vuex
Command To Install Axios Package
npm install Axios
Add A Store Folder And index.js File:


import Vue from 'vue';
import Vuex from 'vuex';

Vue.use(Vuex);

export default new Vuex.Store({
    modules:{

    }
})
- (Line:4) To load or integrate Vuex into the Vue js then Vuex is passed parameter to 'Vue.use()' method. This method is similar to the middleware configuration in other frameworks
- (Linet:6-10) Create an instance of the Vuex Store and this store should be exposed to the application by using the 'export' key. On initializing the Vuex Store expects configurations like 'state', 'mutation','getters','actions', etc. Here we can see we have configured modules property with an empty object literal. This module will be configured with our individual store module in the upcoming steps.
Register Store In main.js:
import Vue from 'vue'
import App from './App.vue'
import store from './store/index'

Vue.config.productionTip = false

new Vue({
  store,
  render: h => h(App),
}).$mount('#app')
- (Line:3) index store imported into the main.js file.
- (Line:8) our global store(src/store/index.js) configured into the entry Vue instance of the application. This configuration makes our store can be accessed into the Vue application components.
Create An Employee Store Module:
const state = {};

const getters = {};

const actions = {};

const mutations = {};

export default {
    state,
    getters,
    actions,
    mutations
}
- Here we created an employee-store module with a basic skeleton structure of the store.
- we can observe the core building block of the store like 'state', 'getters', 'actions', 'mutations', and all are initialized as object literal.
- (Line: 9-14) exposing the store configuration to make it accessible to the application.
- (Line: 1) the state is the storage area of application data. All the API data that going to be rendered or utilized by the application will be stored in the state object. So for our sample, all our employee data will be stored in this 'state' object as well.
- (Line: 3) the getters contain all the filters or methods for fetching data to Vue components in the application from the 'state' object.
- (Line: 5) the actions perform the tasks like fetching API data and stores the data into the 'state' object.
- (Line: 7) the mutations perform the tasks like manipulating of data in the store state object
Register Employee Module Store In Global Store index.js:
import Vue from 'vue';
import Vuex from 'vuex';
import employee from './modules/employee';

Vue.use(Vuex);

export default new Vuex.Store({
    modules:{
        employee
    }
})
- (Line: 9) 'employee' store module registered in the Vuex.Store instance.
Create An Employee Vue Component:
<template>
    <div></div>
</template>

<script>
export default {
    name: "Employee"
}
</script>
Now update the App.vue with our 'Employee' Vue component as follow:<template>
<div id="app" class="container">
<h1>Employees</h1>
<Employee />
</div>
</template>
<script>
import Employee from './components/Employee.vue'
export default {
name: 'App',
components: {
Employee
}
}
</script>
- App.vue component is the root component of our application. All our child component will be registered under this root component
- (Line: 14) 'Employee' component registered inside with the 'App' Vue component.
<link rel="stylesheet" href="https://stackpath.bootstrapcdn.com/bootstrap/4.5.2/css/bootstrap.min.css" integrity="sha384-JcKb8q3iqJ61gNV9KGb8thSsNjpSL0n8PARn9HuZOnIxN0hoP+VmmDGMN5t9UJ0Z" crossorigin="anonymous">Now run our Vue application and the output shows as below:

Employee Store Actions To Call API :
import axios from "axios";

const state = {};

const getters = {};

const actions = {
    async fetchEmployees(){
        const response = await axios.get("http://dummy.restapiexample.com/api/v1/employees");
        console.log(response.data);
    }
};

const mutations = {};

export default {
    state,
    getters,
    actions,
    mutations
}
- Axios library will be used for API communication with simple steps in our sample application.
- (Line: 8-11) In 'actions' we have implemented a method 'fetchEmployees' where we are going to consume the employee API data. For now, we added to console log to check the data later code will update to save the data 'state' object.
Call Store Action From Vue Component:
<template>
    <div></div>
</template>

<script>
import { mapActions } from "vuex";

export default {
    name: "Employee",
    methods:{
        ...mapActions(['fetchEmployees'])
    },
    created(){
        this.fetchEmployees();
    }
}
</script>
- (Line: 6) mapAction got imported from the Vuex Library.
- (Line: 10-12) mapAction that takes the input parameter as an array of action names and it was declared inside of the Vue component 'method' object. After initializing the mapAction method then all the action functions can be accessed using component 'this' scope.
- (Line: 13-15) 'Created' method is a life-cycle method of the Vue component which will be executed on the creation of the component. So here we will try to invoke the employee API by calling the actions related function like 'fetchEmployess'.

Action Use Commit Command To Save Response Data To State Object:
import axios from "axios";

const state = {
    employees = []
};

const getters : {};

const actions = {
    async fetchEmployees({commit}){
        const response = await axios.get("http://dummy.restapiexample.com/api/v1/employees");
        commit('setEmployees', response.data.data);
    }
};

const mutations = {
    setEmployees:(state,data) => {
        state.employees = data;
    }
};

export default {
    state,
    getters,
    actions,
    mutations
}
- (Line: 4) 'employees' property created inside the state object, this property will hold the list of employees.
- (Line: 17-19) 'setEmployees' method is used to update the state object with the employee's data.
- (Line: 12) fetchEmployees(actions method) uses the commit command to invoke the mutation. 'commit' command takes input parameters like the mutations method name(like 'setEmployees') as the first parameter and rest API data as the second parameter.
Create Getters To Fetch Data From State:
import axios from "axios";

const state = {
    employees : []
};

const getters = {
    allEmployees:(state) => state.employees
};

const actions = {
    async fetchEmployees({commit}){
        const response = await axios.get("http://dummy.restapiexample.com/api/v1/employees");
        commit('setEmployees', response.data.data);
    }
};

const mutations = {
    setEmployees:(state,data) => {
        state.employees = data;
    }
};

export default {
    state,
    getters,
    actions,
    mutations
}
- (Line: 8) 'allEmployees' getter method fetches the employee's data from the state object. Here you can observe the input parameter as a 'state' object, this input parameter will automatically be passed by Vuex internally on invoking or accessing the getters(eg: 'allEmployees' getter)
<template>
  <div class="row">
    <div class="card" style="width: 18rem;" v-for="emp in allEmployees" v-bind:key="emp.id">
      <div class="card-header">{{emp.employee_name}}</div>
      <ul class="list-group list-group-flush">
        <li class="list-group-item">Salary: {{emp.employee_salary}}</li>
        <li class="list-group-item">Age: {{emp.employee_age}}</li>
      </ul>
    </div>
  </div>
</template>

<script>
import { mapActions, mapGetters } from "vuex";

export default {
  name: "Employee",
  methods: {
    ...mapActions(["fetchEmployees"])
  },
  computed: {
    ...mapGetters(["allEmployees"])
  },
  created() {
    this.fetchEmployees();
  }
};
</script>
- (Line: 23) using mapGetters, store getter properties, or method is declared inside of the Vue component computed object. On doing this mapGetters initialization now 'allEmployees' will become as the computed property of the 'Employee.vue' Vue component.
- (Line: 3) 'allEmployees' computed property object is used for the data binding.

Update Employee Store For Adding New Employee:
// code hidden for display purpose

const actions = {
  async addEmployee({ commit }, newEmployee) {
     // Note:-
     // Dummy Rest API Example create API returning returning cross-orgin issue
     // so i'm explaining by mocking data here

    //   const response = await axios.post("http://dummy.restapiexample.com/create", newEmployee);
    //   commit('addEmployee', response.data);


      const mapNewEmployee = {
          id:0,
          employee_name: newEmployee.name,
          employee_salary: newEmployee.salary,
          employee_age: newEmployee.age,
          profile_image:""
      }
      commit('addEmployee', mapNewEmployee);
  },
};

const mutations = {
  addEmployee:(state, data) => state.employees.unshift(data)
};
- Note: Dummy Rest API Create endpoint has an issue of cross-origin. So here we implementing in static approach for understanding Vuex.
- (Line: 21) 'addEmployee' action method committing new employee data to 'addEmployee' method in mutation object using the 'commit' command.
- (Line: 26) 'addEmployee' mutation method changing the state of the 'employees' object by adding the new employee object at the top of the 'employees' object collection. 'ushift' javascript method is used to add the new employee record at the top.
Create A AddEmployee Vue Component:
<template>
  <div>
    <form>
      <div class="form-row">
        <div class="col">
          <input type="text" class="form-control" placeholder="Name" v-model="employee.name" />
        </div>
        <div class="col">
          <input type="text" class="form-control" placeholder="age" v-model="employee.age" />
        </div>
        <div class="col">
          <input type="text" class="form-control" placeholder="salary" v-model="employee.salary" />
        </div>
        <div class="col">
          <button type="button" class="btn btn-success" @click="save()">Save</button>
        </div>
      </div>
    </form>
  </div>
</template>

<script>
import { mapActions } from "vuex";

export default {
  name: "AddEmployee",
  data: function() {
    return {
      employee: {
        id: 0,
        name: "",
        age: "",
        salary: ""
      }
    };
  },
  methods: {
    ...mapActions(["addEmployee"]),
    save: function() {
      this.addEmployee(this.employee);
      this.resetEmployee();
    },
    resetEmployee: function() {
        this.employee = {
            id:0,
            name: "",
            age: "",
            salary: ""
        };
    }
  }
};
</script>
- (Line: 27-36) 'data' property of the Vue component contains all the model properties for the data binding.
- (Line: 38) fetches the store action method
- (Line: 39-42)The 'save' method gets invoked on clicking the save button on the form.
- (Line: 43-50) 'resetEmployee' method to reset form with empty fields after saving the item.
<template>
  <div>
    <AddEmployee />
    <br/>
    <div class="row">

    </div>
  </div>
</template>

<script>
import AddEmployee  from "./AddEmployee.vue";

export default {
  // code hidden for display purpose
  name: "Employee",
  components: {
    AddEmployee
  },
};
</script>
- (Line: 18) 'AddEmployee' registered inside of the 'Employee.vue' component
- (Line: 3) added 'AddEmployee' component HTML tag.

Update Existing Employees Using Store:
const state = {
  employees: [],
  employeeToUpdate: null,
  operation:"Add"
};
- In the sample, we are developing we have 2 Vue components like 'Employee' and 'AddEmployee'. The 'Employee' component has a list of employees and the 'AddEmployee' has form fields either to create or update the employee. So on clicking the edit button on the list of an employee on the 'Employee' Vue component needs to pass the data of the employee to be edited to the 'AddEmployee' Vue component. So sharing data between components will be done with the store we are developing here.
- (Line: 3) 'employeeToUpdate' property of the store state to hold the employee information that will be used to share the data between from 'Employee' component to the 'AddEmployee' component.
- (Line: 4) 'operation' property of the store state to hold the information of operation like 'Add' or 'Update' using this information 'save' button on the 'AddEmployee' component will execute its tasks conditionally.
const mutations = {
  setEmployeeToUpdate: (state,data) => {
    state.employeeToUpdate = data.employeeToUpdate;
    state.operation = data.operationName;
    return state;
  },
};
- 'setEmployeeToUpdate' is a method of store mutations, in this method we are updating the store state object properties like 'employeeToUpdate' and 'operation'.
- Mostly methods of mutation take 2 input parameters, a 1st parameter is a state object this parameter is automatically passed by Vuex on invoking the mutations method using the 'commit' command. 2nd parameter like our application input param like data that need to updated in-store, if we have multiple data points to be passed to the mutation function then all those properties will be passed single javascript object literal parameter.
const actions = {
  setEmployeeToUpdate({ commit },data) {
    commit("setEmployeeToUpdate",data);
  },
};
- 'setEmployeeToUpdate' in-store actions method, for action method Vuex by default passes an object literal as 1st input parameter to the method in action method if needed and inside of the object literal 'commit' command is defined.
- The 'commit' command is used to invoke the 'mutation' methods. The 'commit' command takes 2 types of input parameters like 1st parameter is the name of the function of the mutations to be invoked and 2nd parameter is the data that needs to save into the store state.
const getters = {
  findEmployeeById: (state) =>(id) => {
    var employee = state.employees.filter((e) => {
      if (e.id === id) {
        return e;
      }
    });
    return employee[0];
  }
};
'findEmployeeById' is the property of the getters of the store. Here fetching the employee by id and this employee object will be stored in the state of object property like 'employeeToUpdate'. getters are purely properties but to pass a parameter to the getters its return type needs to function like above code.<script>
import { mapActions, mapGetters } from "vuex";
export default {
methods: {
...mapActions(["setEmployeeToUpdate"]),
edit:function(id){
var employee = this.findEmployeeaById(id);
this.setEmployeeToUpdate({employeeToUpdate : employee,operationName:"Update"});
}
},
computed: {
...mapGetters(["findEmployeeById"])
},
};
</script>
- (Line: 5) Using 'mapActions' loaded 'setEmployeeToUpdate' store action in to the Vue components methods.
- (Line: 12) Using 'mapGettes' loaded 'findEmployeeById' store getter into Vue components computed properties. Getters always assigned to computed properties because they maintain the latest changes or track the latest changes.
- (Line: 6-9) The 'edit' method gets invoked on the edit button on the employee box with employee id as an input parameter. Uses 'findEmployeeById' action getter to fetch data. Then fetched data is passed to 'setEmployeeToUpdate' action along with additional info like operational(eg: add or update)
<button type="button" class="btn btn-success" @click="edit(emp.id)">Edit</button>Employee edit button with 'edit' click event with employee id as an input parameter.
const getters = {
  getOperation: (state) => state.operation,
  getEmployeeToUpdate:(state) => state.employeeToUpdate
};
- 'getOperation', 'getEmployeeToUpdate' are store getters. These values are set in the 'Employee' Vue component and these getters will be used in the AddEmployee Vue component.
- 'getOperation' getter fetches the value of operation property its value more likely either add or update that defines employee creation or update functionality. 'getEmployeeToUpdate' getter fetches the employee data that need to be updated.
<script>
import {  mapGetters } from "vuex";

export default {
  name: "AddEmployee",
  data: function() {
    return {
      employee: {
        id: 0,
        name: "",
        age: "",
        salary: ""
      }
    };
  },
  computed: {
    ...mapGetters(["getOperation", "getEmployeeToUpdate"])
  },
  watch: {
    getEmployeeToUpdate: function() {
      if (this.getOperation && this.getOperation.toLowerCase() === "update") {
        this.employeeToUpdate();
      } else {
        this.resetEmployee();
      }
    }
  },
  methods: {
    employeeToUpdate: function() {
      if (this.getEmployeeToUpdate) {
        this.employee.name = this.getEmployeeToUpdate.employee_name;
        this.employee.age = this.getEmployeeToUpdate.employee_age;
        this.employee.salary = this.getEmployeeToUpdate.employee_salary;
        this.employee.id = this.getEmployeeToUpdate.id;
      }
    },
    resetEmployee: function() {
      this.employee = {
        id: 0,
        name: "",
        age: "",
        salary: ""
      };
    }
  }
};
</script>
- (Line: 17) 'mapGetters' load the 'getOperation', 'getEmployeeToUpdate' into component computed properties. On assigning getters in computed props they will become the computed property of the Vue component.
- (Line: 19) Vue component Watch object is to observe the changes of the data in computed properties
- (Line: 20-26) 'getEmployeeToUpdate' property changes are watched to update the employee data in the form. 'getOperation' returns 'Update' value then form act as updating form or on returning 'Add' form act as employee creator.
const actions = {
  async updateEmployee({commit}, data){
    // Note:-
    // Dummy Rest API Example create API returning returning cross-orgin issue
    // so i'm explaining by mocking data here

    // const response = await axios.put(`http://dummy.restapiexample.com/update/${data.id}`, data);
    //   commit('addEmployee', response.data);
    const updateEmp = {
      id: data.id,
      employee_name: data.name,
      employee_salary: data.salary,
      employee_age: data.age,
      profile_image: "",
    };
    commit('updatedEmployee',updateEmp)
  }
};
The 'Update' action method is used to update the rest API to save the updated employee on the server. But our dummy rest API returning a cross-origin issue so we are implementing a static way to understand the Vuex. Finally calling mutation function 'updatedEmployee' using the 'commit' command along with bypassing the updated employee data.const mutations = {
updatedEmployee:(state,data) => {
var employees = state.employees.filter((e) => {
if (e.id !== data.id) {
return e;
}
});
employees.unshift(data);
state.employees = employees;
return state;
}
};
Here removing the old object and assigning the newly updated object at the top of the list of store state objects.export default {
methods: {
...mapActions(["addEmployee","updateEmployee","setEmployeeToUpdate"]),
save: function() {
if (this.getOperation.toLowerCase() === "add") {
this.addEmployee(this.employee);
}else{
this.updateEmployee(this.employee);
}
this.setEmployeeToUpdate({ employeeToUpdate: null, operationName: "Add" });
this.resetEmployee();
},
}
}
- The 'save' method is update to do 2 different tasks like creating employee or updating employee based on the 'getOperation' value.
- (Line: 11) After successful create or update the value of 'operationName' reset back to 'Add'.
import axios from "axios";

const state = {
  employees: [],
  employeeToUpdate: null,
  operation:"Add"
};

const getters = {
  allEmployees: (state) => state.employees,
  findEmployeeById: (state) =>(id) => {
    var employee = state.employees.filter((e) => {
      if (e.id === id) {
        return e;
      }
    });
    return employee[0];
  },
  getOperation: (state) => state.operation,
  getEmployeeToUpdate:(state) => state.employeeToUpdate
};

const actions = {
  async fetchEmployees({ commit }) {
    const response = await axios.get(
      "http://dummy.restapiexample.com/api/v1/employees"
    );
    commit("setEmployees", response.data.data);
  },
  async addEmployee({ commit }, newEmployee) {
    // Note:-
    // Dummy Rest API Example create API returning returning cross-orgin issue
    // so i'm explaining by mocking data here

    //   const response = await axios.post("http://dummy.restapiexample.com/create", newEmployee);
    //   commit('addEmployee', response.data);

    const mapNewEmployee = {
      id: 0,
      employee_name: newEmployee.name,
      employee_salary: newEmployee.salary,
      employee_age: newEmployee.age,
      profile_image: "",
    };
    commit("addEmployee", mapNewEmployee);
  },
  setEmployeeToUpdate({ commit },data) {
    commit("setEmployeeToUpdate",data);
  },
  async updateEmployee({commit}, data){
    // Note:-
    // Dummy Rest API Example create API returning returning cross-orgin issue
    // so i'm explaining by mocking data here

    // const response = await axios.put(`http://dummy.restapiexample.com/update/${data.id}`, data);
    //   commit('addEmployee', response.data);
    const updateEmp = {
      id: data.id,
      employee_name: data.name,
      employee_salary: data.salary,
      employee_age: data.age,
      profile_image: "",
    };
    commit('updatedEmployee',updateEmp)
  }
};

const mutations = {
  setEmployees: (state, data) => {
    state.employees = data;
  },
  addEmployee: (state, data) => state.employees.unshift(data),
  setEmployeeToUpdate: (state,data) => {
    state.employeeToUpdate = data.employeeToUpdate;
    state.operation = data.operationName;
    return state;
  },
  updatedEmployee:(state,data) => {
    var employees = state.employees.filter((e) => {
      if (e.id !== data.id) {
        return e;
      }
    });
    employees.unshift(data);
    state.employees = employees;
    return state;
  }
};

export default {
  state,
  getters,
  actions,
  mutations,
};
src/components/Employee.vue:
<template>
  <div>
    <AddEmployee />
    <br/>
    <div class="row">
      <div class="card" style="width: 18rem;" v-for="emp in allEmployees" v-bind:key="emp.id">
        <div class="card-header">{{emp.employee_name}}</div>
        <ul class="list-group list-group-flush">
          <li class="list-group-item">Salary: {{emp.employee_salary}}</li>
          <li class="list-group-item">Age: {{emp.employee_age}}</li>
        </ul>
        <div>
          <button type="button" class="btn btn-success" @click="edit(emp.id)">Edit</button>
        </div>
      </div>
    </div>
  </div>
</template>

<script>
import { mapActions, mapGetters } from "vuex";
import AddEmployee  from "./AddEmployee.vue";

export default {
  name: "Employee",
  components: {
    AddEmployee
  },
  methods: {
    ...mapActions(["fetchEmployees", "setEmployeeToUpdate"]),
    edit:function(id){
      var employee = this.findEmployeeById(id);
      this.setEmployeeToUpdate({employeeToUpdate : employee,operationName:"Update"});
    }
  },
  computed: {
    ...mapGetters(["allEmployees","findEmployeeById"])
  },
  created() {
    this.fetchEmployees();
  }
};
</script>
src/components/AddEmployee.vue:
<template>
  <div>
    <form>
      <div class="form-row">
        <div class="col">
          <input type="text" class="form-control" placeholder="Name" v-model="employee.name" />
        </div>
        <div class="col">
          <input type="text" class="form-control" placeholder="age" v-model="employee.age" />
        </div>
        <div class="col">
          <input type="text" class="form-control" placeholder="salary" v-model="employee.salary" />
        </div>
        <div class="col">
          <button type="button" class="btn btn-success" @click="save()">Save</button>
        </div>
      </div>
    </form>
  </div>
</template>

<script>
import { mapActions, mapGetters } from "vuex";

export default {
  name: "AddEmployee",
  data: function() {
    return {
      employee: {
        id: 0,
        name: "",
        age: "",
        salary: ""
      }
    };
  },
  computed: {
    ...mapGetters(["getOperation", "getEmployeeToUpdate"])
  },
  watch: {
    getEmployeeToUpdate: function() {
      if (this.getOperation && this.getOperation.toLowerCase() === "update") {
        this.employeeToUpdate();
      } else {
        this.resetEmployee();
      }
    }
  },
  methods: {
    ...mapActions(["addEmployee","updateEmployee","setEmployeeToUpdate"]),
    save: function() {
      if (this.getOperation.toLowerCase() === "add") {
        this.addEmployee(this.employee);
      }else{
        this.updateEmployee(this.employee);
      }
      this.setEmployeeToUpdate({ employeeToUpdate: null, operationName: "Add" });
      this.resetEmployee();
    },
    employeeToUpdate: function() {
      if (this.getEmployeeToUpdate) {
        this.employee.name = this.getEmployeeToUpdate.employee_name;
        this.employee.age = this.getEmployeeToUpdate.employee_age;
        this.employee.salary = this.getEmployeeToUpdate.employee_salary;
        this.employee.id = this.getEmployeeToUpdate.id;
      }
    },
    resetEmployee: function() {
      this.employee = {
        id: 0,
        name: "",
        age: "",
        salary: ""
      };
    }
  }
};
</script>
Now run the application and click on any employee item to edit then output shows below.


Delete Operation With Store:
const actions = {
  async deleteEmployee({commit}, id){
    // Note:-
    // Dummy Rest API Example delete API returning returning cross-orgin issue
    // so i'm explaining by mocking data here
    // const response = await axios.delete(`http://dummy.restapiexample.com/v1/delete/${data.id}`)
    commit('deleteEmployee', id);
  }
};

const mutations = {
  deleteEmployee:(state, id) =>{
    var employees = state.employees.filter((e) => {
      if (e.id !== id) {
        return e;
      }
    });
    state.employees = employees;
    return state;
  }
};
- (Line: 2-8) 'deleteEmploye' action method call the rest API to delete the employee. Here our Dummy Rest API returning cross-origin issue, so we are implementing the process in a static way to understand the delete operation in the store. The 'commit' command is used to call 'deleteEmployee' mutation method with id passing as the parameter.
- (Line: 12-20) 'deleteEmployee' mutation method changes the state of the store object by removing the employee matches with the input parameter id.
<template>
  <div>
    <AddEmployee />
    <br />
    <div class="row">
      <div class="card" style="width: 18rem;" v-for="emp in allEmployees" v-bind:key="emp.id">

        <div>
          <button type="button" class="btn btn-danger" @click="deleteEmp(emp.id)">Edit</button>
        </div>
      </div>
    </div>
  </div>
</template>

<script>
// some code hidden for displya purpose
import { mapActions, mapGetters } from "vuex";
import AddEmployee from "./AddEmployee.vue";

export default {
  methods: {
    ...mapActions(['deleteEmployee']),
    deleteEmp: function(id) {
      this.deleteEmployee(id);
    }
  }
};
</script>
- (Line: 9) 'delete' button added in Employee.vue component and to it clicks the event assign 'deleteEmp' method by passing id as the input parameter to it.
- (Line: 23) 'mapAction' loads store 'deleteEmployee' action method.
- (Line: 24-26) 'deleteEmp' method that's triggered on clicking the 'Delete' button.
Support Me!
Buy Me A Coffee
PayPal Me
Comments
Post a Comment