
Introduction:
Blazor Server Form validation can be achieved by using the 'System.ComponentModel.DataAnnotations'. Blazor Sever is a component-based application, and it provides some default key components for validation like 'EditForm', 'DataAnnotationsValidator', 'ValidationSummary', etc.
Overview On Validation Process:
Blazor Server opts for two kinds of validation like:
- Validation Type 1 - Field Validation, like when the user focuses out of a particular field of a form(eg like user types something and then clicks cursor out of text box), then 'DataAnnotationValidator' component report the validation error message for the particular field by sending the field data to the server for validation.
- Validation Type 2 - On Submitting the form, the form gets validated by the Model level where the 'DataAnnotationValidator' helps to show error messages report from server to the respective fields on UI.
Create Blazor Server Template Application:
Here we are going to understand validation in Blazor Server by creating basic samples. So to get started, create a Blazor Server sample application. You can use any editor to like 'Visual Studio', 'Visual Studio Code' etc. Here I' using Visual Studio Code light-weight code editor. Click here for managing .Net Core application with Visual Studio Code.
Let's create a sample razor page component as 'MyValidation.razor' and configure the route of the page as follows.
Pages/MyValidation.razor:
Pages/MyValidation.razor:
@page "/myvalidation"
EditForm Component:
- EditForm is a default Blazor component.
- EditForm component renders a form element, that cascades 'EditForm.EditContext' to the descendants.
- EditForm.EditContext that handle the rendered form and its fields component(InputText, InputSelect, InputNumber, etc default Blazor field components), EditContext cascades means to have access to its child components(InputText, InputSelect, InputNumber, etc default Blazor field components).
- Using EditFrom.EditContext we can explicitly handle like form validation, subscription to field change events and much more.
- 'Model' is a parameter in an EditForm component. 'Model' specifies the top-level model object for the form. An EditContext will be constructed for the model. If using the 'Model' parameter, do not also supply a value for EditForm.EditContext.
- 'EditForm.OnValidSubmit' is a callback that will be invoked when the form is submitted and the EditForm.EditContext determined to be valid.
- 'EditForm.OnSubmit' is a callback that will be invoked when the form is submitted. On using EditForm.Onsubmit, we are responsible for triggering any validation manually, eg., by calling EditContext.Validate.
- 'EditForm.OnInValidSubmit' is a callback that will be invoked when the form is submitted and the EditForm.EditContext.
DataAnnotationsValidator Component:
DataAnnotationsValidator is the default Blazor component. Adds Data Annotations validation support to an EditForm.EditContext.
Create The EditForm Model Object:
For data binding with EditForm need a Model object. let's create a Model for the sample like 'User.cs'
Models/User.cs:
using System.ComponentModel.DataAnnotations;

namespace BS.TestValidation.Models
{
    public class User
    {
        [Required]
        [StringLength(5, ErrorMessage = "first name is too long")]
        public string FirstName { get; set; }

        [Required]
        [EmailAddress]
        public string Email { get; set; }
    }
}
- 'System.ComponentModel.DataAnnotations' namespace provides attributes for model validation in .Net.
- [Required] validation attribute check for the property to poses some data.
- [StringLength(Property_stringlength, Property_custom_error_message)] validation attribute check for the property not exceeding the string length specified.
- [EmailAddress] validation attribute checks that the property string is in email format.
EditForm Component With Model Parameter:
Now on the razor page, we created 'MyValidation.razor', let's add the EditForm component with the Form Fields(fields declared with default Blazor field components like InputText, InputNumber, etc).
Pages/MyValidation.razor:
Pages/MyValidation.razor:
@page "/myvalidation"

<EditForm>
  <div class="form-group row">
      <label for="txtFirstName" col="col-sm-2 col-form-label">First Name</label>
      <div class="col-sm-10">
          <InputText id="txtFirstName" class="form-control"></InputText>
      </div>
  </div>
  <div class="form-group row">
      <label for="txtEmail" col="col-sm-2 col-form-label">txtEmail</label>
      <div class="col-sm-10">
          <InputText id="txtEmail" class="form-control"></InputText>
      </div>
  </div>
  <div class="form-group row">
      <button type="submit" class="btn btn-primary">Save</button>
  </div>
</EditForm>
Here we can observe we have created a form with the 'EditForm' Blazor component and form fields are declared with 'InputText' Blazor component.Now we need to pass Model to form for data binding. In Blazor for EditForm, component form Model can be passed either to EditForm - Model property or to EditForm.EditContext. Now here we are going to use the Model property of EditForm. Next, we need to bind the Model properties to the form of field components for 2-way binding.
Pages/MyValidation.razor:
@page "/myvalidation"

<EditForm Model="@_userModel" OnValidSubmit="submit">
  <div class="form-group row">
      <label for="txtFirstName" col="col-sm-2 col-form-label">First Name</label>
      <div class="col-sm-10">
          <InputText id="txtFirstName" class="form-control" @bind-Value="@_userModel.FirstName"></InputText>
      </div>
  </div>
  <div class="form-group row">
      <label for="txtEmail" col="col-sm-2 col-form-label">txtEmail</label>
      <div class="col-sm-10">
          <InputText id="txtEmail" class="form-control" @bind-Value="@_userModel.Email"></InputText>
      </div>
  </div>
  <div class="form-group row">
      <button type="submit" class="btn btn-primary">Save</button>
  </div>
</EditForm>

@code
{
    private User _userModel = new User();

    private void submit()
    {
        // logic to save form data to database
        Console.WriteLine("submit method get's invoked from OnValidSubmit callback");
    }
}
Here we can observe in @code block create an object for 'User' and that variable assigned to EditForm Model property (Model="@_userModel"). Enabled the 'OnValidSubmit' method on the edit form which will be invoked if the form valid.Now run the application and we can observe the form as follows.

But if you click on on 'Save' button we can observe no validation gets fired and also submit method get executed. we can observe 'Console.WriteLine' method gets printed as below.

Add DataAnnotationsValidator Component:
The reason behind validation failed because we need to add the 'DataAnnotationsValidator' component inside the EditForm component as below.Pages/MyValidation.razor:
<EditForm Model="@_userModel" OnValidSubmit="submit">
  <DataAnnotationsValidator></DataAnnotationsValidator>
  <!-- code hideen for display purpose -->
</EditForm>
After adding 'DataAnnotationsValidator' run the application and click on 'Save' button, we can observe form validation as follows

ValidationSummary Or ValidationMessage Components:
Now to see an error message we need to configure either ValidationSummary or ValidationMessage Blazor components.
ValidationSummary components display all error messages and it is like one-time configuration in Html
ValidationMessage components display the error message of the specific field inside the form. It needs to configure separately per field.
Let's test our sample application by adding the ValidationSummary component as below.
Pages/MyValidation.razor:
Pages/MyValidation.razor:
<EditForm Model="@_userModel" OnValidSubmit="submit">
  <DataAnnotationsValidator></DataAnnotationsValidator>
  <ValidationSummary></ValidationSummary>
  <!-- code hidden for display purpose -->
</EditForm>
Now run the application and test then the error messages summary has been displayed as below.

Pages/MyValidation.razor:
<EditForm Model="@_userModel" OnValidSubmit="submit">
  <DataAnnotationsValidator></DataAnnotationsValidator>
  <div class="form-group row">
      <label for="txtFirstName" col="col-sm-2 col-form-label">First Name</label>
      <div class="col-sm-10">
          <InputText id="txtFirstName" class="form-control" @bind-Value="@_userModel.FirstName"></InputText>
          <ValidationMessage For="@(() => _userModel.FirstName)"></ValidationMessage>
      </div>
  </div>
  <div class="form-group row">
      <label for="txtEmail" col="col-sm-2 col-form-label">Email</label>
      <div class="col-sm-10">
          <InputText id="txtEmail" class="form-control" @bind-Value="@_userModel.Email"></InputText>
          <ValidationMessage For="@(() => _userModel.Email)"></ValidationMessage>
      </div>
  </div>
  <div class="form-group row">
      <button type="submit" class="btn btn-primary">Save</button>
  </div>
</EditForm>
Here we can observe that the ValidationMessage component is registered for each field by specifying the Model property of the field to the 'For' parameter of the ValidationMessage component.Now run the application and test the validation and we can see the error message as follows.

Understand Field Validation:
At the beginning we have discussed Field Validation, now we are going to check how this Field validation working and happening in the Blazor application.
Now run the application and then we need to test Field validation. In our form, FirstName textbox we have applied string length to 5, so if it exceeds error will show. Now enter more than 5 letters word inside the text box and focus out the cursor from the text box.

Now we can observe the DataAnnotationsValidator component helps to send the field data to the server and validates it. We can understand here 'Email' text box has [Required] validation attribute, but we are not seeing any error message under 'Email' text box, from this we can understand only focused out text box or field(here FirstName field or text box) gets validated.
Now open developer tools and goto networks tab in that select URL as shown below.

Now in the message tab, we can observe sending the field data to the server as follows.

Now below observe the validation result from the server as below.
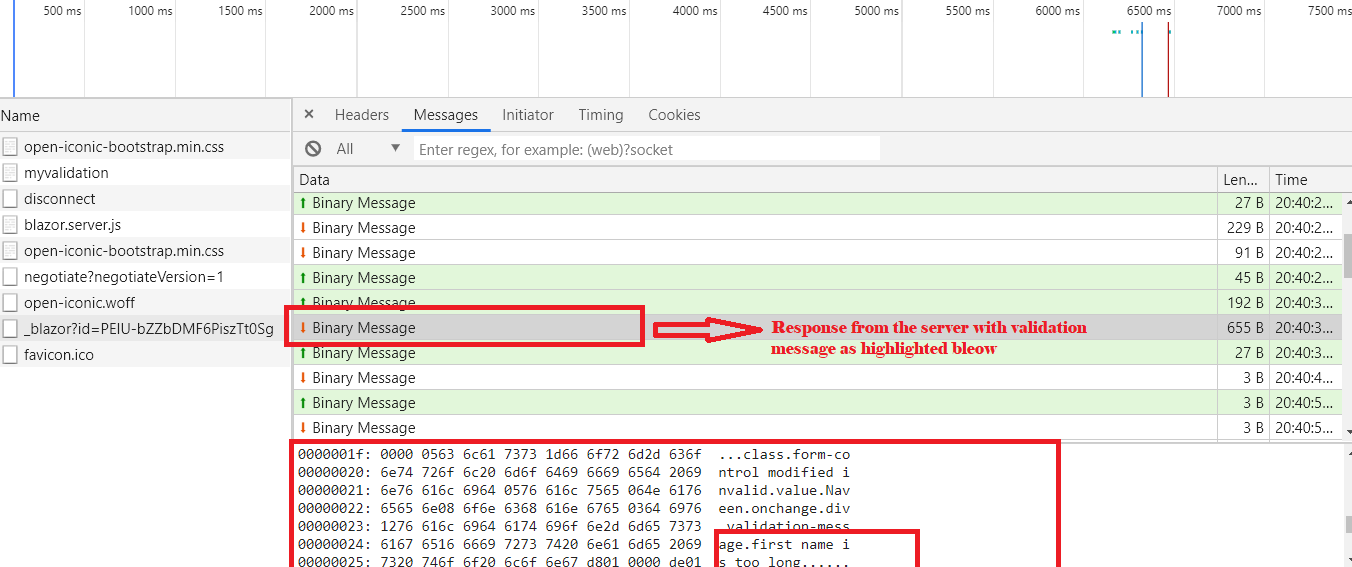
Similarly now if we type the incorrect email format in a text box on focusing out our application sends only Email text box field data and return with validation results.
Understanding Model Validation:
Model Validation means validating the entire form modal on the click submit button. In our sample, we have used EditForm.OnValidSubmit calls back method, it only gets called if the form is valid, so to check the form is valid or not on clicking submit button entire form will be sent to the server and their model gets validated.
Now to test this run the application and click on the submit button we can see all validation will appear on the page as below.

Observe the SignalR message request of the entire form as below(SignalR communication happens in Binary Message which can't be readable completely but we can understand partially).

Similarly, observe the form validation result as below.

EditForm Component With EditContext:
In the previous sample, we used the 'Model' parameter of the EditFormComponent. Now we are going to work with EditForm.EditContext explicitly. Using EditForm.EditContext gives more control over the form than using the 'Model' parameter of the EditForm component. EditContext helps to manually check the form validation, helps to subscribe to every form field change callback, disabling and enabling of a submit form, etc.
Pages/MyValidation.razor:
@page "/myvalidation"

<EditForm EditContext="@_editContext" OnValidSubmit="submit">
  <DataAnnotationsValidator></DataAnnotationsValidator>
  <div class="form-group row">
      <label for="txtFirstName" col="col-sm-2 col-form-label">First Name</label>
      <div class="col-sm-10">
          <InputText id="txtFirstName" class="form-control" @bind-Value="@_userModel.FirstName"></InputText>
          <ValidationMessage For="@(() => _userModel.FirstName)"></ValidationMessage>
      </div>
  </div>
  <div class="form-group row">
      <label for="txtEmail" col="col-sm-2 col-form-label">Email</label>
      <div class="col-sm-10">
          <InputText id="txtEmail" class="form-control" @bind-Value="@_userModel.Email"></InputText>
          <ValidationMessage For="@(() => _userModel.Email)"></ValidationMessage>
      </div>
  </div>
  <div class="form-group row">
      <button type="submit" class="btn btn-primary">Save</button>
  </div>
</EditForm>

@code
{
    private User _userModel = new User();
    private EditContext _editContext;

    protected override void OnInitialized()
    {
        _editContext = new EditContext(_userModel);
    }
    private void submit()
    {
        // logic to save form data to database
        Console.WriteLine("submit method get's invoked from OnValidSubmit callback");
    }
}
Here we can observe that we created the object of Microsoft.AspNetCore.Components.Form.EditContext and taking the 'Model'(User) object as an input parameter. EditContext is also a parameter of the EditForm component.Now if run the application and test validation it works the same as previously.

Enabling Or Disabling Of Save Button:
As we discussed that EditForm.EditContext gives more control over the form of validation. Now we are going to disable the form 'Save' button if the form is invalid.
Now, let's add a variable to store the form validation status as follow.
Pages/MyValidation.razor:
@code
{
    private bool _isInvalidForm = true;
 // code hidden for display purpuse
}
Now update the Html save button with the 'disabled' attribute which takes the '_isInvalidForm' parameter as value.
Pages/MyValidation.razor:
<button type="submit" class="btn btn-primary" disabled="@_isInvalidForm">Save</button>
Now we need to update '_isInvalidForm' status by catching every field change event using the EditContext.OnFieldChange callback. Inside this callback, we can detect the form status by calling EditContext.Validate() method which returns a boolean value of form status. Now on in Blazor life cycle method OnInitialized update as follows.
Pages/MyValidation.razor:
protected override void OnInitialized()
{
 _editContext = new EditContext(_userModel);

 _editContext.OnFieldChanged +=(x, y) => {
  _isInvalidForm = !_editContext.Validate();
 };
}
Now run the application, initially button disabled as follow (because of'_isInvalidForm' initialized with true value while declared).

Now enter the invalid data into the form fields and observe still the button is disabled since the form will be invalid as below.

Now enter the valid data and check button get enabled as below.

Using EditForm.Validate() Method Enables Model Validation:
EditForm.Validate() method enables Model validation which means validating the entire form. If we recall in the above code on every field changed we are calling EditForm.Validate() method as follow.
_editContext.OnFieldChanged +=(x, y) => {
 _isInvalidForm = !_editContext.Validate();
};
By this now on every change of field the entire form will be posted to the server and get validated.Now run the application and enter some invalid data in one field and focus out from the field we can observe the error message applied to all the fields in the form as below.

When To Use EditForm.OnSubmit() Method:
EditForm.OnSubmit is call back which will be invoked either form is valid or invalid. When using EditForm.Model it is not possible to use EditFrom.OnSubmit, because using EditForm.Model, we don't have any control over the form. When using EditForm.EditContext we can use EditForm.OnSubmit, because we have control over the form.
Add the following sample to test with EditForm.OnSbumit().
@page "/myvalidation"

<EditForm EditContext="@_editContext" OnSubmit="submit">
  <!-- code hidden for display purpose -->
</EditForm>

@code
{
    private void submit()
    {
        if(_editContext.Validate())
        {
           // logic to save valid form  to database
        }
    }
}
Wrapping Up:
Hopefully, this article will help to understand the Blazor Server validation technique. I love to have your feedback, suggestions and better techniques in the comment section.
Elegantly explained. I wanted to show validation messages only when submit button is pressed. This article helped me to understand how to do that. (I will refer your article in my site: https://hovermind.com/blazor/)
ReplyDeleteVery good example. I am trying to validate the content of an email field (i.e. entry is a well formed email address). You showed that the server is doing this. Where do I define the logic to check the email field? I could not find an email type in EditForm.
ReplyDeleteHi sada,
ReplyDeleteFor those kind of scenarios we need to create Custom Validator Component
I have made blog on it, you can check it
https://www.learmoreseekmore.com/2021/01/blazor-server-forms-validator-component.html