
Introduction:
Blazor Server is a web framework to develop server-side single-page applications. Blazor is made up of components with the combinations on C#, Html, CSS. Blazor Server is production-ready from the .Net Core 3.0.
Blazor Server Working Mechanism:
- Blazor Server is a very light-weight web development framework.
- In Blazor Server, not all code gets downloaded to the client browsers. Blazor Server made of components these components can be a block of code or page with respective navigation.
- Blazor server application communicates with the server with a SignalR background connection which is inbuilt functionality. Application click, form submission, change events, application page navigation every operation is carried out by the SignalR connection by communicating with the server.
- Blazor updates the Html DOM very gently on every data update without any overhead. Blazor Server application maintains a nice intelligent tree structure to update the required information or changed information on Html DOM.
- These all communication carried by SignalR connection transferring of data is a very minimum data bandwidth that is in BYTES.
- Microsoft has been undergone many load testing with Blazor server application which results in good results.
- Only the main drawback of the Blazor server application is no offline support.
Note: Blazor Server Application runs always with background connection with SignalR connection, that doesn't mean it always involves in transfering of heavy data to client. Only very few bytes of data transfer occurs between client and server.
Lets Dig Deeper Into Blazor Application With An Sample:
To develop the Blazor Server application we need to have .Net Core 3.0 and for VisualStudio editor developers it is mandatory to have VisualStudio 2019 to support .Net Core 3.0 or else we can develop using Microsoft Visual Studio Code editor without any framework restrictions. Click here for steps to create any .Net Core application using Visual Studio Code.
Here sample application development I'm using Visual Studio Code.
CLI Command To Create Blazor Server Template Application:
dotnet new blazorserver -n Your_Application_Name

Setup SQL DataBase Sample Table:
Before starting the sample application need to have a database table to store and fetch the data to our sample application. For this, you can use Microsoft SQL Server or LocalDB(for learning light-weight DB). Here in this sample, I'm using LocalDB.

You can create any sample table for the application or else execute the below query to create a sample table as of mine.
CREATE TABLE [dbo].[Gadgets] (
    [Id]           INT            IDENTITY (1, 1) NOT NULL,
    [ProductName]  VARCHAR (MAX)  NULL,
    [Brand]        VARCHAR (MAX)  NULL,
    [Cost]         DECIMAL (18)   NOT NULL,
    [Type]         VARCHAR (128)  NULL,
    [CreatedDate]  DATETIME       NULL,
    [ModifiedDate] DATETIME       NULL
);
Create And Configure DbContext:
In this sample, we are creating database communication with Core EntityFramework DbContext using the Code First Approach With Existing Database.
Install EntityFrameworkCore:
dotnet add package Microsoft.EntityFrameworkCore
Let's create a class represents the table as follows:
Entities/Gadget.cs:
using System;
namespace BlazorServer.CRUDApp.Entities
{
    public class Gadget
    {
        public int Id { get; set; }
        public string ProductName { get; set; }
        public string Brand { get; set; }
        public decimal Cost { get; set; }

        public string Type { get; set; }
        public DateTime? CreatedDate { get; set; }
        public DateTime? ModifiedDate { get; set; }
    }
}
Now add DbContext which used to communicate database as follows:Data/MyWorldDbContext.cs:
using Microsoft.EntityFrameworkCore;
using BlazorServer.CRUDApp.Entities;

namespace BlazorServer.CRUDApp.Data
{
    public class MyWorldDbContext : DbContext
    {
        public MyWorldDbContext(DbContextOptions options) : base(options)
        {

        }
        public DbSet Gadgets { get; set; }
    }
}
Install EntityFrameworkCore SqlServer Extensitons:
dotnet add package Microsoft.EntityFrameworkCore.SqlServer
Now add the DbContext to .Net Core applications inbuilt dependency injection as follows:
Startup.cs:
using Microsoft.EntityFrameworkCore;

public void ConfigureServices(IServiceCollection services)
{
 // code hidden for display purpose
 services.AddDbContext<MyWorldDbContext>(options =>
  options.UseSqlServer(
   Configuration.GetConnectionString("MyWorldDb")
  )
 );
}
If we observe carefully while registering DbContext, we passing some configuration like a connection string. So where ever if this DbContext inject, dependency injection creates an instance of the DbContext with these configurations are passing as 'DbContextOptions' to DbContext class as above.Now add the database connection string to the appsetting.json as below:
appsettings.json:
"ConnectionStrings":{
    "MyWorldDb":"Your_database_connectionstring"
}
Add New Menu Page Link And New Page Component:
Let's create a new page link for our sample as below:
Shared/NavMenu.razor:
Shared/NavMenu.razor:
<li class="nav-item px-3">
 <NavLink class="nav-link" href="gadget">
  <span class="oi oi-list-rich" aria-hidden="true"></span> Gadgets
 </NavLink>
</li>
Now create a new razor page as below:
Pages/Gadget.razor:
@page "/gadget"
<div>
  <button class="btn btn-primary" type="button">Add Gadget</button>
</div>

Call JavaScript From C# To Invoke Bootstrap Modal:
In our sample application, we are going to add all the items by opening Bootstrap Modal popup and here we going to learn how c# will communicate with javascript functions.
Now, let's add javascript functions to open and close Bootstrap Modal as follows:
wwwroot/js/external.js:
window.global = {
    openModal: function(modalId){
        modalId = '#'+modalId;
        $(modalId).modal('show');
    },
    closeModal:function(modalId){
        modalId = '#'+modalId;
        $(modalId).modal('hide');
    },
}
Here we can observe the opening and closing of Modal function are written in a generic way that accepts Modal popup Html 'id' attribute value. So these functions can be used to any Modal in the entire application.Now add the below Html for Bootstrap Modal.
Pages/Gadget.razor:
<div>
  <div class="modal fade" id="gadgetModal" data-backdrop="static" tabindex="-1" role="dialog" aria-labelledby="staticBackdropLabel" aria-hidden="true">
  <div class="modal-dialog" role="document">
    <div class="modal-content">
      <div class="modal-header">
        <h5 class="modal-title" id="staticBackdropLabel">Modal title</h5>
        <button type="button" class="close" data-dismiss="modal" aria-label="Close">
          <span aria-hidden="true">×</span>
        </button>
      </div>
      <div class="modal-body">
        <form>
          <div class="form-group">
            <label for="txtProdcutName">Name</label>
            <input type="text" class="form-control" id="txtProductName" >
          </div>
          <div class="form-group">
            <label for="txtBrand">Brand Name</label>
            <input type="text" class="form-control" id="txtBrand" >
          </div>
          <div class="form-group">
            <label for="txtCost">Cost</label>
            <input type="text" class="form-control" id="txtCost" >
          </div>
          <div class="form-group">
            <label for="ddlType">Gadget Type</label>
            <select class="form-control" id="ddlType">
              <option value="mobile">Mobile</option>
              <option value="laptop">Laptop</option>
              <option value="Computer">Computer</option>
            </select>
          </div>
        </form>
      </div>
      <div class="modal-footer">
        <button type="button" class="btn btn-secondary" >Close</button>
        <button type="button" class="btn btn-primary" >Save</button>
      </div>
    </div>
  </div>
</div>
</div>
Here we created Bootstrap Modal with form inside represents our item field in that form.Now on clicking the add button, we need to call the Blazor Server method and inside we need to call javascript methods to invoke Bootstrap Modal. So to communicate with javascript from c# code in Blazor Server we are provided with a library 'Microsoft.JSInterop.IJSRuntime', by injecting this 'IJSRuntime' interface we are able to communicate with javascript functions
Pages/Gadget.razor:
@page "/gadget"
@inject IJSRuntime _jsRuntime
Now implement c# methods to invoke javascript methods as follows
Pages/Gadget.razor:
@code
{

  public async Task OpenModal(string modalId, int itemId)
  {

    await _jsRuntime.InvokeVoidAsync("global.openModal", modalId);
  }

  public async Task CloseModal(string modalId)
  {
    await _jsRuntime.InvokeAsync<object>("global.closeModal", modalId);
  }
}
- Here we can observe OpenModal open the Bootstrap Modal and CloseModal to close the Bootstrap Modal.
- In both methods, the input parameter 'modaoId' accepts the value of Bootstrap Modal Html 'id' attribute value.
- Using IJSRuntime injected variable we are invoking javascript methods like 'global.openModal' and 'global.cloaseModal' and we observe we are passing 'modalId' parameter value to javascript functions.
Pages/Gadget.razor:
<div>
  <button class="btn btn-primary" type="button" @onclick='@(e => OpenModal("gadgetModal",0))' >Add Gadget</button>
</div>
- '@onclick' is a click event syntax for razor pages and for the click event assigned c# method. If we carefully observed we didn't assign method directly we used lambda or arrow function.
- The reason for arrow functions to pass parameters to the method, direct method assigning way we can't pass parameters.

So let's add the script tag as follows:
Pages/_Host.cshtml:
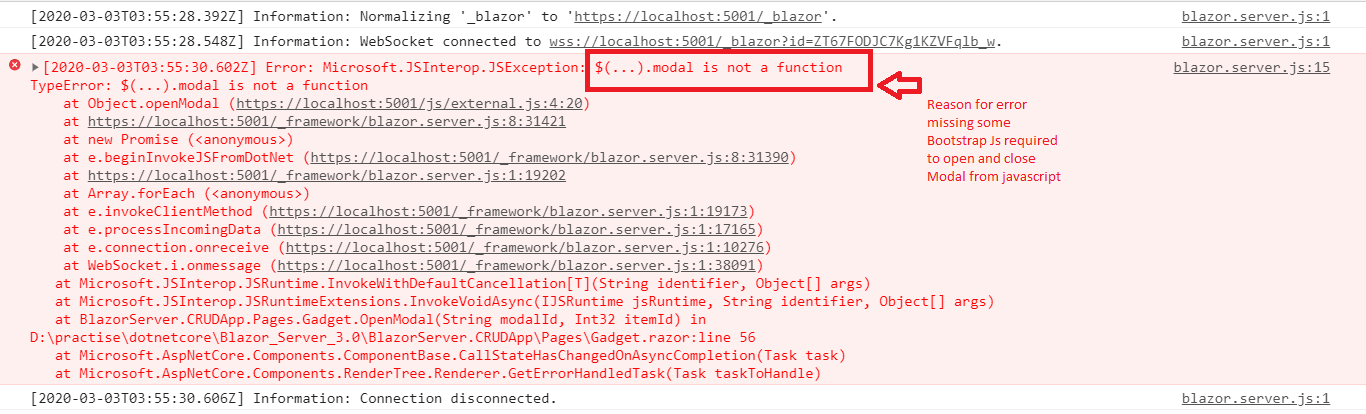
<script src="js/external.js"></script>Now if we run and test the application again

Pages/_Host.cshtml:
<script src="https://code.jquery.com/jquery-3.4.1.slim.min.js" integrity="sha384-J6qa4849blE2+poT4WnyKhv5vZF5SrPo0iEjwBvKU7imGFAV0wwj1yYfoRSJoZ+n" crossorigin="anonymous"></script>
<script src="_framework/blazor.server.js"></script>
<script src="js/external.js"></script>
Now if run and test application we face another error as below.
Pages/_Host.cshtml:
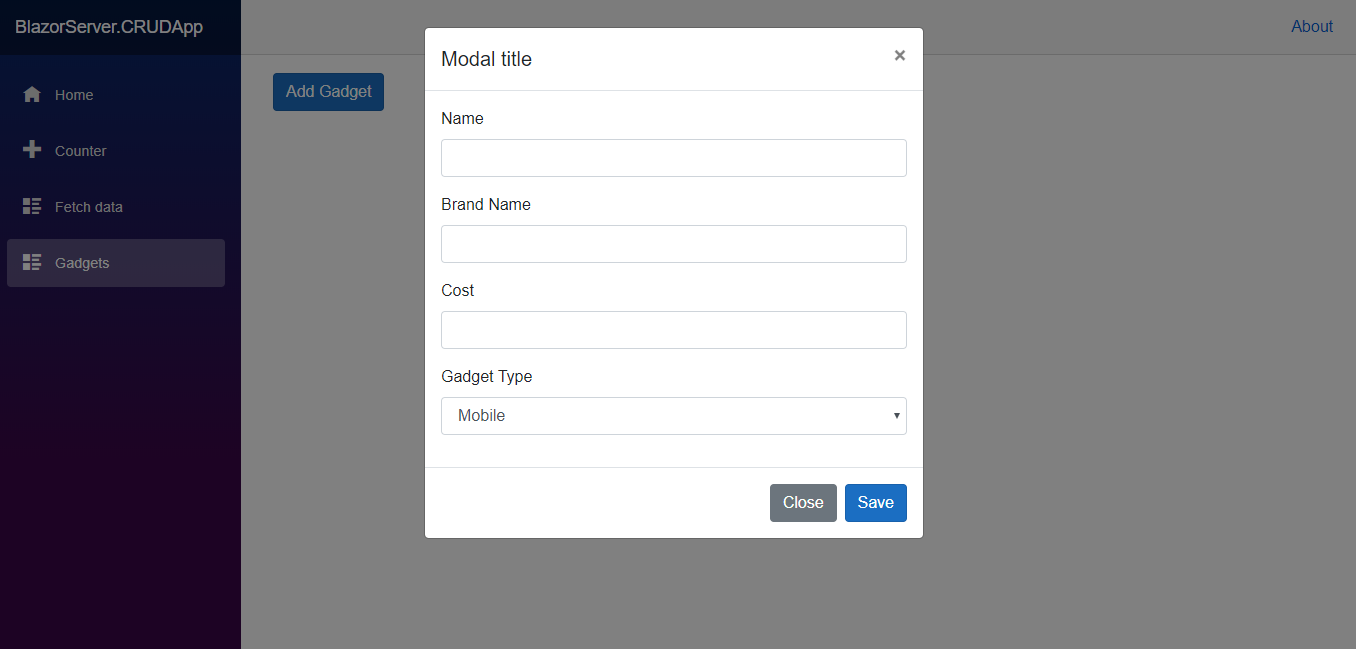
<script src="https://cdn.jsdelivr.net/npm/popper.js@1.16.0/dist/umd/popper.min.js" integrity="sha384-Q6E9RHvbIyZFJoft+2mJbHaEWldlvI9IOYy5n3zV9zzTtmI3UksdQRVvoxMfooAo" crossorigin="anonymous"></script>
 <script src="https://stackpath.bootstrapcdn.com/bootstrap/4.4.1/js/bootstrap.min.js" integrity="sha384-wfSDF2E50Y2D1uUdj0O3uMBJnjuUD4Ih7YwaYd1iqfktj0Uod8GCExl3Og8ifwB6" crossorigin="anonymous"></script>
Finally, if we run the application and click on the add button we can see Bootstrap Modal opens as below.
Create Operation:
Now let's write code for creating items in Blazor Server Application. Let's create business logic for adding items as follows:
Logics/IGadgetLogic.cs:
using BlazorServer.CRUDApp.Entities;
namespace BlazorServer.CRUDApp.Logics
{
    public interface IGadgetLogic
    {
        void AddGadget(Gadget gadget);
    }
}
Logics/GadgetLogic.cs:
using BlazorServer.CRUDApp.Data;
using BlazorServer.CRUDApp.Entities;

namespace BlazorServer.CRUDApp.Logics
{
    public class GadgetLogic:IGadgetLogic
    {
        public readonly MyWorldDbContext _myWorldDbContext;

        public GadgetLogic(MyWorldDbContext myWorldDbContext)
        {
            _myWorldDbContext = myWorldDbContext;
        }

        public void AddGadget(Gadget gadget)
        {
            _myWorldDbContext.Gadgets.Add(gadget);
            _myWorldDbContext.SaveChanges();
        }
    }
}
Here we can observe by injecting DbContext and then created a method to add items. Now we need to register these logic class for dependency injection as follow.Startup.cs:
using BlazorServer.CRUDApp.Logics;

public void ConfigureServices(IServiceCollection services)
{
   // code hidden for display purpose
 services.AddScoped<IGadgetLogic, GadgetLogic>();
}
@bind is razor syntax that helps to implement 2-way binding data. Using 2-way binding implementing forms to create items will very simple. So to use 2-binding in forms we need an object whose property represents each field in the form for data pumping between Html and c#. So let's create an object in @code block as follows.Pages/Gadget.razor:
@code
{
  public BlazorServer.CRUDApp.Entities.Gadget Model = new BlazorServer.CRUDApp.Entities.Gadget();

  // code hidden for display purpose
}
Here we can observe an object is created with a fully qualified name that because of object name and 'Gadget.razor' name or same, so if I don't specify full name before object the application thinking it as razor component class name(means this Gadget.razor on compilation turns to class 'Gadget.cs'). In general either we can import namespace within the razor file or in the _Import.razor(the file which holds all library references of entire application, it is like one-time reference declaration)Now update the form fields in the Bootstrap Modal with this 'Model' object for 2-way binding as follows.
<div class="modal-body">
 <form>
   <input type="hidden" @bind="Model.Id" id="gadgetId">
   <input type="hidden" @bind="Model.CreatedDate" id="createdDate">
   <input type="hidden" @bind="Model.ModifiedDate" id="modifiedDate">
   <div class="form-group">
  <label for="txtProdcutName">Name</label>
  <input type="text" class="form-control" id="txtProductName" @bind="Model.ProductName">
   </div>
   <div class="form-group">
  <label for="txtBrand">Brand Name</label>
  <input type="text" class="form-control" id="txtBrand" @bind="Model.Brand">
   </div>
   <div class="form-group">
  <label for="txtCost">Cost</label>
  <input type="text" class="form-control" id="txtCost" @bind="Model.Cost">
   </div>
   <div class="form-group">
  <label for="ddlType">Gadget Type</label>
  <select class="form-control" id="ddlType" @bind="Model.Type">
    <option value="mobile">Mobile</option>
    <option value="laptop">Laptop</option>
    <option value="Computer">Computer</option>
  </select>
   </div>
 </form>
</div>
Here we can observe object properties are involved in model binding by assigning to '@bind' razor syntax. A few input hidden fields are added that represents the fields in the 'Model' object, it is not mandatory to maintain them as hidden fields, but using them as hidden fields will help in updating Item scenarios.Now import a reference to the business logic we created above into the _Imports.razor as follows
_Imports.razor:
@using BlazorServer.CRUDApp.LogicsNow inject business logic class which has logic to save items as follows
Pages/Gadget.razor:
@inject IGadgetLogic _gadgetLogicNow write a component method that will pass the item object to business logic class to save the item as follow.
Pages/Gadget.razor:
public async Task SaveGadget(string modalId)
{
 if(Model.Id == 0)
 {
   // id zero represents new item
   Model.CreatedDate = DateTime.Now;
   _gadgetLogic.AddGadget(Model);
 }
 await _jsRuntime.InvokeAsync<object>("global.closeModal", modalId);
}
Here we are passing Bootstrap Modal Html id to close the Modal after saving the item and we are checking object Id to create new items.Now update the save button on Bootstrap Modal with a click event as below.
Pages/Gadget.razor:
<button type="button" class="btn btn-primary" @onclick='(e => SaveGadget("gadgetModal"))'>Save</button>
Now run the application then click the add button and fill-up the form to create a new item as below.


Read Operation:
Now add logic to fetch the list items from the database as follows.
Logics/IGadgetLogic.cs:
public interface IGadgetLogic
{
 // code hidden for display purpose
 IList<Gadget> GetAll();
}
Logics/GadgetLogic.cs:
using System.Collections.Generic;
using System.Linq;

namespace BlazorServer.CRUDApp.Logics
{
    public class GadgetLogic : IGadgetLogic
    {
       // code hidden for displaly purpose
        public IList<Gadget> GetAll()
        {
            IList<Gadget> gadgets = _myWorldDbContext.Gadgets.ToList();
            return gadgets;
        }
    }
}
Lets declare collection item varible to store the data from the database as follows.Pages/Gadget.razor:
@code
{
 public IList<BlazorServer.CRUDApp.Entities.Gadget> AllGadgets =
    new List<BlazorServer.CRUDApp.Entities.Gadget>();
 // code hidden for display purpose
}
Let's consume the business logic for fetching all items to our razor page as followsPages/Gadget.razor:
@code
{
public IList<BlazorServer.CRUDApp.Entities.Gadget> AllGadgets =
    new List<BlazorServer.CRUDApp.Entities.Gadget>();
  protected override void OnInitialized()
  {
    GetAllGadgets();
  }
  // code hidden for display purpose
  public void GetAllGadgets()
  {
    AllGadgets = _gadgetLogic.GetAll();
  }
}
Here we can GetAllGadgets() method fetching data from our business logic file. OnInitialized() is a Blazor server life cycle method, this method used to preload the data before rendering.Now we going to display all our items by adding the following Bootstrap Table to bind data as follow.
Pages/Gadget.razor:
<div>
  <table class="table table-striped">
    <thead>
      <tr>
        <th>Product Name</th>
        <th>Brand Name</th>
        <th>Cost(Rupees)</th>
        <th>Type</th>
        <th>Created Date</th>
        <th>Modified Date</th>
        <th>Actions</th>
      </tr>
    </thead>
    <tbody>
      @foreach(BlazorServer.CRUDApp.Entities.Gadget item in AllGadgets)
      {
          <tr>
            <td>@item.ProductName</td>
            <td>@item.Brand</td>
            <td>@item.Cost</td>
            <td>@item.Type</td>
            <td>@item.CreatedDate</td>
            <td>@item.ModifiedDate</td>
            <td>Edit | Delete</td>
          </tr>
      }
    </tbody>
  </table>
</div>
Here we binding our data by looping the table rows. Now run the application and check data looks as below.
Refresh Grid Data On Adding New Item:
Let's update the grid data on adding a new item as below.
Logics/IGadgetLogic.cs:
public interface IGadgetLogic
{
 Gadget AddGadget(Gadget gadget);
}
Logics/GadgetLogic.cs:
public class GadgetLogic : IGadgetLogic
{
 // code hidden for display purpose
 public Gadget AddGadget(Gadget gadget)
 {
  _myWorldDbContext.Gadgets.Add(gadget);
  _myWorldDbContext.SaveChanges();
  return gadget;
 }
}
Here we can observe we have updated the logic to return the newly added item to the database to this method consumers.Now update the razor page that will update the grid with the new item.
Pages/Gadget.razor:
public async Task SaveGadget(string modalId)
{
 if(Model.Id == 0)
 {
   // id zero represents new item
   Model.CreatedDate = DateTime.Now;
   var newGadget = _gadgetLogic.AddGadget(Model);
   AllGadgets.Add(newGadget);
 }
 await _jsRuntime.InvokeAsync<object>("global.closeModal", modalId);
}
Here we update code add our new item to the list of items that are used to bind the grid.


public async Task OpenModal(string modalId, int itemId)
{
 if(itemId == 0)
 {
   Model = new BlazorServer.CRUDApp.Entities.Gadget();
 }
 await _jsRuntime.InvokeVoidAsync("global.openModal", modalId);
}
Now if we test again, we get empty form without any old data.
Update Operation:
Now update the business logic file with the following code for update items.
Logics/IGadgetLogic.cs:
public interface IGadgetLogic
{
 Gadget UpdateGadget(Gadget gadget);
}
Logics/GadgetLogic.cs:
public Gadget UpdateGadget(Gadget gadget)
{
 _myWorldDbContext.Gadgets.Update(gadget);
 _myWorldDbContext.SaveChanges();
 return gadget;
}
Now update the razor page to display Bootstrap Modal with item data to be updated as follow.
Pages/Gadget.razor:
public async Task OpenModal(string modalId, int itemId)
{
 if(itemId == 0)
 {
   Model = new BlazorServer.CRUDApp.Entities.Gadget();
 }
 else
 {
   Model = AllGadgets.Where(_ => _.Id == itemId).FirstOrDefault();
 }
 await _jsRuntime.InvokeVoidAsync("global.openModal", modalId);
}
Here we can observe we update the OpenModal method, based on 'itemId' passed to the method filtering the data from the collection and assign the object to form the binding model.Now update the Edit button to invoke the OpenModal method as follow.
<button type="button" class="btn btn-primary" @onclick='@(e => OpenModal("gadgetModal",item.Id))'>Edit</button>
Now run the application and check the edit button.

public async Task SaveGadget(string modalId)
{
 if(Model.Id == 0)
 {
   // id zero represents new item
   Model.CreatedDate = DateTime.Now;
   var newGadget = _gadgetLogic.AddGadget(Model);
   AllGadgets.Add(newGadget);
 }
 else
 {
   Model.ModifiedDate = DateTime.Now;
   var gadgetToUpdate = _gadgetLogic.UpdateGadget(Model);
   AllGadgets = AllGadgets.Where(_ => _.Id != Model.Id).ToList();
   AllGadgets.Add(gadgetToUpdate);
 }
 await _jsRuntime.InvokeAsync<object>("global.closeModal", modalId);
}
Now test the application we can observe that the updated data will be reflected in the grid.Delete Operation:
Now update the business logic file with the following code
Logics/IGadgetLogic.cs:
public interface IGadgetLogic
{
 void Delete(Gadget gadget);
}
Logics/GadgetLogic.cs:
public void Delete(Gadget gadget)
{
 _myWorldDbContext.Gadgets.Remove(gadget);
 _myWorldDbContext.SaveChanges();
}
Now add new confirmation modal popup for item deletion as below.
Pages/Gadget.razor:
<div class="modal fade" id="deleteConfirmation" tabindex="-1" role="dialog" aria-labelledby="exampleModalLabel" aria-hidden="true">
  <div class="modal-dialog" role="document">
    <div class="modal-content">
      <div class="modal-header">
        <h5 class="modal-title" id="exampleModalLabel">Are You Sure You Want To Remove This Item?</h5>
        <button type="button" class="close" data-dismiss="modal" aria-label="Close">
          <span aria-hidden="true">×</span>
        </button>
      </div>

      <div class="modal-footer">
        <button type="button" class="btn btn-secondary" data-dismiss="modal">Close</button>
        <button type="button" class="btn btn-primary"  >Ok</button>
      </div>
    </div>
  </div>
</div>
Now add a logic to open this delete confirmation popup as below.
Pages/Gadget.razor:
@code
{
  // code hidden for display
  public int itemToDelete;
  public async Task OpenDeleteModal(string modalId, int itemId)
  {
     itemToDelete = itemId;
     await _jsRuntime.InvokeVoidAsync("global.openModal", modalId);
  }

}
Here 'itemToDelete' variable to hold the id of an item that needs to be deleted.Now update the delete button to invoke the 'OpenDeleteModal' as below.
Pages/Gadget.razor:
<button type="button" class="btn btn-primary" @onclick='@(e => OpenDeleteModal("deleteConfirmation", item.Id))'>Delete</button>
Now run the application as below.

Pages/Gadget.razor:
@code
{
 // code hidden for display purpose
  public async Task CloseModal(string modalId)
  {
    await _jsRuntime.InvokeAsync<object>("global.closeModal", modalId);
  }
  public async Task ConfirmDelete(string modalId)
  {
    var itemTodelete = AllGadgets.Where (_=> _.Id == itemToDelete).FirstOrDefault();
    _gadgetLogic.Delete(itemTodelete);
    AllGadgets.Remove(itemTodelete);
    await _jsRuntime.InvokeAsync<object>("global.closeModal", modalId);
  }
}
Now update the 'Ok' button Html as follows.<button type="button" class="btn btn-primary" @onclick='@(e => ConfirmDelete("deleteConfirmation"))' >Ok</button>
Now we can check all CRUD operations in a Blazor Server sample application.KEY NOTES: 1.Blazor Server application won't download entire c# code to the browser. 2.Don't be think like data should fetch using HttpClient API calls as it as an single page application. We can write database code similar to other dotnet application like MVC, WEB API, Razor pages, because no c# code related database will be exposed client 3.Using SignalR data communication will be taken Bytes of memory.
Wrapping Up:
Hopefully, this article will help to understand basic CRUD on the Blazor Server application. I love to have your feedback, suggestions and better techniques in the comment section.
Very nice and helpful tutorial. Million thanks. I am new to Blazor world and you contribute to get me started as fast as possible. Hop to see more articles from you.
ReplyDeleteGreat read, thanks
ReplyDelete