
Introduction:
In Part-1 we have implemented SSO with sharing authentication cookie between domain and subdomain binds to an MVC application. Now we implement the sharing authentication cookie between two different applications which runs under another application in IIS Server. For example, ASP.NET Core MVC application is client application shares login cookie to the ASP.NET Core WEB API which is hosted under the MVC application as a child in IIS Server. To know more about child application runs under another application click here
Core Concept:
Sharing authentication Cookie between entirely two different applications, but one application runs under other applications in IIS.
Create an MVC Application:
Create an MVC application by following Part-1, consider it is the main application for registering users and log-in to the application.
Create WEB API Application:
Now we have to create another application, which runs under the MVC application(created by following Step 1) this application will be the child application. we are going to use the login cookie created in MVC's main application, in the child application to make the user as authenticated.
Create Asp.net Core Web API application, while creating a project from VisualStudio select authentication to none in the web API template.
Application Hosting And Domain Bindings:
Now host the Web API application under the MVC application as a child in IIS. To host an application under another application click here.
After hosting your application should looks as below.
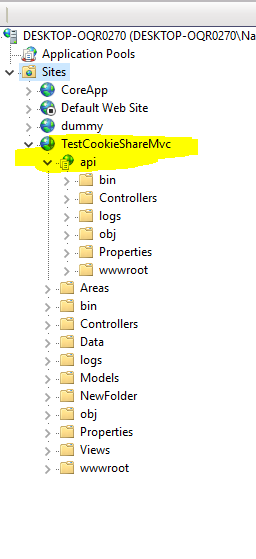
So here "TestCookieShareMvc" is our main MVC application which can be accessed with URL "http://testmyapp.com". "API" is our Dotnet core web API application is a child application that can be accessed with URL "http://testmypp.com/api".
Run ASP.NET Core WEB API Application:
In the Dotnet Core Web API project, we have a predefined endpoint to test API, so navigate to that endpoint as "http://testmyapp.com/api/values" and it results as below

Error On Adding Authorize Attribute:
Now add "Authorization" attribute to the endpoint as below

Now once again navigate to same endpoint "http://testmyapp.com/api/values", its results in an error
as saying no authentication scheme adds as below

Configure Authentication Middleware:
Now we need to add an authentication scheme to our web API. In the dotnet core, we can add authentication as middleware. Open "Startup.cs" file in the "configure" method need to add authentication middleware as below

Register ASP.NET Core Identity Authentication:
In Startup.cs file now register authentication in "ConfigureService()" as below

. "Coookie.Name" should be the same as the name used in MVC application
. "Identity.Application" it is an authentication schema name, by default Microsoft Identity login uses this schema name. If you are using IdentityServer4 Login then the schema name will be different. So it depends on your login plugin.
"Note: Here in this sample for login I have used Microsoft Identity in MVC application. So schema name should be 'Identity.Application'. If you used any self-made name it won't work"
401 UnAuthorized:
Now navigate to "http://testmyapp.com/api/values" you will get unauthorized 401 status as below

Data Protection API Service Registration:
The final step is to register the Data Protection API the same as we did in the MVC application.

Pass directory info also same as we did in MVC application that looks as follows

In appSetting.json file pass the Path of MVC application "Ring" folder path in this Web API project as below

Run Application To Test Authentication:
Now navigate to "http://testmyapp.com" then log in with your user credentials. After successfully login now navigate to Web API application as "http://testmyapp.com/api/values" you will able to see endpoint gets authorized and JSON result from the API.
Summary:
Here we have shared a login cookie between the client application (MVC) and the API Application (WEB API) as a child to the MVC. Data Protection API which is provided by ASP.NET Core used for encryption and decryption helped in creating the secured login cookie.
Refer:
. Source code click here
. Cookie share Part 1
. Hosting application under application click here
In Part-1 we have implemented SSO with sharing authentication cookie between domain and subdomain binds to an MVC application. Now we implement the sharing authentication cookie between two different applications which runs under another application in IIS Server. For example, ASP.NET Core MVC application is client application shares login cookie to the ASP.NET Core WEB API which is hosted under the MVC application as a child in IIS Server. To know more about child application runs under another application click here
Core Concept:
Sharing authentication Cookie between entirely two different applications, but one application runs under other applications in IIS.
Create an MVC Application:
Create an MVC application by following Part-1, consider it is the main application for registering users and log-in to the application.
Create WEB API Application:
Now we have to create another application, which runs under the MVC application(created by following Step 1) this application will be the child application. we are going to use the login cookie created in MVC's main application, in the child application to make the user as authenticated.
Create Asp.net Core Web API application, while creating a project from VisualStudio select authentication to none in the web API template.
Application Hosting And Domain Bindings:
Now host the Web API application under the MVC application as a child in IIS. To host an application under another application click here.
After hosting your application should looks as below.
So here "TestCookieShareMvc" is our main MVC application which can be accessed with URL "http://testmyapp.com". "API" is our Dotnet core web API application is a child application that can be accessed with URL "http://testmypp.com/api".
Run ASP.NET Core WEB API Application:
In the Dotnet Core Web API project, we have a predefined endpoint to test API, so navigate to that endpoint as "http://testmyapp.com/api/values" and it results as below
Error On Adding Authorize Attribute:
Now add "Authorization" attribute to the endpoint as below
Now once again navigate to same endpoint "http://testmyapp.com/api/values", its results in an error
as saying no authentication scheme adds as below
Configure Authentication Middleware:
Now we need to add an authentication scheme to our web API. In the dotnet core, we can add authentication as middleware. Open "Startup.cs" file in the "configure" method need to add authentication middleware as below
Register ASP.NET Core Identity Authentication:
In Startup.cs file now register authentication in "ConfigureService()" as below
. "Coookie.Name" should be the same as the name used in MVC application
. "Identity.Application" it is an authentication schema name, by default Microsoft Identity login uses this schema name. If you are using IdentityServer4 Login then the schema name will be different. So it depends on your login plugin.
"Note: Here in this sample for login I have used Microsoft Identity in MVC application. So schema name should be 'Identity.Application'. If you used any self-made name it won't work"
401 UnAuthorized:
Now navigate to "http://testmyapp.com/api/values" you will get unauthorized 401 status as below
Data Protection API Service Registration:
The final step is to register the Data Protection API the same as we did in the MVC application.
Pass directory info also same as we did in MVC application that looks as follows
In appSetting.json file pass the Path of MVC application "Ring" folder path in this Web API project as below
Run Application To Test Authentication:
Now navigate to "http://testmyapp.com" then log in with your user credentials. After successfully login now navigate to Web API application as "http://testmyapp.com/api/values" you will able to see endpoint gets authorized and JSON result from the API.
Summary:
Here we have shared a login cookie between the client application (MVC) and the API Application (WEB API) as a child to the MVC. Data Protection API which is provided by ASP.NET Core used for encryption and decryption helped in creating the secured login cookie.
Refer:
. Source code click here
. Cookie share Part 1
. Hosting application under application click here
Comments
Post a Comment