
Introduction:
MongoDB is a document-oriented database, which is classified as a NoSQL database. In MongoDB, tables are called collections and records are called documents. It stores data in JSON format. The reading of data from MongoDB is fast when compared to the Relational Database. But MongoDB doesn't have a relation between the collections. We can't declare NoSQL is better than SQL or vice-versa. So depending on the application requirement either select NoSQL or SQL or Both database.
Dotnet Core by default uses an MSSQL database, but it has built-in support for all other types of datastores like MYSQL, ORACLE, and MongoDB, etc.
Step 1:
Click here to install the MongoDB community edition. After successful installation go to "C:\Program Files\MongoDB\Server\4.2\bin" and then run "mongod.exe". Now we started MongoDB server in our local machine on a default port 27017.
Step 2:
Now open MongoDB shell command "mongo.exe" which is found in "C:\Program Files\MongoDB\Server\4.2\bin", where we can execute database queries.
Step 3:
Now create a database name as "MyWorldDatabase" using the following command "use MyWorldDatabase" in mongo.exe command. If the database already exists it will use existing or else creates a new database with that name on adding a document in a collection for the first time.

Step 4:
Create a collection name as "LivingCreatures", using the command "db.createCollection('LivingCreatures')"

Step 5:
In MongoDB records or data called as documents. So Adding document to MongoDB can be done with commands "db.collectionName.insertOne()" for one document insertion and "db.collectionName.insertMany()" for mutiple document insertion. Add the following test documents into "LivingCreatures" collection

now to see all the documents use the command "db.LivingCreatures.find({}).pretty()", here pretty() extention function to display output in good format.

Step 6:
Create a Dotnet Core Web API project, click here. "Install-Package MongoDB.Driver.Core -Version 2.9.1" this NuGet provides all helper methods to access MongoDB.
Step 7:
Now add "Models" folder in web API project. Add class and name as "LivingCreature" which represents our collection in the database
. "BsonId" attribute represents the primary key in the document.
. "BsonRepresentation(BsonType.ObjectId)" attribute to assign as a string instead of an object from document primary key which is auto-generated in MongoDB.
Step 8:
Update the "appsettings.json" with the following configurations

. "ConnectionString" contains MongoDB connection string
. "DatabaseName" name of the databse
. "LivingCreatureCollection" name of the collection
Step 9:
In "Models" add a class name as "AppSetting.cs" which contains all configuration properties
Step 10:
Now configure "AppSetting.cs" in application "startup.cs" file. In "startup.cs" file, go to "ConfigureServices" method add the following line of code
MongoDB is a document-oriented database, which is classified as a NoSQL database. In MongoDB, tables are called collections and records are called documents. It stores data in JSON format. The reading of data from MongoDB is fast when compared to the Relational Database. But MongoDB doesn't have a relation between the collections. We can't declare NoSQL is better than SQL or vice-versa. So depending on the application requirement either select NoSQL or SQL or Both database.
Dotnet Core by default uses an MSSQL database, but it has built-in support for all other types of datastores like MYSQL, ORACLE, and MongoDB, etc.
Step 1:
Click here to install the MongoDB community edition. After successful installation go to "C:\Program Files\MongoDB\Server\4.2\bin" and then run "mongod.exe". Now we started MongoDB server in our local machine on a default port 27017.
Step 2:
Now open MongoDB shell command "mongo.exe" which is found in "C:\Program Files\MongoDB\Server\4.2\bin", where we can execute database queries.
Step 3:
Now create a database name as "MyWorldDatabase" using the following command "use MyWorldDatabase" in mongo.exe command. If the database already exists it will use existing or else creates a new database with that name on adding a document in a collection for the first time.
Step 4:
Create a collection name as "LivingCreatures", using the command "db.createCollection('LivingCreatures')"
Step 5:
In MongoDB records or data called as documents. So Adding document to MongoDB can be done with commands "db.collectionName.insertOne()" for one document insertion and "db.collectionName.insertMany()" for mutiple document insertion. Add the following test documents into "LivingCreatures" collection
 [
    {
      "CreatureName": "Human Being",
      "Home": "Land",
      "Category": "Omnivores",
      "Description": "Eats both plants and flesh of other animals"
    },
    {
      "CreatureName": "Lion",
      "Home": "Land",
      "Category": "Carnivores",
      "Description": "Eats flesh of other animals"
    },
    {
      "CreatureName": "Tiger",
      "Home": "Land",
      "Category": "Carnivores",
      "Description": "Eats flesh of other animals"
    },
    {
      "CreatureName": "Bear",
      "Home": "Land",
      "Category": "Omnivores",
      "Description": "Eats both plants and flesh of other animals"
    },
    {
      "CreatureName": "Goat",
      "Home": "Land",
      "Category": "Herbivores",
      "Description": "Eats plants"
    }
  ]
now to see all the documents use the command "db.LivingCreatures.find({}).pretty()", here pretty() extention function to display output in good format.
Step 6:
Create a Dotnet Core Web API project, click here. "Install-Package MongoDB.Driver.Core -Version 2.9.1" this NuGet provides all helper methods to access MongoDB.
Step 7:
Now add "Models" folder in web API project. Add class and name as "LivingCreature" which represents our collection in the database
  namespace MongoDBSample1.Model
{
    public class LivingCreature
    {
        [BsonId]
        [BsonRepresentation(BsonType.ObjectId)]
        public string Id { get; set; }
        public string CreatureName { get; set; }
        public string Home { get; set; }
        public string Description { get; set; }
      public string Category { get; set; }
    }
}
. "BsonId" attribute represents the primary key in the document.
. "BsonRepresentation(BsonType.ObjectId)" attribute to assign as a string instead of an object from document primary key which is auto-generated in MongoDB.
Step 8:
Update the "appsettings.json" with the following configurations
. "ConnectionString" contains MongoDB connection string
. "DatabaseName" name of the databse
. "LivingCreatureCollection" name of the collection
Step 9:
In "Models" add a class name as "AppSetting.cs" which contains all configuration properties
  namespace MongoDBSample1.Model
{
    public class AppSettings
    {
        public string LivingCreatureCollection { get; set; }
        public string ConnectionString { get; set; }
        public string DatabaseName { get; set; }
    }
}
Step 10:
Now configure "AppSetting.cs" in application "startup.cs" file. In "startup.cs" file, go to "ConfigureServices" method add the following line of code
services.Configure(Configuration.GetSection(nameof(AppSettings)));Now "AppSetting.cs" can be accessed with "Microsoft.Extensions.Options.IOptions<T>" in any class by dependency injction.
Step 11:
Add a new folder name as "Data". In the "Data" folder add a class name as "MyWorldContext" which holds MongoDB client that interacts with a database.
IMyWorldContext.cs:
 namespace MongoDBSample1.Data
{
    public interface IMyWorldContext
    {
        IMongoDatabase MyWorldDb { get; }
    }
}
MyWorldContext.cs:
  namespace MongoDBSample1.Data
{
    public class MyWorldContext: IMyWorldContext
    {
        public   IMongoDatabase MyWorldDb { get; set; }

        public MyWorldContext(IOptions<appsettings> options)
        {
            var mongoClient = new MongoClient(options.Value.ConnectionString);
            MyWorldDb = mongoClient.GetDatabase(options.Value.DatabaseName);
        }
    }
}
. "mongoClient.GetDatabase("Name_Of_The_Database")" provides access to the required database
Now MyWorldContext needs to be registered for dependency injection in the "ConfigureServices()" method in "startup.cs" file.
services.AddSingleton<IMyWorldContext, MyWorldContext>();
." AddSingleton()" means objects get created on application start and lives until the application stop, like one-time creation. MongoClient to be initialized one time, so context class registered for singleton scope.
Step 12:
Create a folder name as "Repos" and add a file name as "LivingCreatureRepository.cs" which do all CRUD operations on "LivingCreatures" collection
ILivingCreatureRepository.cs:
  namespace MongoDBSample1.Repos
{
    public interface ILivingCreatureRepository
    {
        Task<IList<LivingCreature>> GetAll();
    }
}
LivingCreatureRepository.cs:
  namespace MongoDBSample1.Repos
{
    public class LivingCreatureRepository:ILivingCreatureRepository
    {
        private readonly IMongoCollection<LivingCreature> _livingCreatreCollction;
        public LivingCreatureRepository(IOptions<AppSettings> options, IMyWorldContext myWorldContext)
        {
            _livingCreatreCollction = myWorldContext.MyWorldDb.GetCollection<LivingCreature>(options.Value.LivingCreatureCollection);
        }

        public async Task<IList<LivingCreature>> GetAll()
        {
            return await _livingCreatreCollction.Find(_ => true).ToListAsync();
        }
    }
}
. "IMongoCollection" holds "LivingCreatures" collection
. "_livingCreatureCollection.find()" gets the documents matches, to get all document give "true" in find() method which returns all documents from the "LivingCreatures" collection.
Now to inject this "LivingCreaturesRepositry" register in "startup.cs" file. Add the following line "configureService()" method
services.AddScoped<ILivingCreatureRepository, LivingCreatureRepository>();
. "AddScoped()" repository instance gets created per request.
Step 13:
Create a controller name as "LivingCreatureController.cs", add action method to get all the "LivingCreatures".
 namespace MongoDBSample1.Controllers
{
    [Route("api/[controller]")]
    [ApiController]
    public class LivingCreatureController : ControllerBase
    {
        private readonly ILivingCreatureRepository _livingCreatureRepository;

        public LivingCreatureController(ILivingCreatureRepository livingCreatureRepository)
        {
            _livingCreatureRepository = livingCreatureRepository;
        }

        [HttpGet]
        [Route("all")]
        public async Task<IActionResult> GetAll()
        {
            return Ok(await _livingCreatureRepository.GetAll());
        }
    }
}
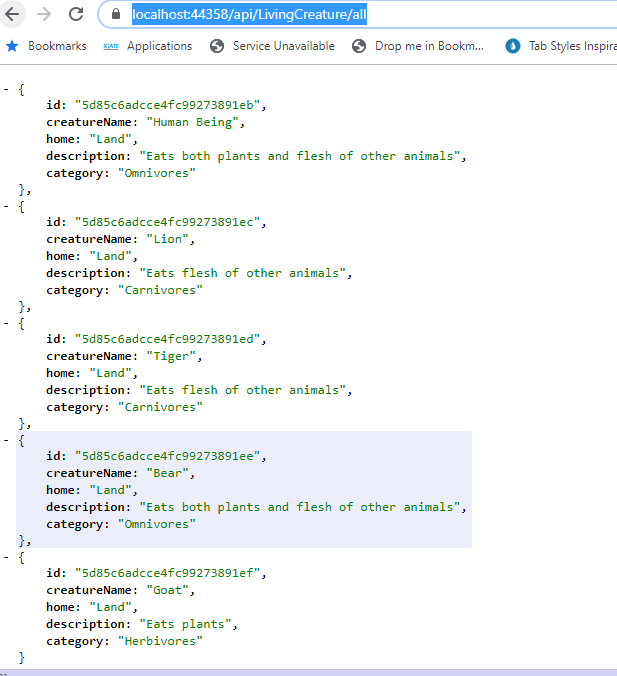
now run the web API and navigate to "https://localhost:44358/api/LivingCreature/all"
Step 14:
Now we need to add logic to create a new document to "LivingCreatures" collection. Update the
"LivingCreatureRepository.cs" with the following method.
ILivingCreatureRepository.cs:
Task AddCreature(LivingCreature creature);
LivingCreatureRepository.cs:
   public async Task AddCreature(LivingCreature creature)
        {
            await  _livingCreatreCollction.InsertOneAsync(creature);
        }
. "_livingCreaterCollection.InsertOneAsync()" adds new document to collection
Now add action method to the controller as below
     [HttpPost]
        [Route("add")]
        public async Task Create(LivingCreature creature)
        {
            await _livingCreatureRepository.AddCreature(creature);
            return Ok();
        }
To test this endpoint browser directly don't support the "POST" action, use google postman or fiddler to test the post endpoint as below

To check the newly added document, once again navigate to get endpoint above.
Step 15:
Update a document in the collection by using dotnet helper methods like "MongoDB.Driver.ReplaceOneAsync(_filter_expresion,_document_tobeUpdated)", based on filter expression, matching record get update.
Add below code to repository
ILivingCreatureRepository.cs:
Task Update(LivingCreature creature);LivingCreatureRepository.cs:
   public async Task Update(LivingCreature creature)
        {
            await _livingCreatreCollction.ReplaceOneAsync(_ => _.Id == creature.Id, creature);
        }
Add update action method in controller as below
  [HttpPost]
        [Route("update")]
        public async Task Update(LivingCreature creature)
        {
            await _livingCreatureRepository.Update(creature);
            return Ok();
        }
Test it using postman as below

Step 16:
Delete a document in the collection by using dotnet helper methods like "MongoDB.Driver.DeleteOneAsync(id)", based on id of a document, matching document get deleted.
ILivingCreatureRepository.cs:
Task Delete(string id);LivingCreatureRepository.cs:
   public async Task Delete(string id)
        {
            await _livingCreatreCollction.DeleteOneAsync(_ => _.Id == id);
        }
Controller: [HttpDelete]
[Route("delete")]
public async Task Delete(string id)
{
await _livingCreatureRepository.Delete(id);
return Ok();
}

Support Me!
Buy Me A Coffee
PayPal Me
same thing i had done but its not entering into the controller ,it shows 404 error....
ReplyDeletewhy?????
Hi Kavya,
Delete404 means unable to found your end point(API url)
cross check your end point